Terraform is not just another automation tool. In modern Azure environments, it is a core operational skill used by cloud engineers, DevOps engineers, and platform teams to build, manage, and scale infrastructure safely.
This guide takes you beyond a simple lab. Instead of only showing what to deploy, it explains why each component exists, how Terraform interacts with Azure, and how this approach mirrors real production workflows.
If your goal is to work professionally with Azure and Infrastructure as Code, this is the foundation you must understand.
If Terraform itself is new to you, start with the Terraform Basics reference. The Azure Fundamentals reference explains where subscriptions, resource groups, and Azure Resource Manager fit into the platform hierarchy.
Why Terraform Matters for Azure Engineers
Infrastructure as Code (IaC) is the practice of defining infrastructure using machine-readable configuration files instead of manual steps in the Azure Portal.
In traditional environments, infrastructure is created by clicking through interfaces. This approach does not scale, is difficult to audit, and often leads to configuration drift. IaC solves this by allowing infrastructure to be:
- Version-controlled
- Peer-reviewed
- Reproducible
- Automated
Terraform is one of the most widely adopted IaC tools because it uses a declarative model. You describe the desired end state, and Terraform determines how to reach it.
Key characteristics that make Terraform valuable in Azure environments:
- Cloud-agnostic: Terraform works across Azure, AWS, GCP, and more
- Declarative syntax: You define what you want, not how to build it
- State-aware: Terraform tracks deployed resources to prevent duplication or drift
In real Azure jobs, Terraform is commonly used to:
- Provision identical infrastructure across dev, test, and production
- Reduce manual errors
- Detect and correct configuration drift
- Enable safe automation through CI/CD pipelines
This lab is intentionally hands-on and explicit. There are no shortcuts, no portal clicks, and no hidden abstractions. The workflow mirrors how infrastructure is deployed in professional environments.
Sources
- HashiCorp Terraform Overview: https://developer.hashicorp.com/terraform/intro
- Microsoft Terraform on Azure: https://learn.microsoft.com/azure/developer/terraform/overview
Understanding Terraform Before Writing Code
Before diving into configuration files, it’s important to understand how Terraform actually works.
Declarative vs Imperative Infrastructure
With Terraform, you do not write scripts that say “Create this resource, then that resource.” Instead, you define the desired outcome, and Terraform computes the execution plan.
Terraform compares:
- What exists in Azure
- What exists in the Terraform state file
- What is defined in your configuration
From this comparison, Terraform determines what must be created, updated, or destroyed.
Terraform State (Why It Matters)
Terraform stores resource metadata in a state file. This file allows Terraform to:
- Track existing resources
- Detect drift
- I avoid recreating infrastructure unnecessarily
For a single-user disposable lab, local state keeps the first run understandable. It is not a team or production design: local state can contain sensitive values, is easy to lose, and cannot safely coordinate concurrent writers. I never commit terraform.tfstate or saved plan files. Production environments should use a protected remote backend such as Azure Blob Storage with native locking, recoverable blob versions, and Microsoft Entra authorization.
Architecture Overview
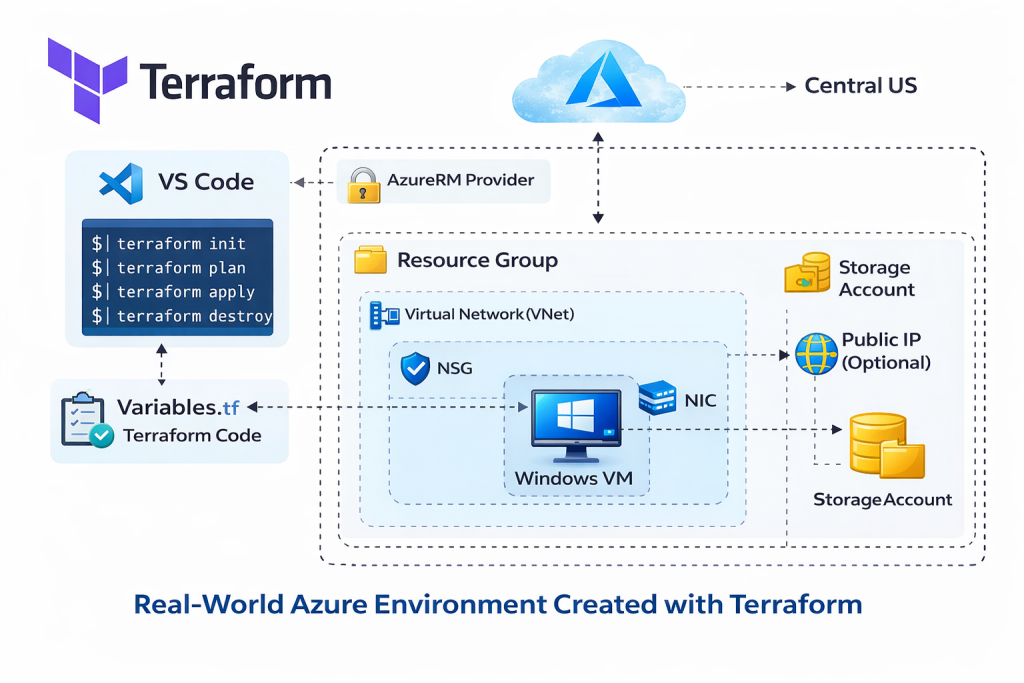
Lab Overview: What We’re Building
In this lab, we build a complete Azure infrastructure stack using Terraform that reflects a realistic production layout.
Environment Components Explained
Each component exists for a specific operational reason:
- Resource group: A lifecycle and governance container for the lab resources. It is not a network boundary.
- Virtual network (VNet): The regional private address space for the workload.
- Subnet: A segment of the VNet where the VM's network interface is placed.
- Network security group (NSG): A stateful packet filter associated with the subnet. Custom rules are evaluated in priority order before Azure's default rules.
- Public IP: A lab-only ingress path. Production workloads should normally remain private and use Azure Bastion, a VPN, or another controlled access path.
- Network interface (NIC): Connects the VM to the subnet and optionally to the public IP.
- Linux virtual machine: The compute workload, configured for SSH-key authentication and a system-assigned managed identity.
- AzureRM provider: Translates Terraform resource operations into Azure Resource Manager API calls.
Read Azure Networking for the underlying VNet, subnet, and NSG behavior, and Azure Compute for guidance on when a VM is the right service instead of App Service or AKS.
Official references
Prerequisites
Before starting, ensure the following are installed and configured:
- An active Azure subscription
- Visual Studio Code (for writing Terraform code)
- Terraform CLI
- Azure CLI
Terraform uses the Azure CLI for authentication when running locally. This is the recommended approach for development and learning environments.
After installing Azure CLI, authentication is handled via:
az loginTerraform then automatically uses the authenticated Azure context.
Confirm both the tenant and subscription before planning:
az account show
az account set --subscription <subscription-id>
Sources
- Terraform installation: https://developer.hashicorp.com/terraform/install
- Azure CLI installation: https://learn.microsoft.com/cli/azure/install-azure-cli
Current AzureRM Provider and Authentication
AzureRM 4.x requires a subscription ID for plan and apply. Pin the provider to a reviewed major-version range. This guide passes the subscription as an input variable; a CI configuration can instead omit the provider argument and supply the supported ARM_SUBSCRIPTION_ID environment variable.
I create providers.tf:
terraform {
  required_version = ">= 1.5.0, < 2.0.0"

  required_providers {
    azurerm = {
      source  = "hashicorp/azurerm"
      version = "~> 4.0"
    }
  }
}

provider "azurerm" {
  features {}

  subscription_id = var.subscription_id
}
Azure CLI authentication is appropriate for local interactive work. Non-interactive CI should use a narrowly scoped service principal or managed identity with OpenID Connect/workload identity federation, not a stored client secret. Supply identity settings through the supported ARM_* environment variables and keep credentials out of provider blocks, .tfvars, plans, and logs.
The provider and backend authenticate independently. Configuring OIDC for AzureRM resource operations does not automatically configure the Azure Blob state backend; both must be able to acquire tokens for their respective control-plane and data-plane operations.
Production State: Azure Blob with Entra ID
Bootstrap the state storage account and private tfstate container separately, then configure the backend:
terraform {
  backend "azurerm" {
    use_azuread_auth     = true
    use_oidc             = true
    storage_account_name = "tfstateprod001"
    container_name       = "tfstate"
    key                  = "network/prod.tfstate"
  }
}
Provide tenant and client IDs through ARM_TENANT_ID and ARM_CLIENT_ID. The CI identity needs Storage Blob Data Contributor on the state container; management-plane Contributor alone does not grant blob data access. Azure Blob Storage supplies native state locking and consistency checks. Enable blob versioning and soft delete, restrict network access, and never place an account key, SAS token, or client secret in the backend block because backend configuration can be copied into .terraform metadata and plan files.
For local development against the same backend, use the backend's authenticated Azure CLI mode instead of converting the production configuration to a shared key. Re-run terraform init -reconfigure when intentionally changing backend authentication or location.
🎥 Video Walkthrough
Using Variables for Secure and Reusable Code
Hardcoding values directly into Terraform files is discouraged in real environments.
Instead, Terraform separates configuration logic from environment-specific values.
variables.tf
This file defines inputs such as:
- Location
- VM name
- Admin username
- VM size
Each variable includes a type and description, making the configuration self-documenting.
terraform.tfvars
This file stores actual values for a specific environment. For example:
- Development VM size
- Region
- Naming conventions
This separation allows the same Terraform codebase to be reused across multiple environments without modification.
.tfvars is configuration, not a secret store. I keep credentials and other secrets out of committed variable files. Terraform's sensitive marking reduces accidental CLI/UI disclosure but does not remove the value from state or plan files; use workload identity where possible and an appropriate secrets system when a secret is unavoidable.
Why Variables Matter in Production
Using variables helps to:
- Improve security by avoiding hardcoded credentials
- Enable reuse across environments
- Simplify long-term maintenance
- Support automation and CI/CD pipelines
This approach follows Terraform’s official best practices.
Source
- Terraform variables: https://developer.hashicorp.com/terraform/language/values/variables
Build the Resource Group, VNet, NSG, and VM
The following configuration is intentionally small enough to understand as one root module, but it includes the controls a useful lab should not omit: constrained inputs, consistent tags, SSH keys, a source-restricted NSG rule, managed identity, boot diagnostics, and outputs for verification.
I use five files in the same directory:
terraform-azure-lab/
├── providers.tf
├── variables.tf
├── main.tf
├── outputs.tf
└── terraform.tfvars
Terraform loads every .tf file in a directory as one module. The filenames organize the configuration for people; they do not control resource creation order.
Define and validate the inputs
I create variables.tf. The SSH source must be a specific IPv4 CIDR, normally your current public IP followed by /32. The validation deliberately rejects an internet-wide rule.
variable "subscription_id" {
  type        = string
  description = "Azure subscription that owns the lab resources."
}

variable "location" {
  type        = string
  description = "Azure region for all lab resources."
  default     = "uksouth"
}

variable "resource_prefix" {
  type        = string
  description = "Lowercase prefix used to name the lab resources."
  default     = "ctbv-tf-lab"

  validation {
    condition     = can(regex("^[a-z][a-z0-9-]{1,18}[a-z0-9]$", var.resource_prefix))
    error_message = "resource_prefix must be 3-20 lowercase letters, numbers, or hyphens, and must start with a letter."
  }
}

variable "admin_username" {
  type        = string
  description = "Local administrator name for the Linux VM."
  default     = "azureadmin"
}

variable "ssh_public_key_path" {
  type        = string
  description = "Path to an existing OpenSSH public key."
  default     = "~/.ssh/id_ed25519.pub"
}

variable "allowed_ssh_cidr" {
  type        = string
  description = "Public IPv4 CIDR allowed to connect over SSH, normally one address with /32."

  validation {
    condition = (
      can(cidrnetmask(var.allowed_ssh_cidr)) &&
      var.allowed_ssh_cidr != "0.0.0.0/0"
    )
    error_message = "allowed_ssh_cidr must be a valid IPv4 CIDR and cannot be 0.0.0.0/0."
  }
}
If you do not already have an SSH key pair, create one locally with ssh-keygen -t ed25519. Terraform reads only the .pub file; never pass the private key into Terraform or Azure.
Create the resource group and network
I create main.tf with names and tags defined once, then add the resource group, VNet, and subnet:
locals {
  common_tags = {
    environment = "lab"
    managed-by  = "terraform"
    workload    = "terraform-azure-foundations"
  }
}

resource "azurerm_resource_group" "lab" {
  name     = "rg-${var.resource_prefix}"
  location = var.location
  tags     = local.common_tags
}

resource "azurerm_virtual_network" "lab" {
  name                = "vnet-${var.resource_prefix}"
  location            = azurerm_resource_group.lab.location
  resource_group_name = azurerm_resource_group.lab.name
  address_space       = ["10.20.0.0/16"]
  tags                = local.common_tags
}

resource "azurerm_subnet" "workload" {
  name                 = "snet-workload"
  resource_group_name  = azurerm_resource_group.lab.name
  virtual_network_name = azurerm_virtual_network.lab.name
  address_prefixes     = ["10.20.1.0/24"]
}
The /16 leaves room for additional subnets while the /24 gives this workload a clear segment. Azure does not treat subnets as security boundaries by default, so segmentation becomes meaningful only when it is paired with deliberate NSGs and routing. Plan address spaces globally before connecting VNets; overlapping ranges prevent peering and complicate hybrid routing.
References such as azurerm_resource_group.lab.name create implicit dependencies. Terraform can see that the VNet needs the resource group and that the subnet needs the VNet, so it builds a dependency graph rather than relying on file or block order.
Create and associate the NSG
I add the following resources to main.tf:
resource "azurerm_network_security_group" "workload" {
  name                = "nsg-${var.resource_prefix}-workload"
  location            = azurerm_resource_group.lab.location
  resource_group_name = azurerm_resource_group.lab.name
  tags                = local.common_tags
}

resource "azurerm_network_security_rule" "allow_ssh" {
  name                        = "allow-ssh-from-admin"
  priority                    = 100
  direction                   = "Inbound"
  access                      = "Allow"
  protocol                    = "Tcp"
  source_port_range           = "*"
  destination_port_range      = "22"
  source_address_prefix       = var.allowed_ssh_cidr
  destination_address_prefix  = "*"
  resource_group_name         = azurerm_resource_group.lab.name
  network_security_group_name = azurerm_network_security_group.workload.name
}

resource "azurerm_subnet_network_security_group_association" "workload" {
  subnet_id                 = azurerm_subnet.workload.id
  network_security_group_id = azurerm_network_security_group.workload.id
}
NSGs are stateful: when this inbound rule permits an SSH connection, return traffic for that connection is automatically allowed. Rules are evaluated from the lowest priority number upward until the first match. Azure also creates default rules, including a final inbound deny, so the custom priority 100 rule is evaluated first.
Associating the NSG with the subnet gives every NIC placed in that subnet the same baseline. I avoid casually attaching a second NSG to the NIC as well; both sets of rules must allow the traffic, which can make effective access harder to diagnose.
A public IP is a lab convenience, not the production target
The example permits SSH only from allowed_ssh_cidr, but the VM still has an internet-routable
address. A production design should normally omit the VM public IP and connect through Azure
Bastion, a VPN/ExpressRoute path, or a controlled jump host. I do not change the source to
0.0.0.0/0 just to make SSH work.
Create the public IP and NIC
Continue main.tf with a Standard, static public IP and a NIC connected to the workload subnet:
resource "azurerm_public_ip" "vm" {
  name                = "pip-${var.resource_prefix}-vm01"
  location            = azurerm_resource_group.lab.location
  resource_group_name = azurerm_resource_group.lab.name
  allocation_method   = "Static"
  sku                 = "Standard"
  tags                = local.common_tags
}

resource "azurerm_network_interface" "vm" {
  name                = "nic-${var.resource_prefix}-vm01"
  location            = azurerm_resource_group.lab.location
  resource_group_name = azurerm_resource_group.lab.name
  tags                = local.common_tags

  ip_configuration {
    name                          = "primary"
    subnet_id                     = azurerm_subnet.workload.id
    private_ip_address_allocation = "Dynamic"
    public_ip_address_id          = azurerm_public_ip.vm.id
  }

  depends_on = [
    azurerm_subnet_network_security_group_association.workload
  ]
}
The NIC naturally depends on the subnet and public IP because it references their IDs. The explicit depends_on adds a behavioral dependency that Terraform cannot infer from an attribute: the subnet NSG association must exist before Terraform attaches the internet-facing NIC. I use explicit dependencies sparingly and only for ordering that is real but invisible in the data references.
Create the Linux VM
Finish main.tf with the compute resource:
resource "azurerm_linux_virtual_machine" "lab" {
  name                            = "vm-${var.resource_prefix}-01"
  computer_name                   = "tf-lab-01"
  location                        = azurerm_resource_group.lab.location
  resource_group_name             = azurerm_resource_group.lab.name
  size                            = "Standard_B2s"
  admin_username                  = var.admin_username
  disable_password_authentication = true
  network_interface_ids           = [azurerm_network_interface.vm.id]
  tags                            = local.common_tags

  admin_ssh_key {
    username   = var.admin_username
    public_key = file(pathexpand(var.ssh_public_key_path))
  }

  identity {
    type = "SystemAssigned"
  }

  os_disk {
    name                 = "osdisk-${var.resource_prefix}-vm01"
    caching              = "ReadWrite"
    storage_account_type = "Standard_LRS"
  }

  source_image_reference {
    publisher = "Canonical"
    offer     = "0001-com-ubuntu-server-jammy"
    sku       = "22_04-lts-gen2"
    version   = "latest"
  }

  boot_diagnostics {}
}
This configuration disables password authentication, so the VM accepts the matching SSH private key rather than a reusable password. The system-assigned managed identity gives the VM an Azure identity without embedding a credential; it has no permissions until you explicitly assign an Azure role at the minimum required scope. The empty boot_diagnostics block uses managed storage for console and boot troubleshooting.
Standard_B2s is a reasonable lab default, not a universal production recommendation. Confirm SKU availability and quota in your region, and select compute, disk, availability-zone, backup, patching, and resilience settings from workload requirements. For a scalable VM fleet, continue with Modular Terraform and Azure VM Scale Sets.
Add useful outputs
I create outputs.tf:
output "resource_group_name" {
  description = "Resource group containing the lab."
  value       = azurerm_resource_group.lab.name
}

output "vm_private_ip" {
  description = "Private address assigned to the VM NIC."
  value       = azurerm_network_interface.vm.private_ip_address
}

output "vm_public_ip" {
  description = "Lab-only public address assigned to the VM."
  value       = azurerm_public_ip.vm.ip_address
}

output "vm_name" {
  description = "Name of the Linux virtual machine."
  value       = azurerm_linux_virtual_machine.lab.name
}

output "nic_name" {
  description = "Name of the VM network interface."
  value       = azurerm_network_interface.vm.name
}

output "ssh_command" {
  description = "Command for connecting from the allowed source address."
  value       = "ssh ${var.admin_username}@${azurerm_public_ip.vm.ip_address}"
}
Outputs expose operationally useful attributes without copying values manually from the Azure Portal. Outputs are also stored in state; never output a password, private key, token, or other secret merely for convenience.
Supply environment-specific values
I create terraform.tfvars and replace the example subscription and documentation-only IP address:
subscription_id  = "00000000-0000-0000-0000-000000000000"
location         = "uksouth"
resource_prefix  = "ctbv-tf-lab"
allowed_ssh_cidr = "203.0.113.10/32"
203.0.113.10 belongs to an address range reserved for documentation and will not give you access. Replace it with your current public IPv4 address and keep /32 to authorize only that address. The values in this example are not secrets, but reviewed team environments should still separate per-environment values and avoid committing local overrides accidentally.
Format, Validate, Plan, and Apply
I run the workflow from the configuration directory:
terraform fmt -recursive
terraform init
terraform validate
terraform plan -out=tfplan
terraform show tfplan
terraform apply tfplan
Commit .terraform.lock.hcl so local and CI runs select the same reviewed provider version. I do not commit .terraform/, terraform.tfstate*, crash logs, or saved plan files; plan artifacts can contain the same sensitive data as state.
Before approving the plan, check the summary and inspect every replacement or deletion. For this first deployment, the dependency graph should create one resource group, one VNet, one subnet, one NSG and rule, one association, one public IP, one NIC, and one VM.
Verify the Deployment
Terraform success means Azure accepted the control-plane operations. I verify the resulting configuration and the access path as separate steps:
terraform output

az vm get-instance-view \
  --resource-group "$(terraform output -raw resource_group_name)" \
  --name "$(terraform output -raw vm_name)" \
  --query instanceView.statuses \
  --output table

az network nic list-effective-nsg \
  --resource-group "$(terraform output -raw resource_group_name)" \
  --name "$(terraform output -raw nic_name)" \
  --output table

terraform output -raw ssh_command
I run the printed SSH command from the address allowed by allowed_ssh_cidr. If it times out, verify your current public IP, the effective NSG rules, the VM power state, and the NIC/public-IP association before changing security rules. The Azure Networking reference explains NSG evaluation; the Terraform state-lock troubleshooting guide covers a different failure mode where a run cannot acquire state.
Terraform Lifecycle Commands Explained
Terraform follows a clear and predictable lifecycle.
terraform init
Initializes the working directory and downloads required providers.
This step must be run before any other command.
terraform plan
Generates an execution plan showing exactly what Terraform will change.
This step is critical in production environments to prevent accidental changes.
Save the reviewed plan when an approval gate separates planning from deployment:
terraform plan -out=tfplan
terraform show tfplan
terraform apply
Applies the planned changes and deploys infrastructure to Azure.
Terraform will prompt for confirmation unless auto-approved.
terraform apply tfplanApplying the saved plan ensures Terraform executes the exact artifact that was reviewed rather than calculating a different plan later.
terraform destroy
Creates and applies a plan to remove all resources managed by the selected state. Confirm the backend key, workspace, subscription, and destroy plan before approval.
These commands are intentionally designed to encourage safe and auditable infrastructure changes.
Source
- Terraform CLI workflow: https://developer.hashicorp.com/terraform/cli
How Terraform Interacts with Azure (Conceptual Flow)
Understanding the execution flow helps prevent confusion and errors:
- Terraform CLI reads configuration files
- Provider authenticates via Azure CLI locally or workload identity in CI
- Terraform queries Azure Resource Manager
- A plan is generated by comparing state and configuration
- Approved changes are applied
- State file is updated
This flow lets Terraform reconcile configuration, state, and Azure. State is Terraform's record, not an infallible copy of reality, which is why drift review and protected state storage matter.
Common Troubleshooting Scenarios
I use this order instead of repeatedly applying:
- I run
terraform fmt -checkandterraform validateto separate configuration errors from Azure API errors. - I run
az account showand confirm the tenant/subscription matchARM_TENANT_IDandARM_SUBSCRIPTION_ID. A valid login to the wrong subscription often looks like a missing resource. - I run
terraform providersand inspect.terraform.lock.hclto confirm the intended AzureRM version. - For
AuthorizationFailed, record the principal object ID, action, scope, and correlation ID. I check Azure RBAC at the exact scope and distinguish management-plane permission from storage/Key Vault data-plane permission. - For provider-registration errors, check
az provider show --namespace <namespace>. Register it through the platform process, or setresource_provider_registrations = "none"when Terraform's identity intentionally lacks registration rights and registration is managed elsewhere. - For drift, run
terraform plan -refresh-onlyand review before accepting state changes. I do not edit state by hand. - For a lock, prove no active run owns it before
terraform force-unlock <lock-id>.
Region-specific VM SKU availability, quota, globally unique storage names, NSG rules, and backend network restrictions are Azure service failures rather than Terraform language failures. Preserve the Azure request/correlation ID so the correct service boundary can be investigated.
Introduction to Modularization (Best Practice)
As environments grow, a single main.tf file becomes difficult to manage.
In production, infrastructure is often split into modules:
- Network module (VNet, subnets, NSGs)
- Compute module (VMs)
- Shared variables and outputs
Modules enable:
- Reuse across projects
- Cleaner code organization
- Team collaboration
For learning purposes, a single configuration file is appropriate. As complexity grows, modularization becomes essential.
Lab Validation and Cleanup
Validation
After deployment:
- I verify resources in the Azure Portal
- Confirm VM provisioning and networking
- Validate NSG rule behavior
This confirms Terraform deployed infrastructure as expected.
Cleanup
Always destroy lab resources when finished to avoid unnecessary costs.
I create and review a separate destroy plan before applying it:
terraform plan -destroy -out=destroy.tfplan
terraform show destroy.tfplan
terraform apply destroy.tfplan
terraform destroy proposes deletion of every object managed by the selected state, including imported resources. I review the destroy plan, confirm the backend key/workspace/subscription, and verify that shared dependencies are not owned by this state before approving it. Terraform does not automatically know that an imported or jointly consumed resource should be protected.
Source
- Azure cost management basics: https://learn.microsoft.com/azure/cost-management-billing
Continue Learning
- Continue from this single-VM lab to the production-ready Azure Terraform environment, which adds remote state, controlled outbound access, private endpoints, monitoring, verification, and cleanup.
- I compare the implementation with the equivalent Azure infrastructure built with Bicep to understand the trade-off between an Azure-native language and Terraform's provider model.
- Study Infrastructure as Code Security before moving this root module into CI/CD or granting it broader Azure permissions.
- Extend the network with Azure VNet peering and hub-and-spoke routing after you understand why Azure peering is non-transitive.
- Move from one VM to modular Terraform and an autoscaling Azure VM Scale Set when the workload needs repeatable modules, load balancing, and horizontal scaling.
- I use the Azure networking with PowerShell and Network Watcher lab to validate the same network concepts through a different automation interface.
Final Thoughts
This guide demonstrates how real Azure infrastructure is built using Terraform, not just how to run commands.
Once you understand:
- Declarative infrastructure
- State management
- Safe deployment workflows
You can confidently scale this knowledge into production, automation pipelines, and enterprise environments.
References
- Terraform Registry - AzureRM Provider
- HashiCorp - AzureRM 4.0 Upgrade Guide
- HashiCorp - AzureRM Backend
- HashiCorp - Manage Sensitive Data
- Microsoft Learn - Authenticate Terraform to Azure
- Microsoft Learn - Store Terraform State in Azure Storage
- Microsoft Learn - Troubleshoot Terraform on Azure
- Microsoft Learn - Create a Linux VM with Terraform
- Microsoft Learn - Azure Virtual Network Overview
- Microsoft Learn - Manage Azure Resource Groups
- Microsoft Learn - Network Security Groups Overview
- Microsoft Learn - Azure Bastion Overview
- HashiCorp - Resource Dependencies