This lab demonstrates how to design and implement secure file system management in a domain environment using Active Directory, Windows Server 2019, and Hyper-V.
The focus is on enterprise-style file sharing, using NTFS permissions, group-based access control, and mapped network drives, all aligned with real-world Windows domain best practices.
For production, host departmental file shares on a dedicated, patched domain member file server or supported clustered service, not on a domain controller. The screenshots use the lab DC to keep the environment small, but combining directory services and general file-serving expands the DC's attack surface and recovery scope.
Lab Context & Prerequisites
This lab builds on earlier foundational work:
Prerequisites
- Active Directory Domain Services installed and functional
- Domain-joined client computer
- Domain administrator credentials
- Hyper-V networking configured
Lab Objective
To securely manage shared resources in a Windows Server domain by:
- Deploying a file server
- Using group-based NTFS permissions
- Mapping network drives for domain users
- Enforcing least-privilege access
Understanding File Systems in Windows (Foundation)
Before configuring permissions, it’s important to understand Windows file systems:
FAT32
- Legacy file system
- Maximum file size: 4 GB
- ❌ No file-level security
- ❌ Not suitable for domain environments
exFAT
- Optimized for removable storage
- ❌ No NTFS-style permission model
- ❌ Not recommended for Windows domains
NTFS (New Technology File System)
- Supports file and folder permissions
- Enables auditing, encryption, and compression
- ✅ Required for enterprise and domain security
Conclusion: NTFS is the appropriate choice for this Windows file-server lab. ReFS can also be valid for supported Windows Server workloads, but its feature trade-offs must be evaluated rather than treating one file system as universally suitable.
Step-by-Step Lab Tasks
Step 1: Set Up the File Server
- I use a dedicated Windows Server member server to host shared folders in production
- Ensure the server is domain-joined
On the lab server, open Server Manager. If you follow the production recommendation, perform these steps on the dedicated member file server.
Go to Add Roles and Features. → Choose File and Storage Services → Install the File Server role.
Step 2: Create Organizational Units and Security Groups
- I create OUs for logical separation
- I create security groups in Active Directory
- Follow best practice: assign permissions to groups, not individual users
I use the AGDLP pattern for a single domain:
- I add user Accounts to role-based Global groups, such as
GG-HR-Staff. - I add those global groups to resource-specific Domain Local groups, such as
DL-HR-Documents-Modify. - assign Permissions on the folder to the domain local group.
This separates “who the user is” from “what access this resource grants” and makes permission changes easier to audit.
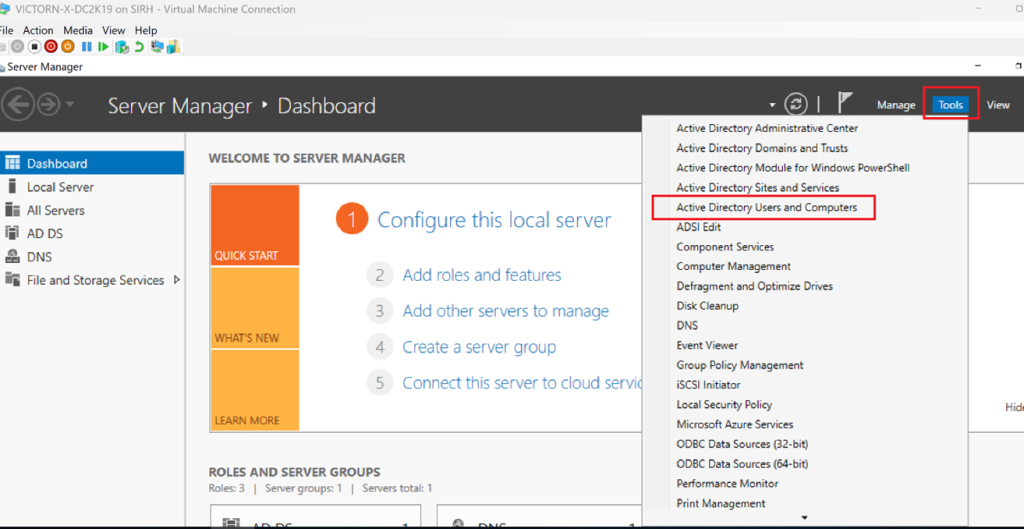
Go to Server Manager → Tools → Use Active Directory Users and Computers (ADUC)
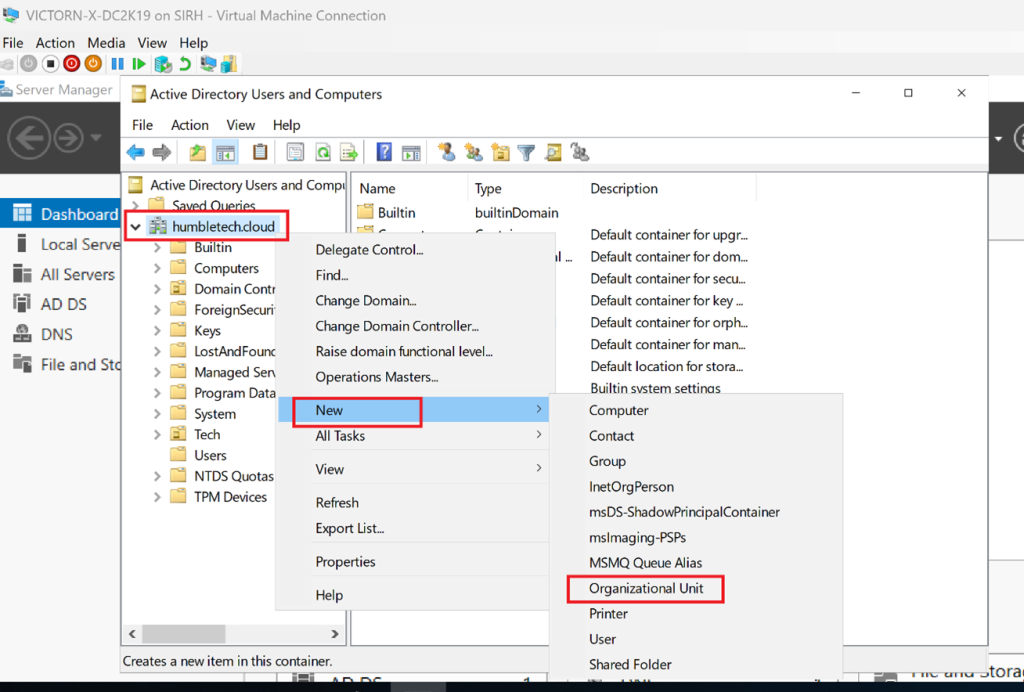
Right-click the domain (humbletech.cloud) → New → Organizational Unit
Name the OU (e.g., HR Dept) → Click OK
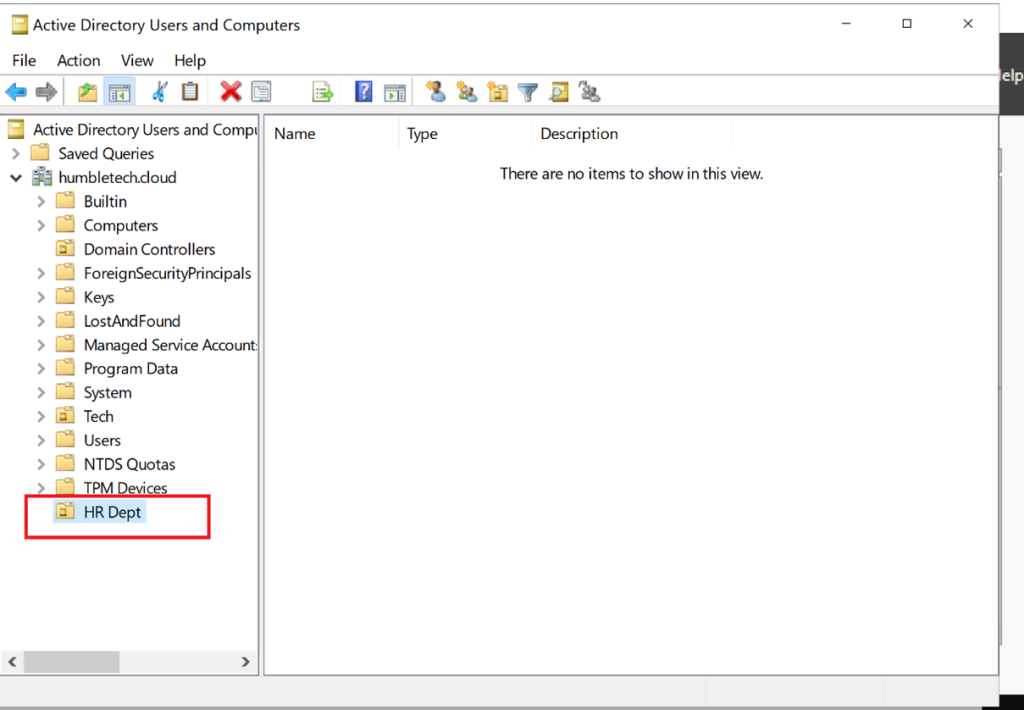
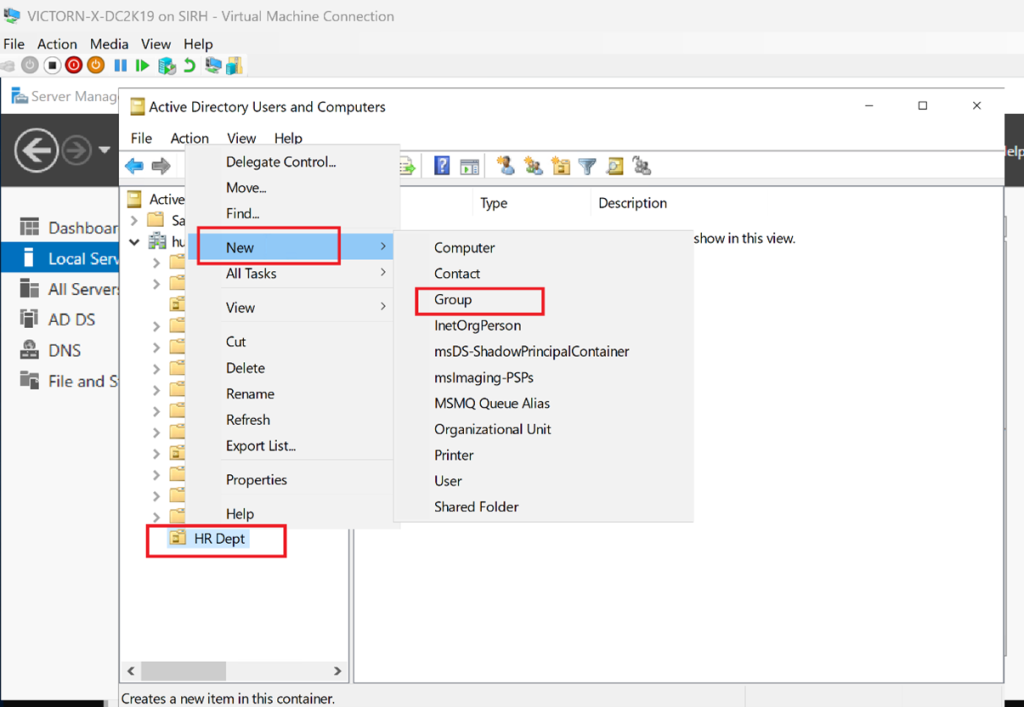
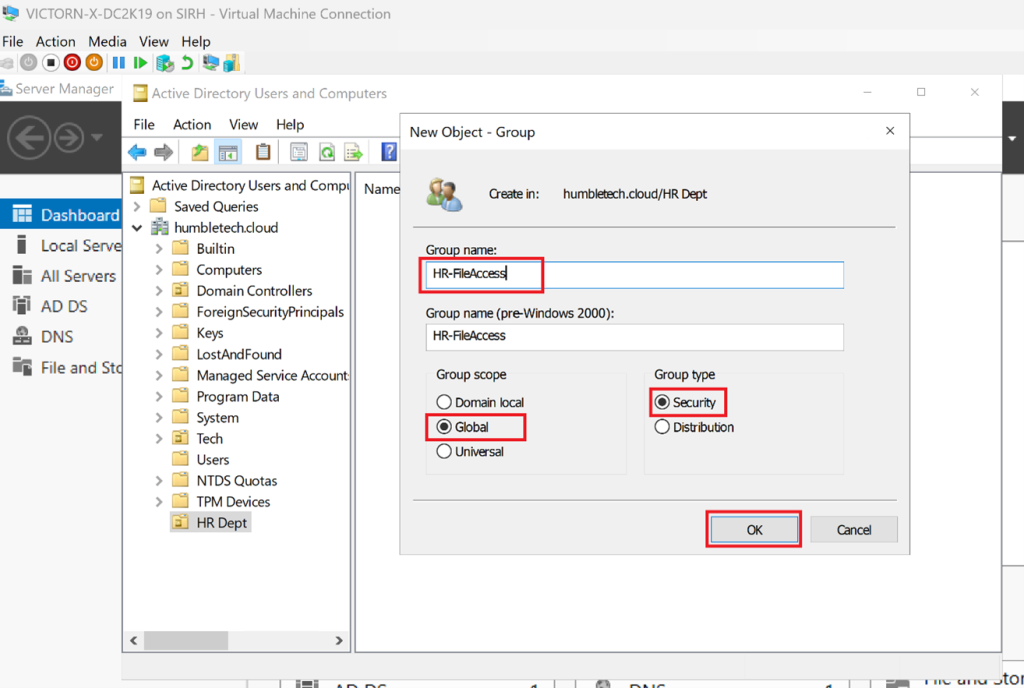
Navigate to the newly created OU → Right-click the OU → New → Group
I create a role group such as GG-HR-Staff with Global scope and Security type. I create DL-HR-Documents-Modify with Domain Local scope, add the global group to it, and later assign the folder permission to the domain local group.
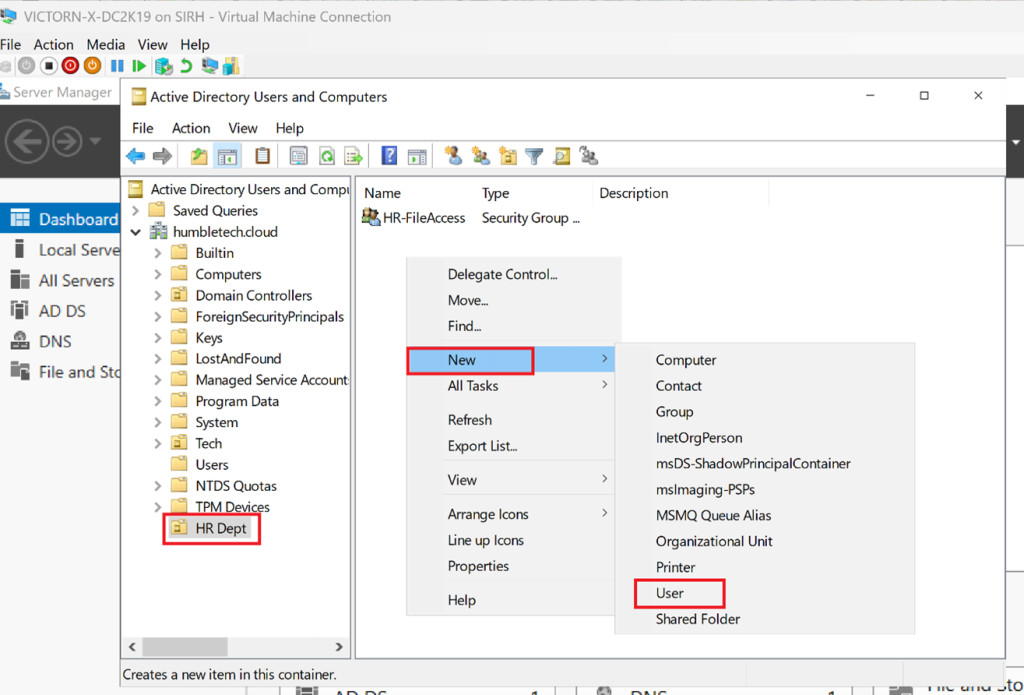
Right-click the OU → New → User
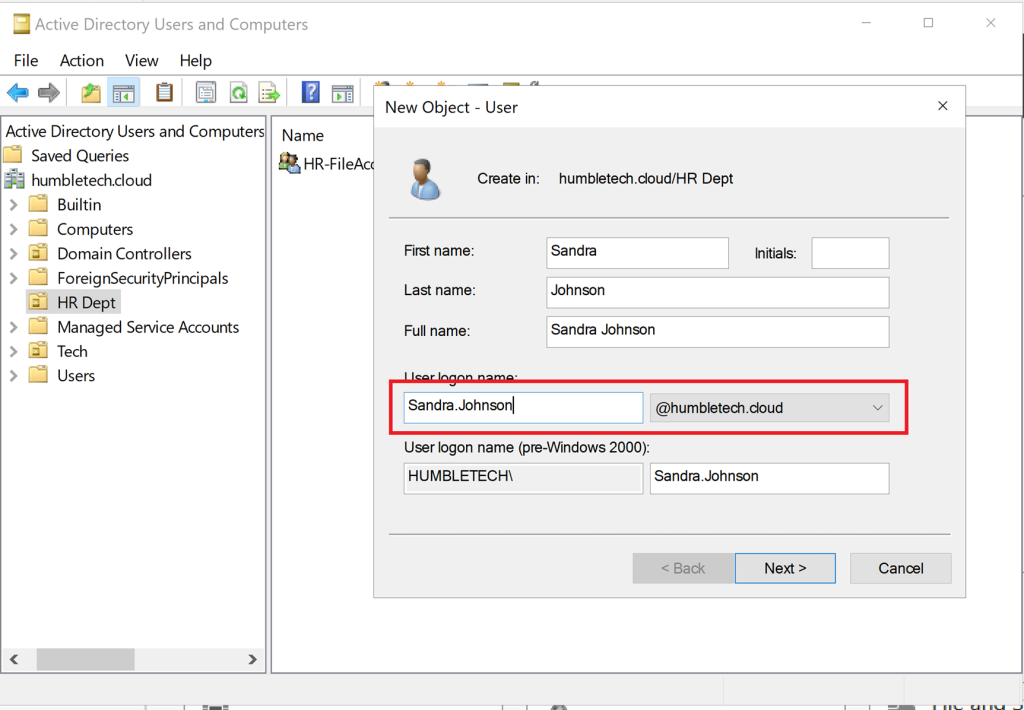
Fill in the First Name, Last Name, and User Logon Name → Set a password
Go to the Member Of tab → Click Add
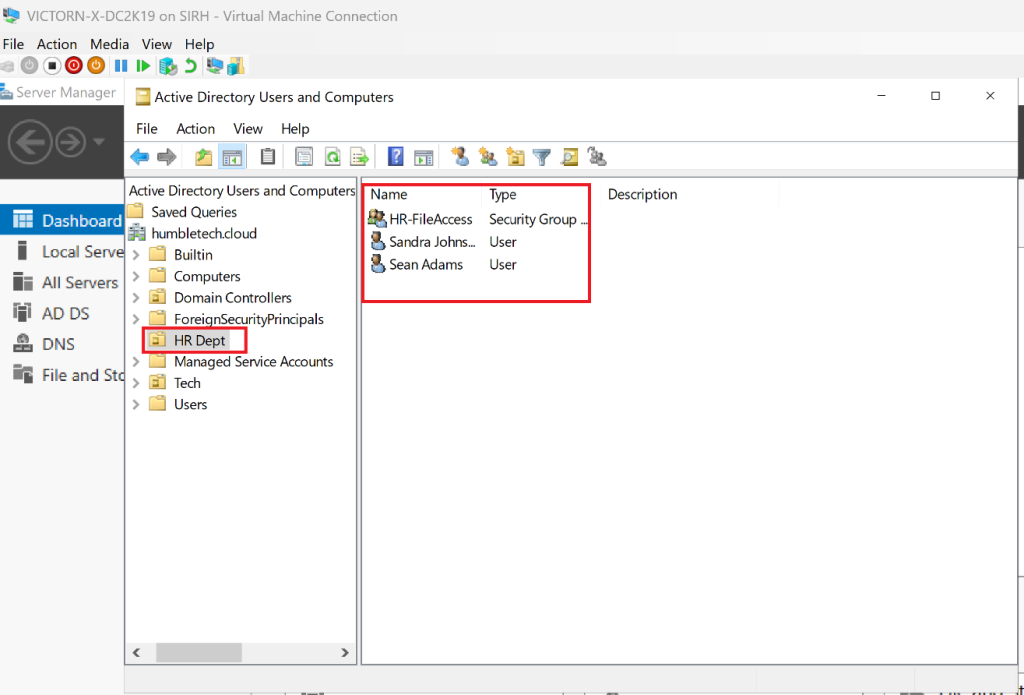
I add the user to the role group, for example GG-HR-Staff, rather than directly to the resource-permission group.
Step 3: Create and Share a Folder
- I create a structured folder hierarchy (e.g., by department)
- Configure basic share settings
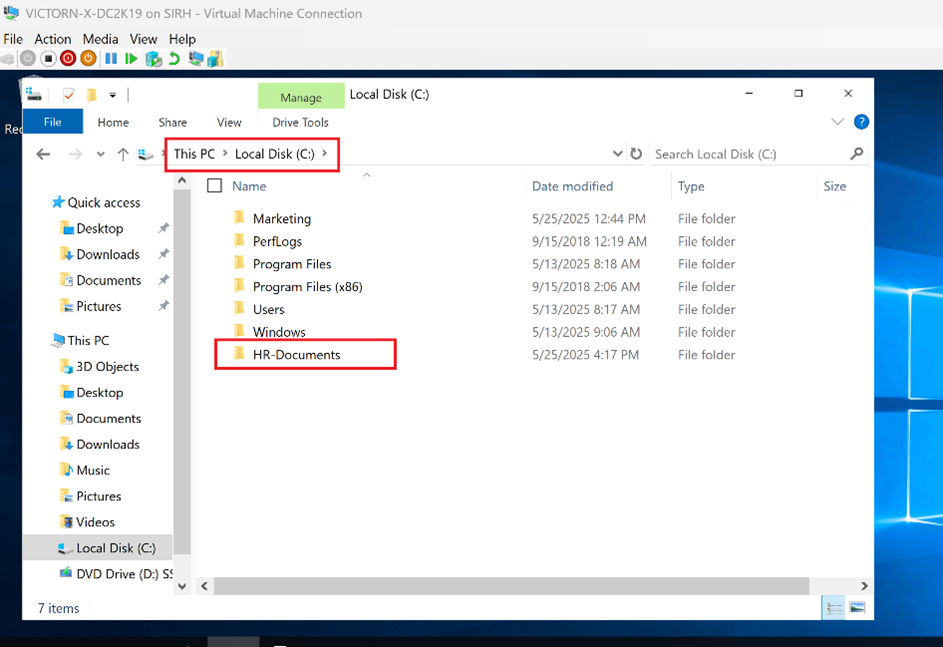
I create a folder (e.g., C:\HR-Documents on the VICTORN-X-DC2K19 server)
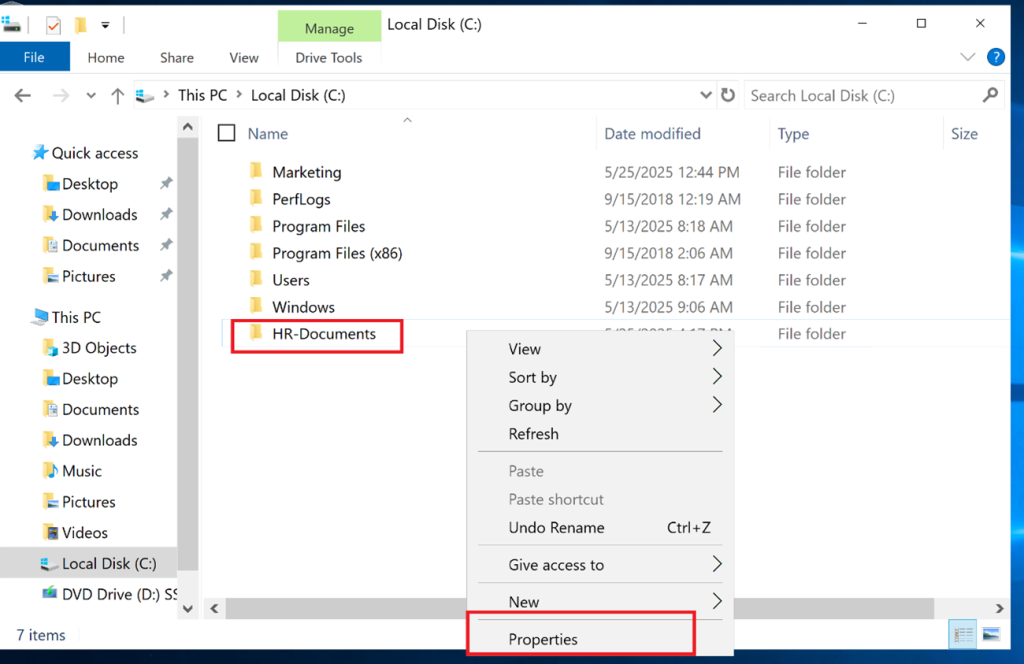
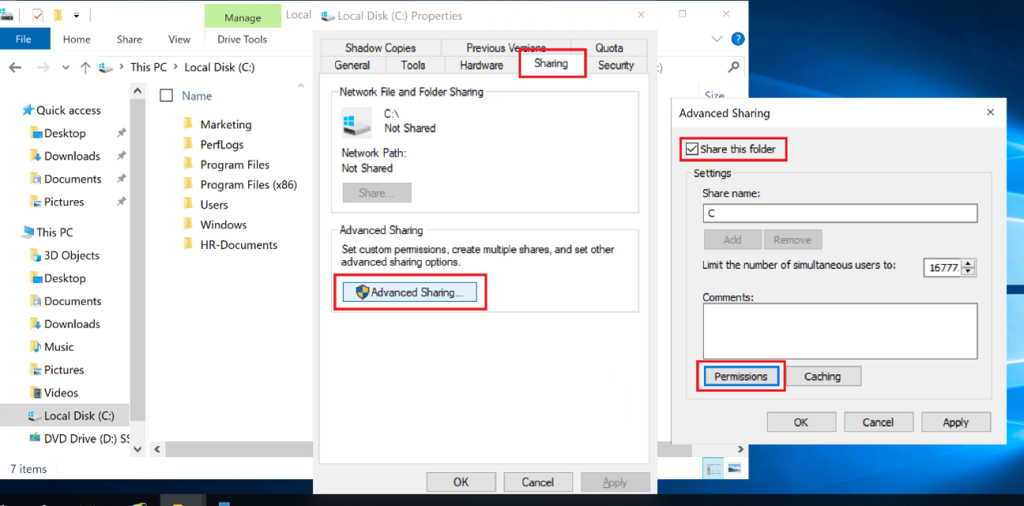
Right-click on the Folder → Properties → Sharing Tab → Advanced Sharing
I check “Share this folder”
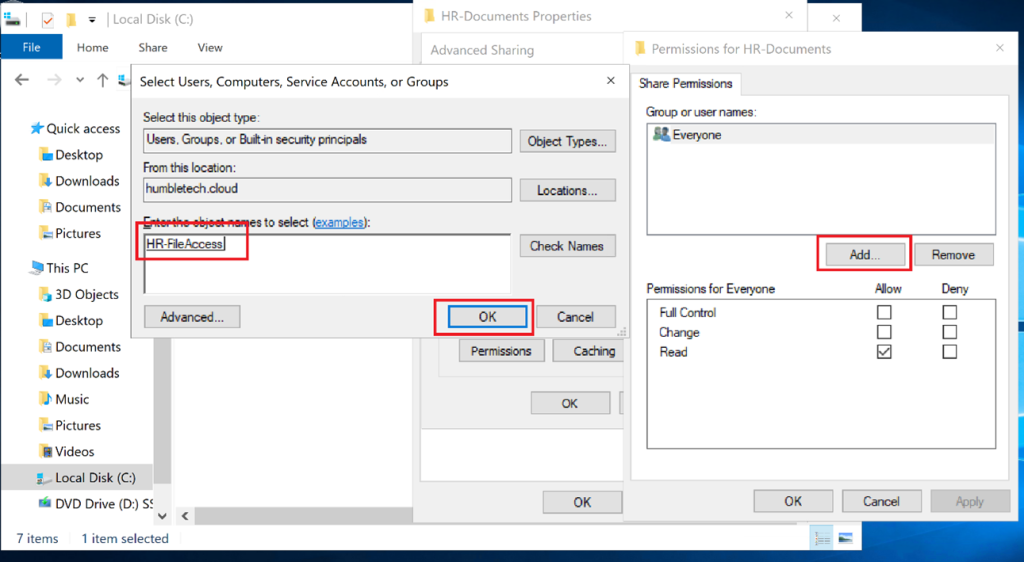
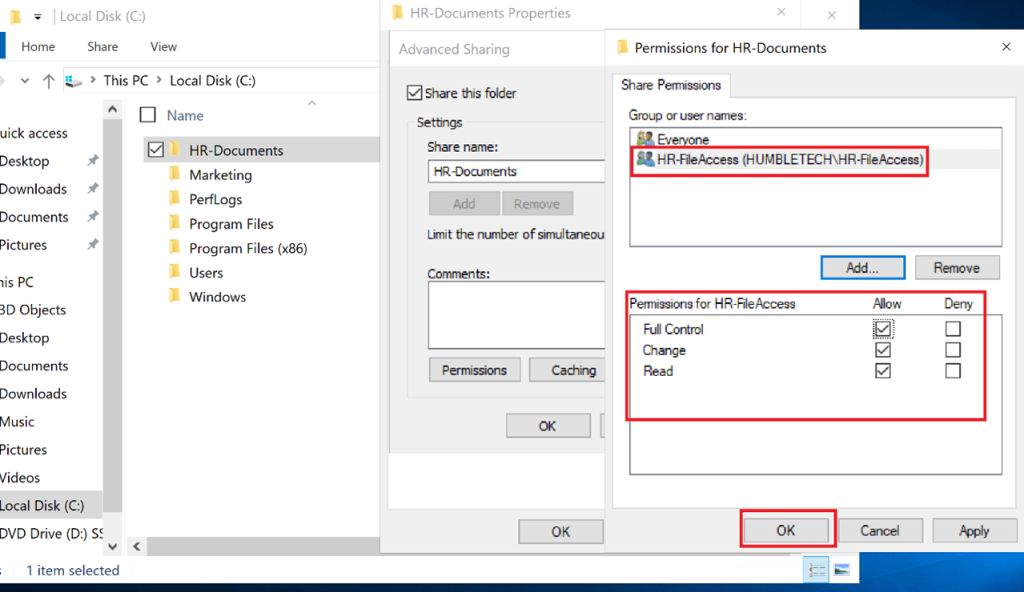
Click Permissions and choose one documented permission model. A common model grants authenticated users broad share-level access and enforces granular authorization with NTFS. Another uses aligned groups at both layers. Don't mix approaches without understanding the effective result.
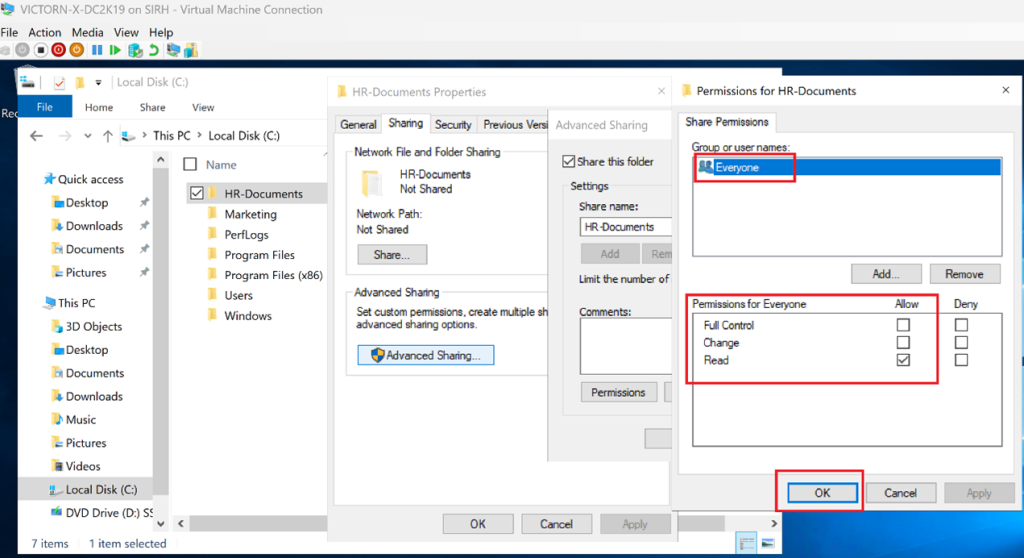
Click Add → Search and select the group (e.g., HR-FileAccess) → Click OK
For this lab, grant the resource group DL-HR-Documents-Modify the required share permission. If the design leaves a broader principal with Full Control at the share layer, the NTFS ACL must be the intentionally restrictive authorization boundary and must be verified before the share is exposed.
Step 4: Configure NTFS Permissions (File System Security)
- Apply NTFS permissions at the folder level
- I review inheritance before changing it; disabling inheritance can create long-term maintenance problems
- Grant Read & Execute or Modify according to the role
- Reserve Full Control for administrators who genuinely need to change permissions or ownership
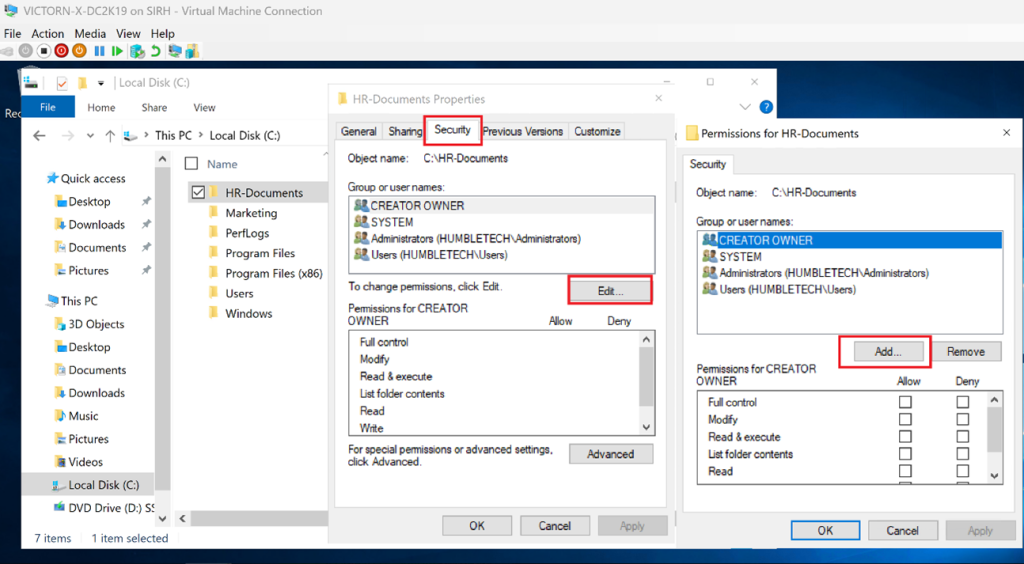
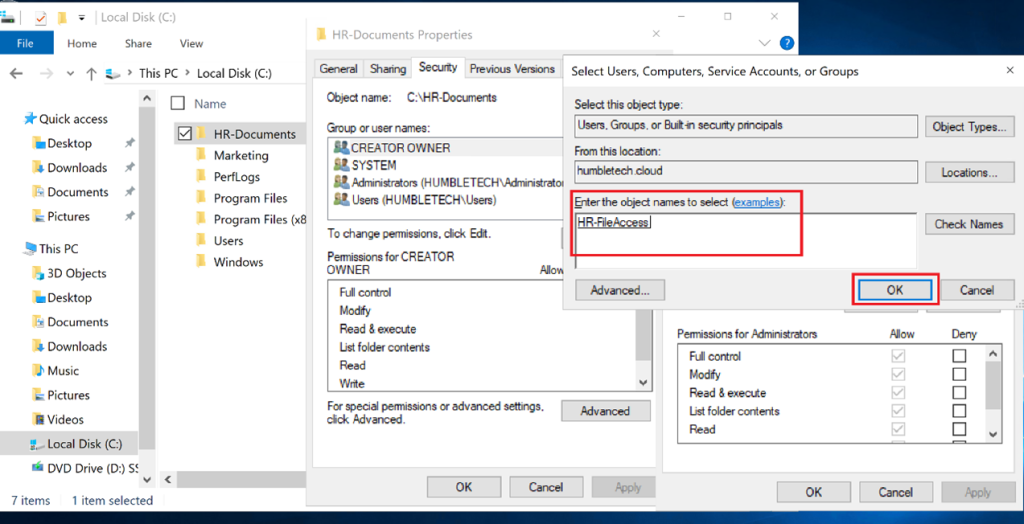
Go to Security tab → Click Edit → Add domain groups
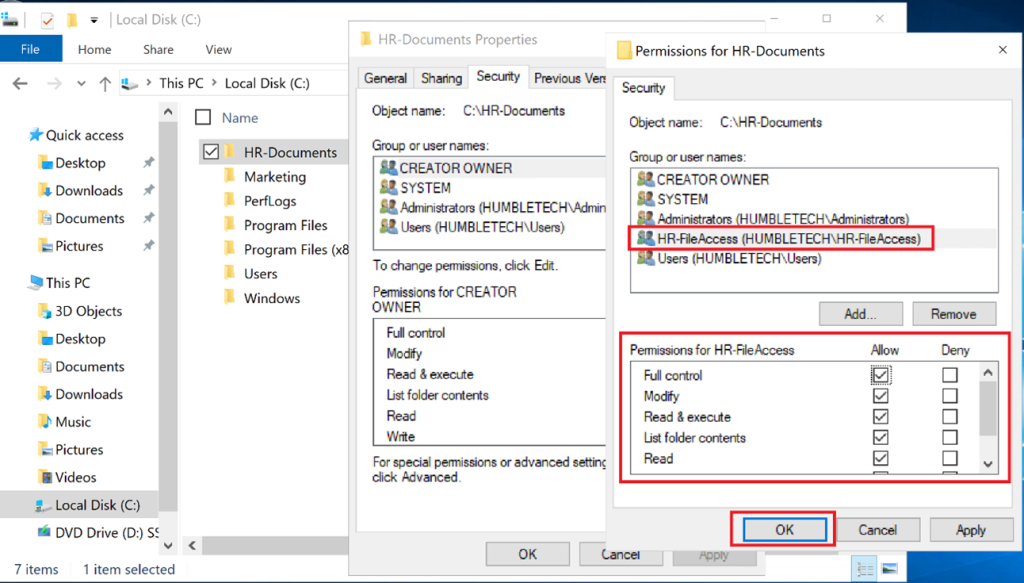
Assign specific permissions to the domain local resource group. Most contributors need Modify, not Full Control.
When access occurs over SMB, Windows evaluates both the share permissions and the NTFS ACL. The effective result is constrained by the more restrictive combination, with explicit deny entries taking precedence in important cases. I test with representative users instead of reasoning only from one dialog.
Tips: Always assign permissions to groups, not individual users, to follow best practices.
Step 5: Assign Group-Based Access to the Shared Folder
- Assign NTFS permissions to security groups
- Validate access by logging in as different users
On the folder’s Security tab, grant DL-HR-Documents-Modify the intended access.
Apply the desired NTFS permissions and confirm their inheritance scope.
Step 6: Map Network Drives
- Map shared folders as network drives
- Ensure users only see resources they are authorized to access
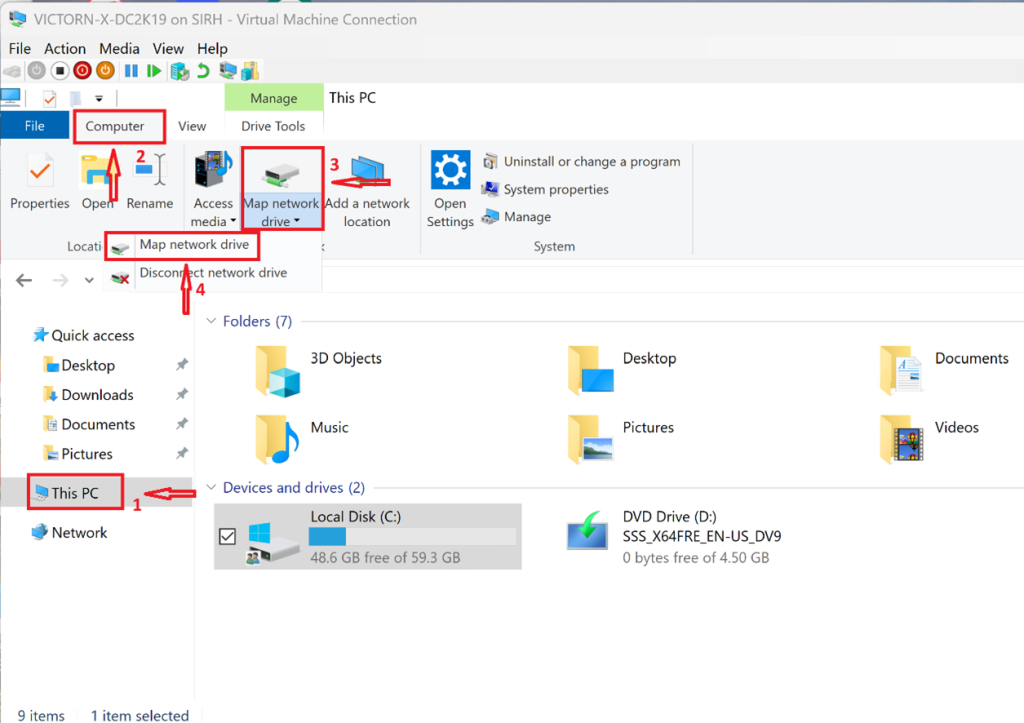
Navigate to This PC → **Computer **→ Map network drive and select Map network drive
Map a drive to the UNC path, for example \\FS01\HR-Documents.
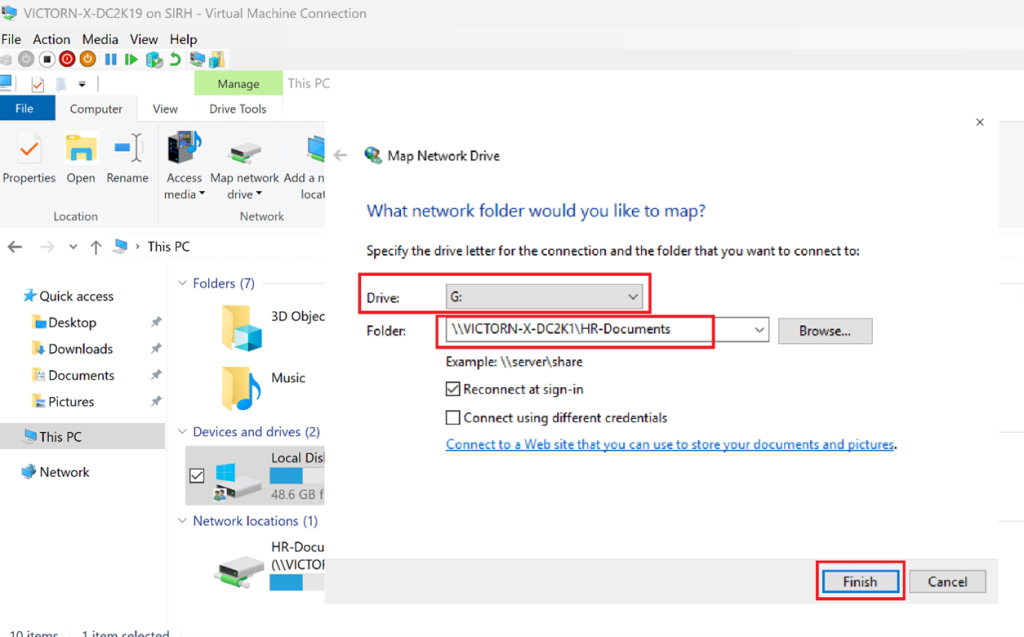
Sign in to your domain user PC you created (e.g., Sandra.johnson@humbletech.cloud)
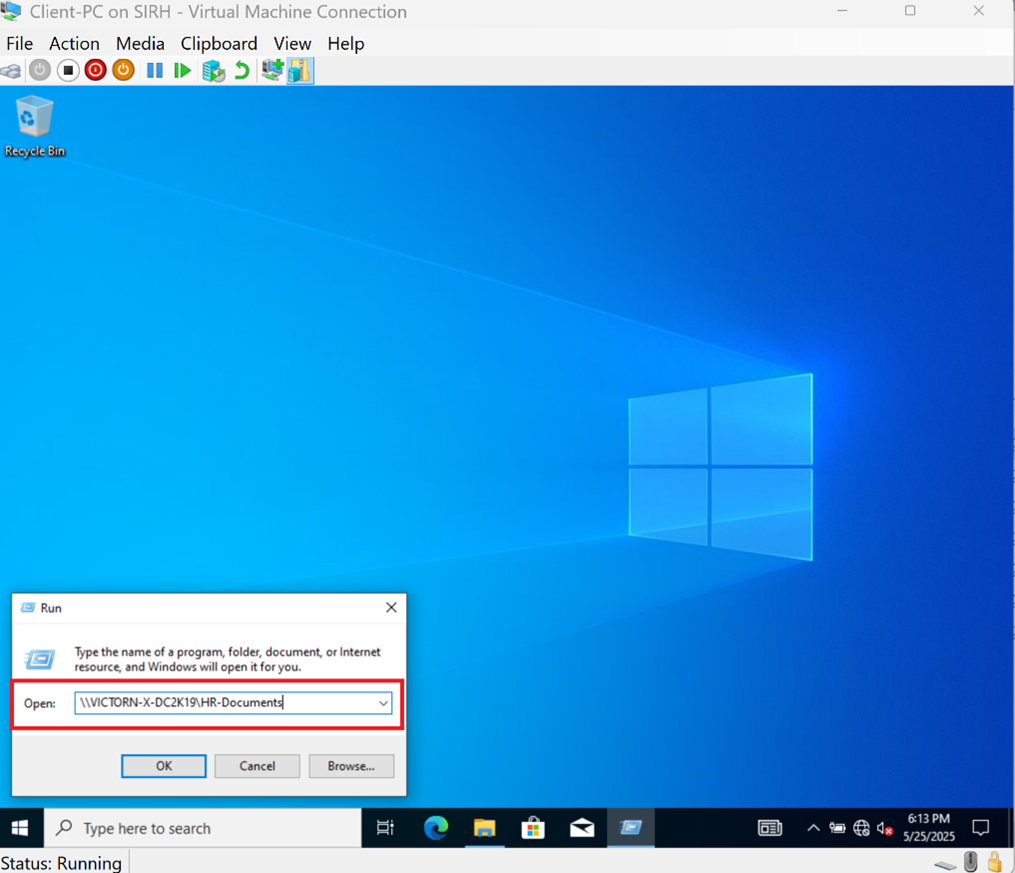
I use Run to open \VICTORN-X-DC2K19\HR-Documents to confirm the HR Dept can access the Shared Folder on the Network location.
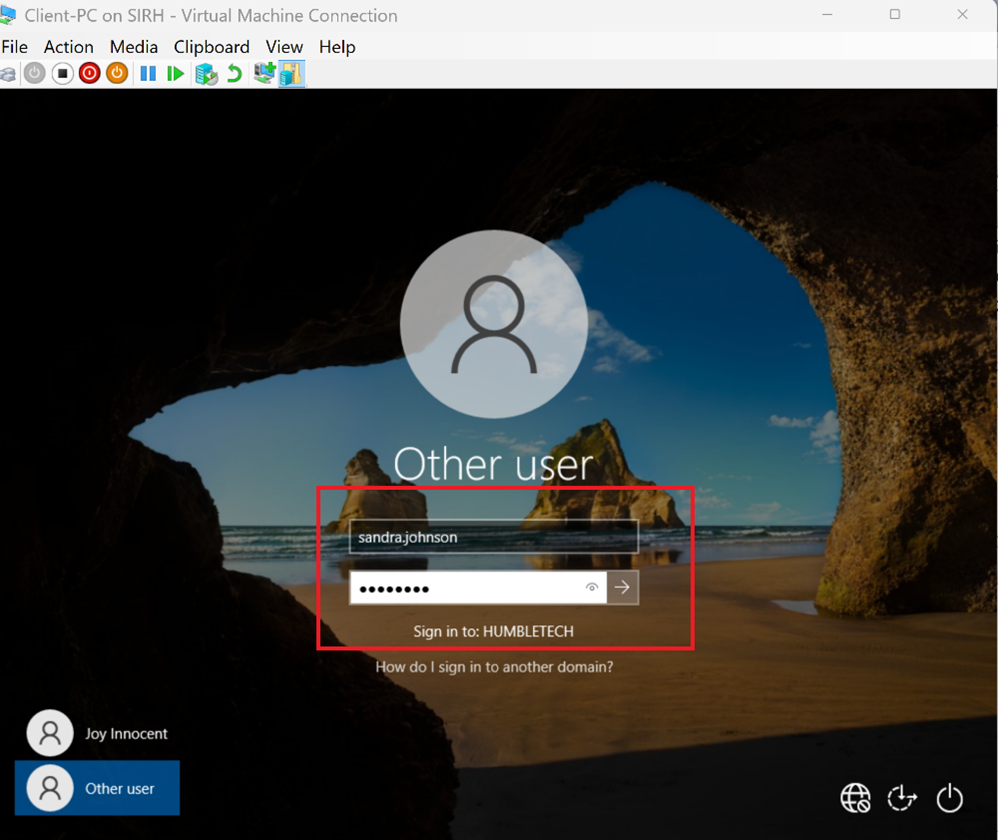
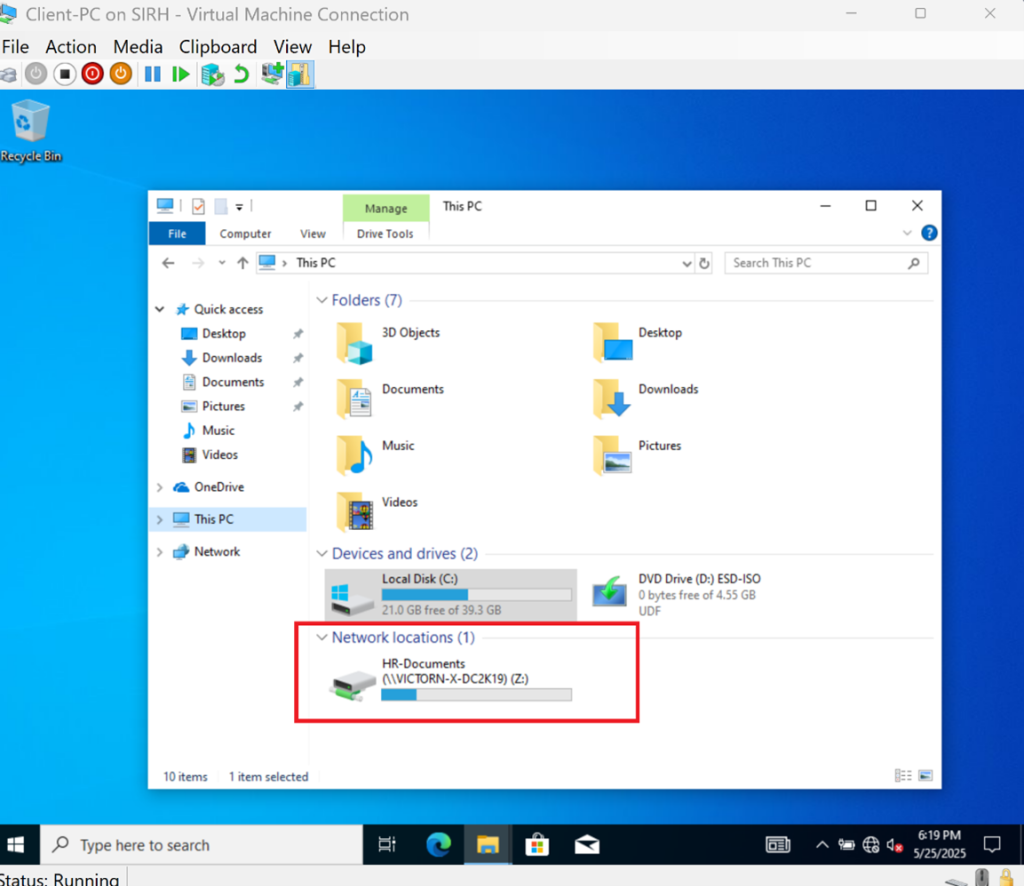
Congratulations! You Have Successfully Built a Secure File System Management with NTFS Permissions and Mapped Drives in a Windows Server
Deploy the Drive with Group Policy Preferences
Manual mapping proves connectivity but doesn't scale. In Group Policy Management, create a user-targeted Drive Maps preference under:
User Configuration → Preferences → Windows Settings → Drive Maps
Set the action, drive letter, label, and UNC path, then use item-level targeting or security filtering so only the intended role group receives the mapping. A mapped drive is a convenience, not an authorization control; the share and NTFS ACLs must still deny unauthorized access.
Validate Effective Access
I test at least four cases:
- An HR contributor can create, modify, and delete only where intended.
- An HR read-only user can read but can't modify.
- An unrelated standard user is denied even when entering the UNC path directly.
- A file-server administrator can recover and manage content without using a normal user account.
Useful checks include:
Get-SmbShare -Name 'HR-Documents'
Get-SmbShareAccess -Name 'HR-Documents'
Get-Acl 'C:\HR-Documents' | Format-List
whoami /groups
After group membership changes, sign out and back in so the user receives a new access token. Also test from the client over SMB; a local test on the server doesn't exercise the share permission layer.
Production Enhancements
- Enable access-based enumeration if users shouldn't see folders they can't access.
- Enable object-access auditing only with a deliberate SACL and log-retention plan.
- I use quotas and file screening where requirements justify File Server Resource Manager.
- Back up the data and ACLs, then test file and full-server recovery.
- Consider DFS Namespaces for a stable logical path rather than exposing a server hostname in every mapping.
- Monitor capacity, failed access, backup health, and unusually large or rapid file changes.
Why This Lab Matters
This project demonstrates:
- Principle of least privilege access
- Secure, scalable file access management
- Real-world Active Directory file server design
- Enterprise-ready identity and access control practices
These skills are fundamental in on-premises, hybrid, and cloud-connected Windows environments.
For a cloud-backed alternative that retains a Windows Server namespace, compare this design with Azure File Sync. Continue with the AD PowerShell automation guide to create the role and resource groups repeatably.
Lab Outcome
By completing this lab, the environment includes:
- A secure NTFS-based file server
- Group-controlled access to shared resources
- Mapped drives for domain users
- A realistic corporate IT file management setup