Point-to-Site VPN helps us connect a client computer to an Azure virtual network securely. This simply means you can connect to a compute resource using its private IP on the Azure Virtual Network.
Secure remote access is a common requirement in cloud projects. In this lab, a Point-to-Site (P2S) VPN is configured so a client computer can connect to an Azure Virtual Network (VNet) and reach resources using private IP addresses.
What is Point-to-Site VPN
A Point-to-Site (P2S) VPN gateway creates a secure connection from an individual client device to an Azure VNet. The connection is initiated from the client machine, making it a practical choice for remote workers or scenarios where only a few clients need access to the VNet, such as from home or a conference. P2S VPN is also a useful solution to use instead of S2S VPN when you have only a few clients that need to connect to a VNet.
What is a VPN Gateway
A VPN gateway is a type of virtual network gateway that can send encrypted traffic between:
- Azure VNets and on-premises networks over the public internet, or
- Azure VNets through a VNet-to-VNet VPN connection.
This is different from VNet peering, which uses Azure's backbone directly without creating an IPsec VPN tunnel. Read Azure Networking and the VNet peering guide before choosing between the two designs.
Lab Walkthrough: Configure Azure Point-to-Site VPN (Certificates)
Prerequisites
- Azure subscription
- Permission to create networking resources
- Windows 10+ or Windows Server 2016+ for certificate generation via PowerShell
- A client address pool that doesn't overlap the Azure VNet, peered VNets, on-premises networks, or other networks from which clients connect
- A cost-approved VPN Gateway SKU in a supported region
This lab uses self-signed certificate authentication because it makes the trust flow visible. For an organization, evaluate Microsoft Entra ID authentication with OpenVPN and Azure VPN Client, which can add Conditional Access and multifactor authentication, or use certificates issued by a managed enterprise PKI. Authentication method, tunnel type, client operating system, and VPN client must be selected together.
Creating a Virtual Network
A P2S VPN requires a VNet with two subnets:
- GatewaySubnet (required for VPN gateway)
- Workload subnet (where your VM will live)
Recommended addressing
- VNet Address Space:
172.16.0.0/16 - GatewaySubnet:
172.16.1.0/27(recommended size for many configs) - Workload subnet (example):
172.16.0.0/24
Portal steps
Firstly, we need to create a Virtual Network
-
Sign in to the Azure Portal.
-
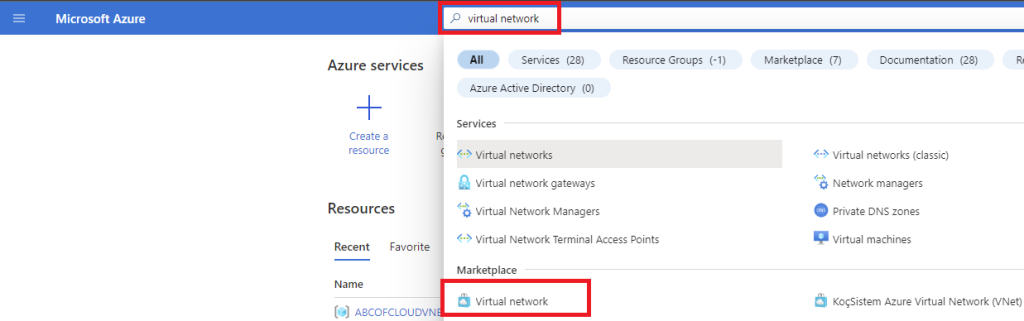
Search for virtual network in Azure portal.
-
In the search results, select virtual network right under Marketplace.
-
On the Virtual network page, click on Create.
-
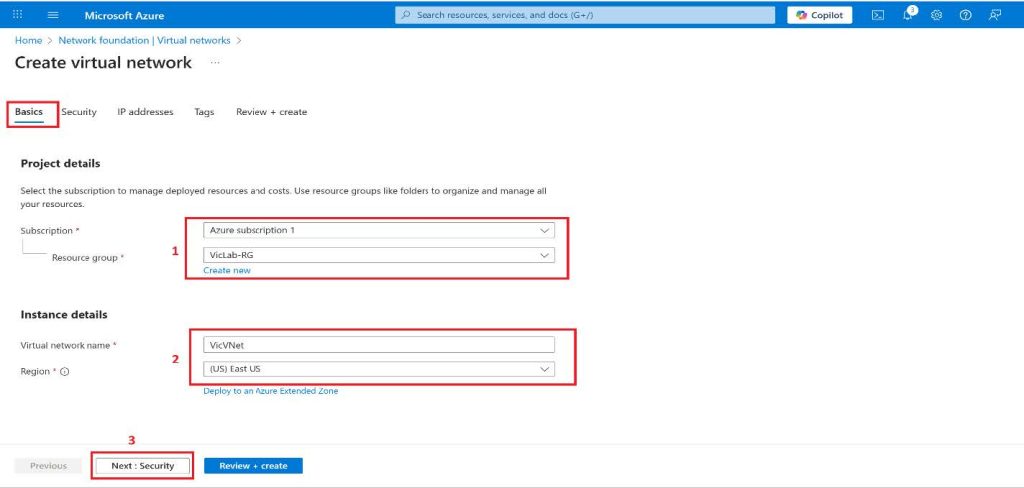
Under the Basics tab, choose the Subscription you want to use for this project.
-
A Resource Group can be selected from an existing resource group, or a new resource group can be created by clicking on Create new.
-
Enter a preferred name for the virtual network.
-
Choose a preferred location for the Virtual Network by clicking on the drop-down and selecting the region you prefer, and then click on Next at the bottom. Note: The location determines where the resources that you deploy to this VNet will live.
For this tutorial, we will leave the Security tab with the default settings and then click on Next again.
We will be using the 172.16.0.0/16 for our address space, and for the subnet,t we will create two subnets: abcofcloudsubnet with a subnet address space of 172.16.0.0/24.
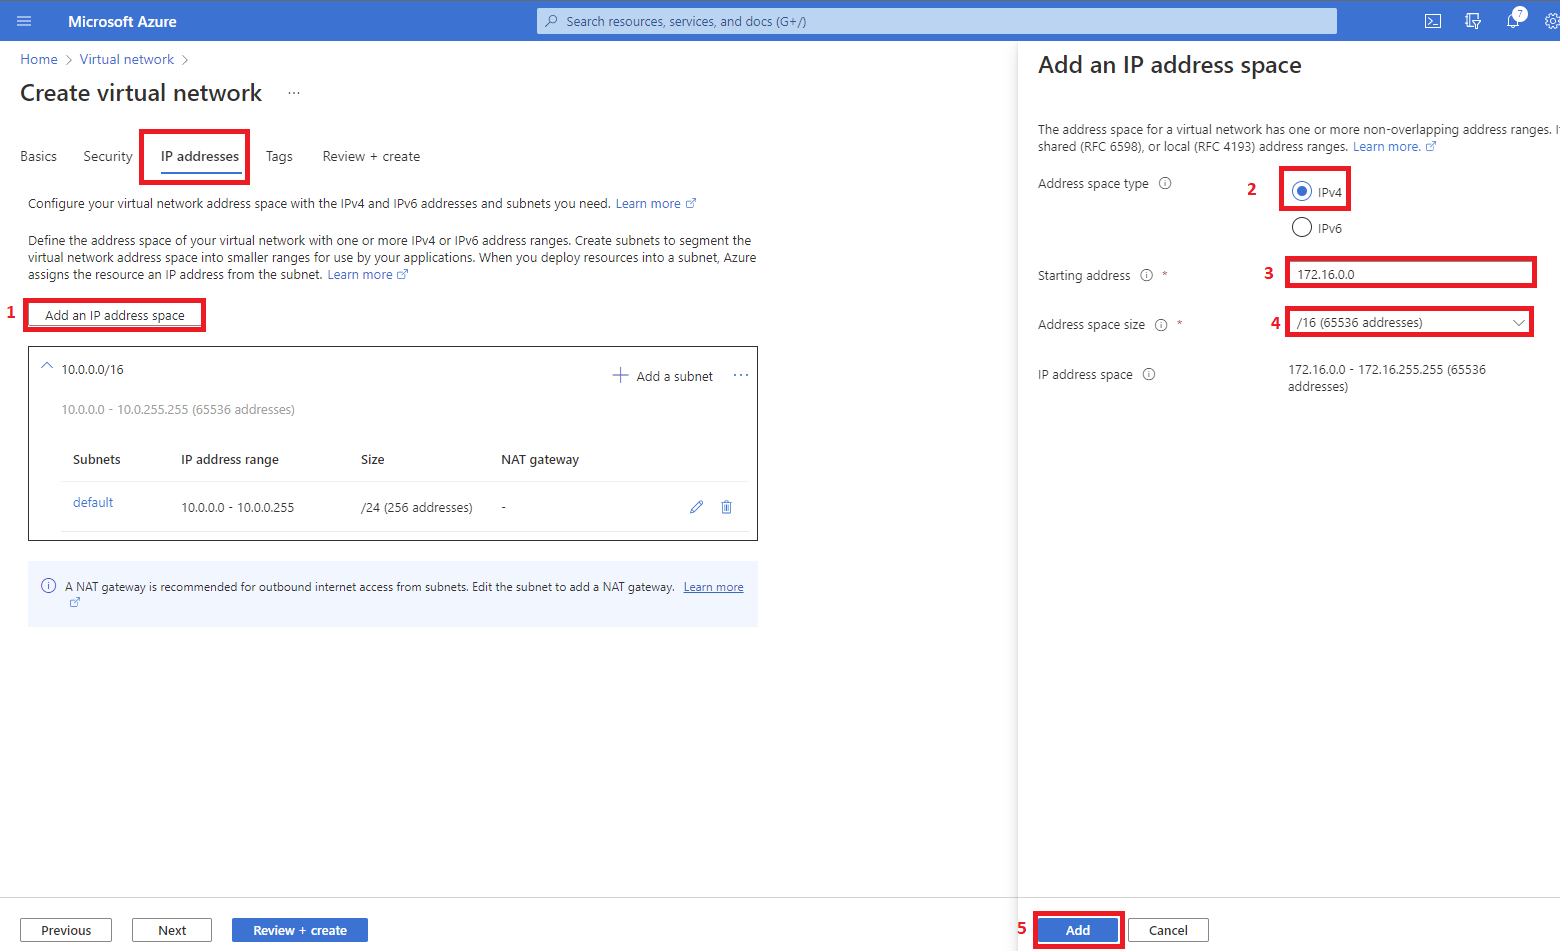
- On the IP addresses tab, click on the Add an IP address space and select the Address space type radio button for IPv4. Starting address type 172.16.0.0, Address space size use the drop-down to select /16 (65536 addresses) and click the Add button.
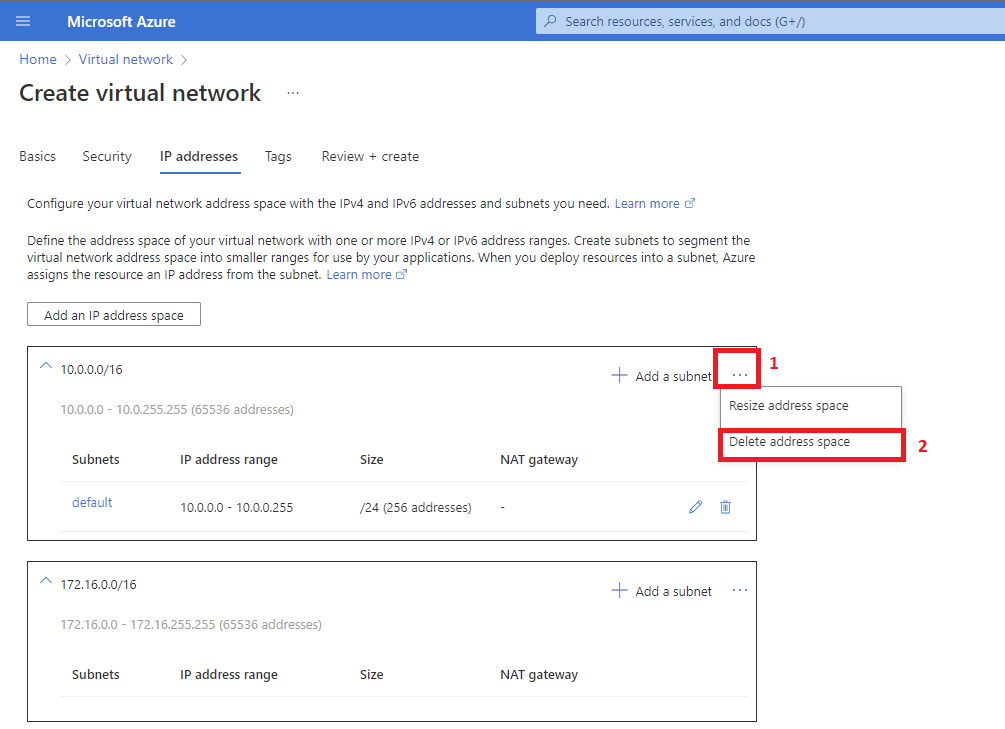
- After this has been added, you can now delete the default address space.
- This is the time we add our subnet, click on the plus(+) button beside Add a subnet, and on the pop-out button by the right under the Subnet details enter a preferred name, for this tutorial I will be using abcofcloudsubnet, the Starting address as 172.16.0.0 and Subnet size as /24 (256 addresses) then click on the Add button.
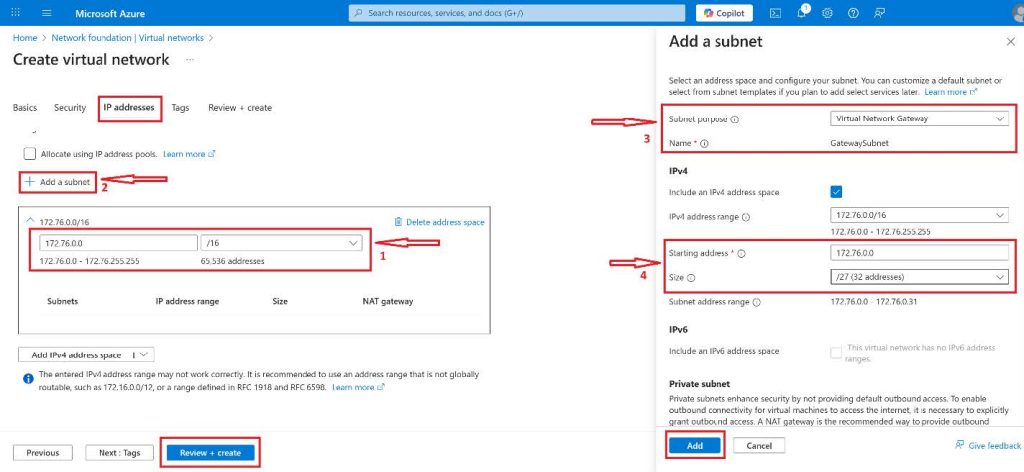
- Click on the Review + Create button to have an overview of your settings and then click Create.
Let's Create the VPN Gateway
-
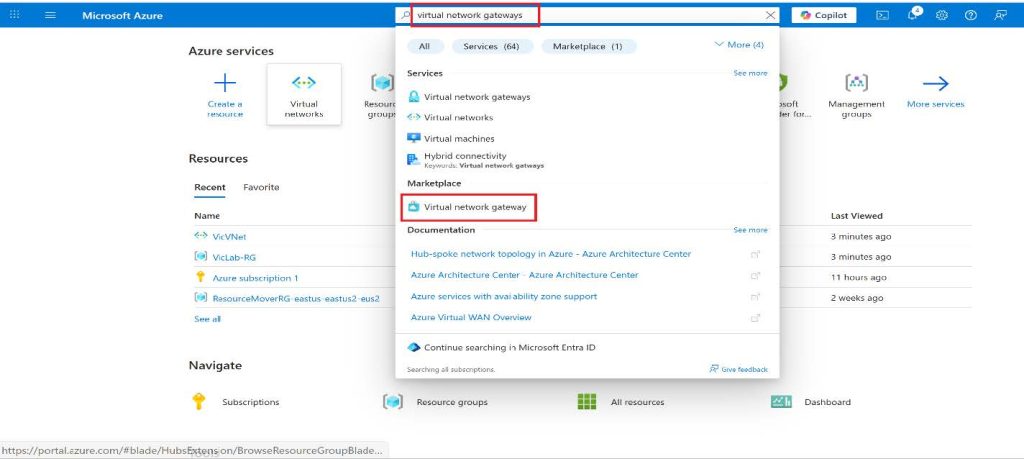
Search for the Virtual Network Gateway in the Azure portal.
-
In the Search result, under Marketplace, select Virtual network gateway.
-
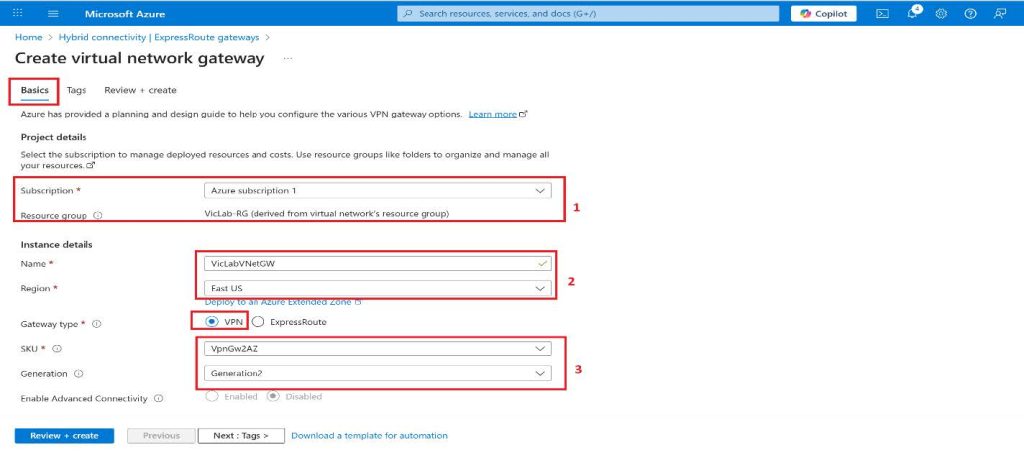
Choose the subscription you want from the drop-down.
-
The Resource Group will be auto-filled when we select the virtual network.
-
Enter any preferred name for your gateway.
-
We will be using VPN as the Gateway type in this tutorial.
-
Route-based is the VPN type we will be using for this tutorial; this can be selected based on your requirement or business need.
-
This lab uses
VpnGw2AZ. It is a zone-redundant SKU and can be expensive for a short exercise. I review current regional availability, performance, connection limits, generation support, and pricing instead of treating this value as a universal default. -
Generation2 will be the choice for this tutorial.
-
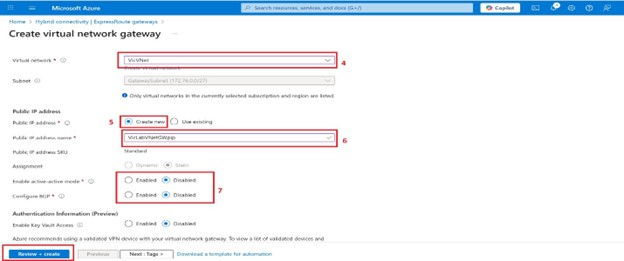
Our Virtual network will be the one we created previously.
-
You can either create a subnet in your virtual subnet with the name Gatewaysubnet, or youcan get the Gateway subnet address range automatically.
-
We will change the default Gateway subnet address range to 172.16.1.0/27 or larger, which is (/26,/25,/24, etc.) Anything lesser will throw an error if you’re trying to deploy a zone-redundant/zonal gateway, and also, this allows enough IP addresses for future changes.
-
Public IP address is set to Create new; you can choose to use an existing one if you already have one created. These settings specify the public IP address object that gets associated with the VPN gateway. The public IP address is assigned to this object when the VPN gateway is created. The only time the primary Public IP address changes is when the gateway is deleted and re-created. It doesn't change across resizing, resetting, or other internal maintenance/upgrades of your VPN gateway.
-
Enter a preferred name for the Public IP address name.
The Assignment setting is controlled by the Public IP Address Type value.
Enable active-active mode, and Configure BGP will be disabled in this tutorial.
- Click on Review + Create and then Create. Tags can be added based on your requirements.
Gateway deployment can take a significant amount of time. You can safely navigate away from the portal deployment page and monitor the deployment from the resource group, notifications, or activity log. Don't start a second deployment merely because the gateway isn't immediately available.
Welcome from the short break. The next thing we will be doing is creating a Self-Sign root and client certificate.
Create Self-Signed Certificates for the Lab
-
Open PowerShell with elevated privileges from a computer running Windows 10 or later, or Windows Server 2016.
-
I run the following Microsoft-compatible example. It creates a self-signed root certificate in
Certificates - Current User\Personal\Certificatesand keeps the certificate object in$certfor the next command.
$rootParams = @{
    Type              = 'Custom'
    Subject           = 'CN=VicP2SRootCert'
    KeySpec           = 'Signature'
    KeyExportPolicy   = 'Exportable'
    KeyUsage          = 'CertSign'
    KeyUsageProperty  = 'Sign'
    KeyLength         = 2048
    HashAlgorithm     = 'sha256'
    NotAfter          = (Get-Date).AddMonths(24)
    CertStoreLocation = 'Cert:\CurrentUser\My'
}

$cert = New-SelfSignedCertificate @rootParams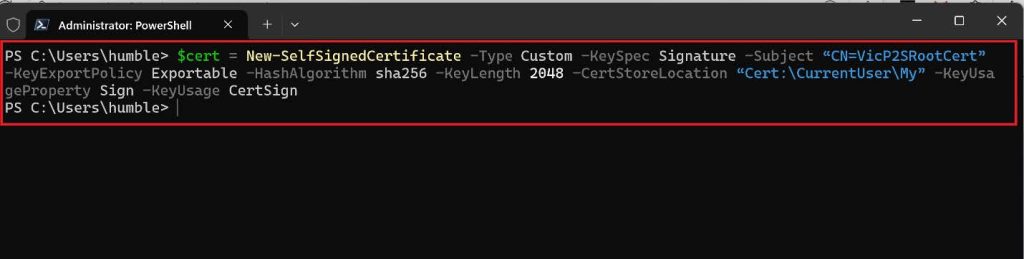
Keep this PowerShell session open so the
$certvariable remains available for the client-certificate command.
- If you haven't closed your PowerShell console after creating the self-signed root certificate. This cmdlet continues from the previous section and uses the declared '$cert' variable. The result is a client certificate named ‘abcofcloudP2SClientCert’. The client certificate that you generate is automatically installed in 'Certificates - Current User\Personal\Certificates' on your computer.
$clientParams = @{
    Type              = 'Custom'
    Subject           = 'CN=VicP2SClientCert'
    DnsName           = 'VicP2SClientCert'
    KeySpec           = 'Signature'
    KeyExportPolicy   = 'Exportable'
    KeyLength         = 2048
    HashAlgorithm     = 'sha256'
    NotAfter          = (Get-Date).AddMonths(18)
    CertStoreLocation = 'Cert:\CurrentUser\My'
    Signer            = $cert
    TextExtension     = @('2.5.29.37={text}1.3.6.1.5.5.7.3.2')
}

New-SelfSignedCertificate @clientParams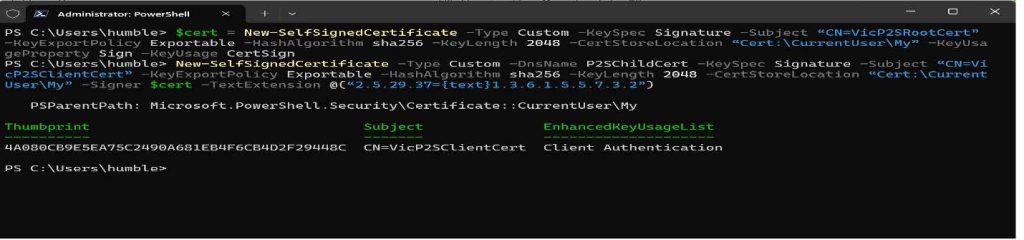
If the PowerShell session was closed, find the root certificate and reconstruct $cert before generating another client certificate.
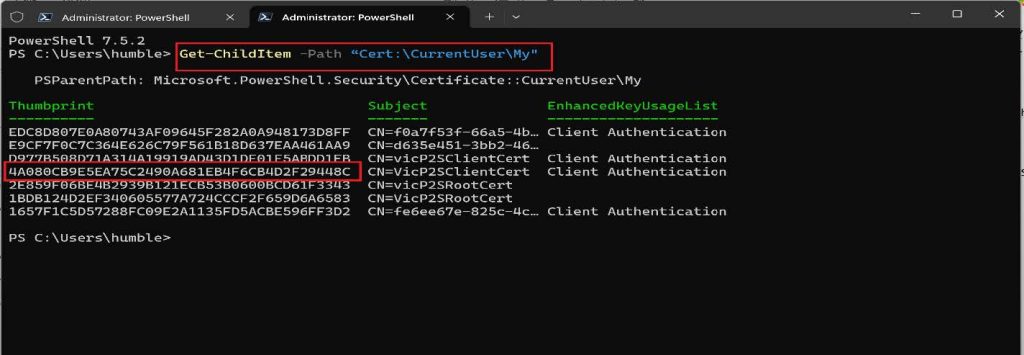
2a. I run this cmdlet to get a list of certificates that are installed on your computer.
Get-ChildItem -Path "Cert:\CurrentUser\My"2b. Using the thumbprint of the root certificate that was returned after running the previous cmdlet, run this next cmdlet.
$rootThumbprint = '<ROOT-CERTIFICATE-THUMBPRINT>'
$cert = Get-ChildItem -Path "Cert:\CurrentUser\My\$rootThumbprint"
Replace the placeholder with the thumbprint displayed on your computer. I never copy a thumbprint from a screenshot and assume it identifies your certificate.
2c. You can now run this cmdlet to generate a client certificate. Modify the CN to give it your preferred name.
$clientParams = @{
    Type              = 'Custom'
    Subject           = 'CN=VicP2SClientCert'
    DnsName           = 'VicP2SClientCert'
    KeySpec           = 'Signature'
    KeyExportPolicy   = 'Exportable'
    KeyLength         = 2048
    HashAlgorithm     = 'sha256'
    NotAfter          = (Get-Date).AddMonths(18)
    CertStoreLocation = 'Cert:\CurrentUser\My'
    Signer            = $cert
    TextExtension     = @('2.5.29.37={text}1.3.6.1.5.5.7.3.2')
}

New-SelfSignedCertificate @clientParams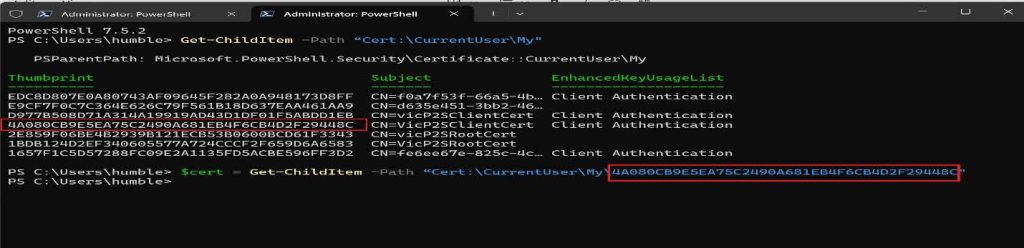
For production, issue a unique client certificate to each device or user so an individual certificate can be revoked without affecting every client.
View and Export Root Certificate
-
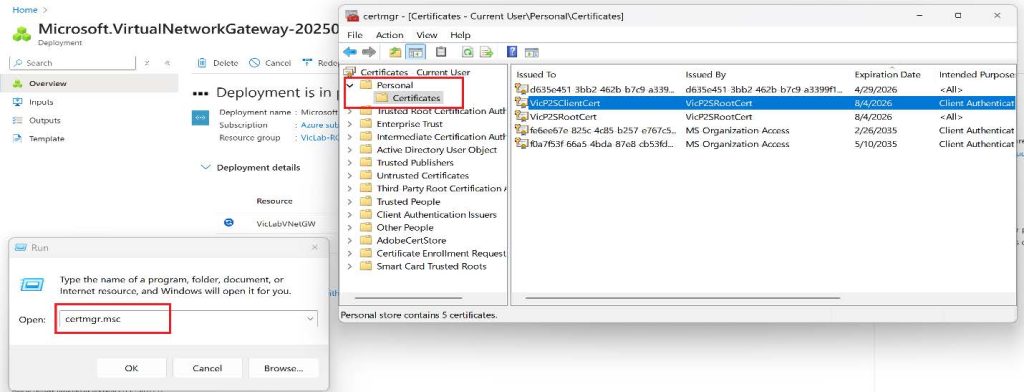
Press Win + R key and type certmgr.msc or Manage User Certificates. A common error that you should avoid is accidentally opening the Certificates of your Local Computer, rather than the Certificates of the Current User.
-
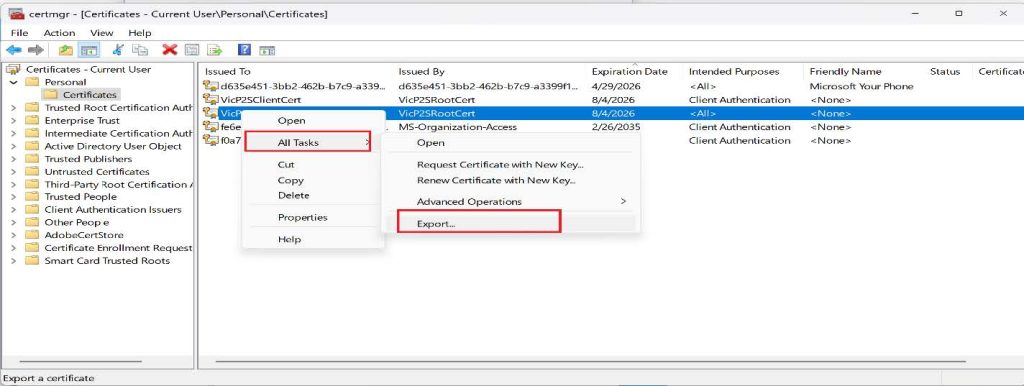
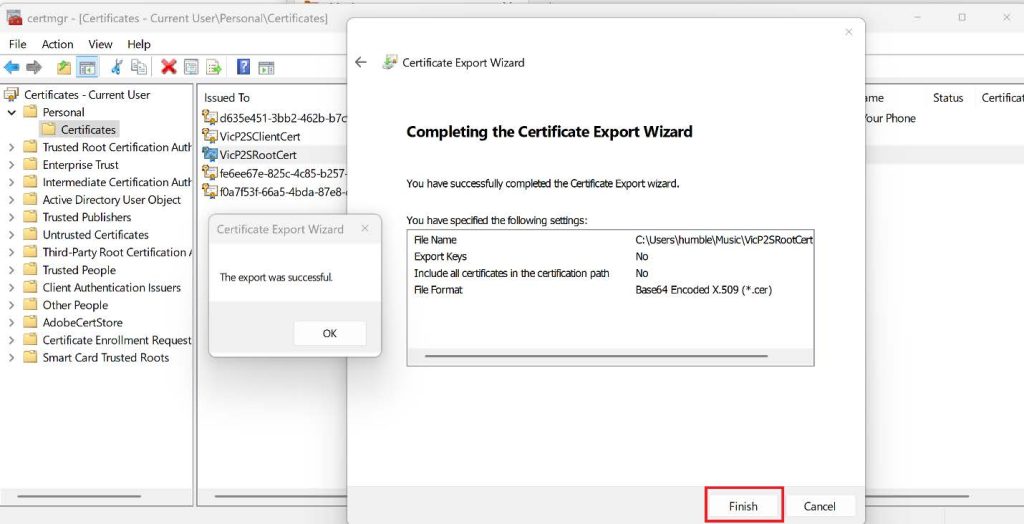
Right-click on the root certificate, click on All Task then click on Export.
-
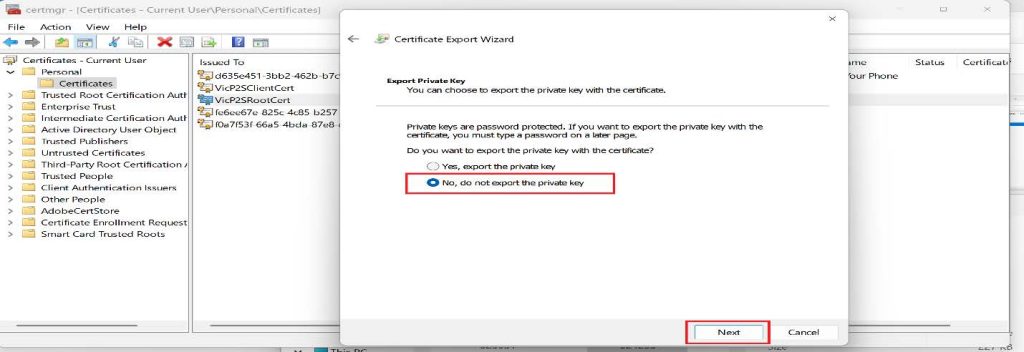
Click on Next on the Certificate Export Wizard, and select No, do not export the private key, then click on Next.
-
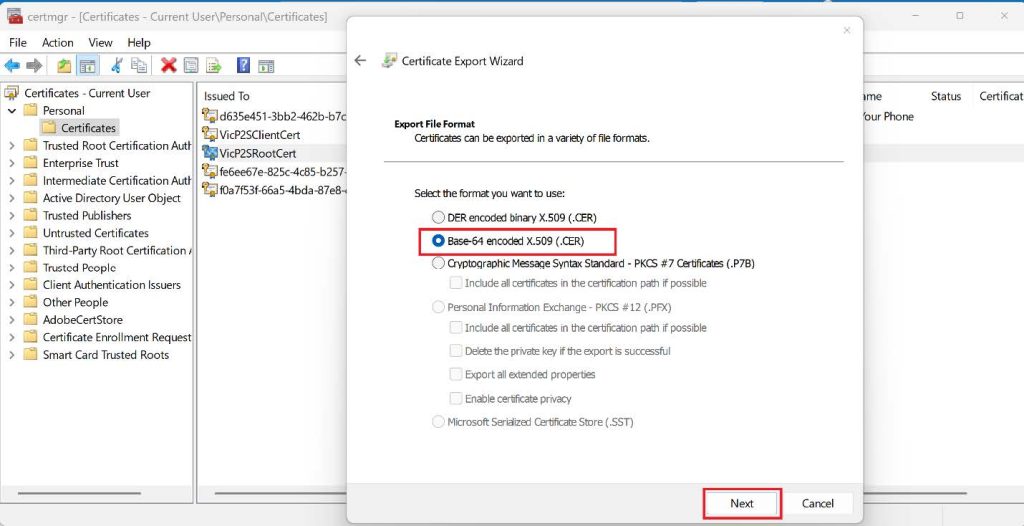
On the Export File Format page, select the Base-64 encoded X.509 (.CER), and then click Next.
-
Browse the location you want to save it and then give it a preferred name then click Next, Click Finish to export the certificate to your preferred location. You’ll see a confirmation from a pop-up saying, “The export was successful”.
View and Export Client Certificate
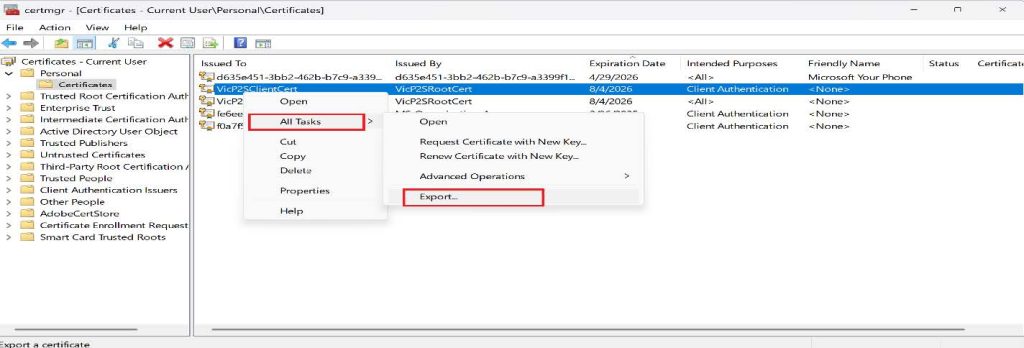
- Right-click on the **client certificate **and click on All Tasks, then click on Export
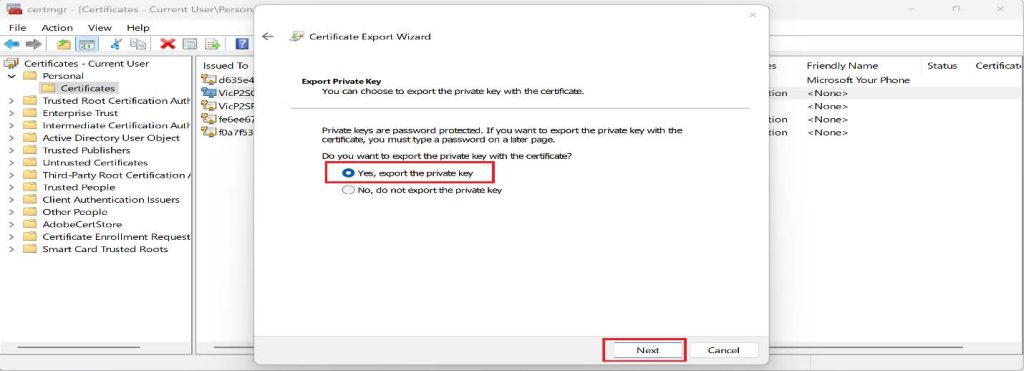
- On the Certificate Export Wizard, click **Next **to continue.
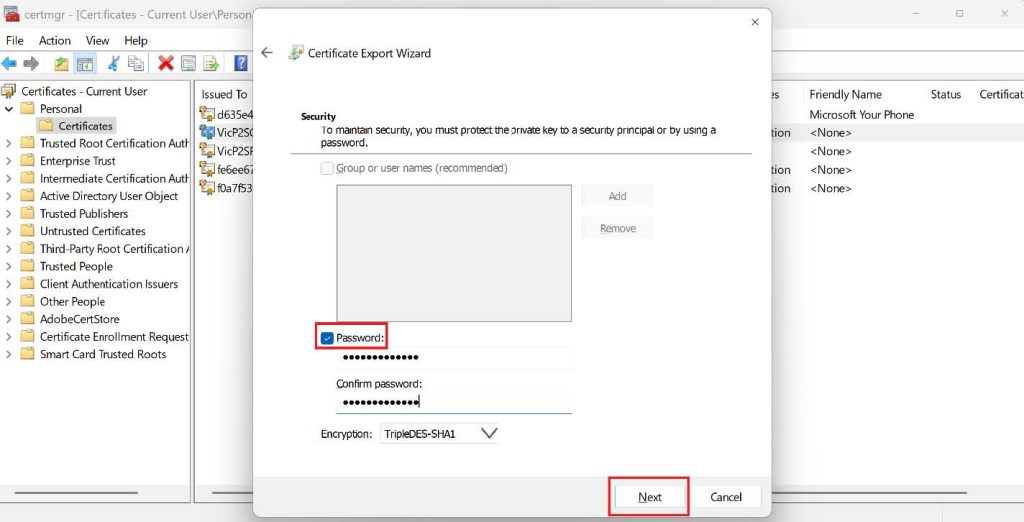
- Select Yes, export the private key, and then click Next.
- On the Export File Format page, leave the defaults selected.
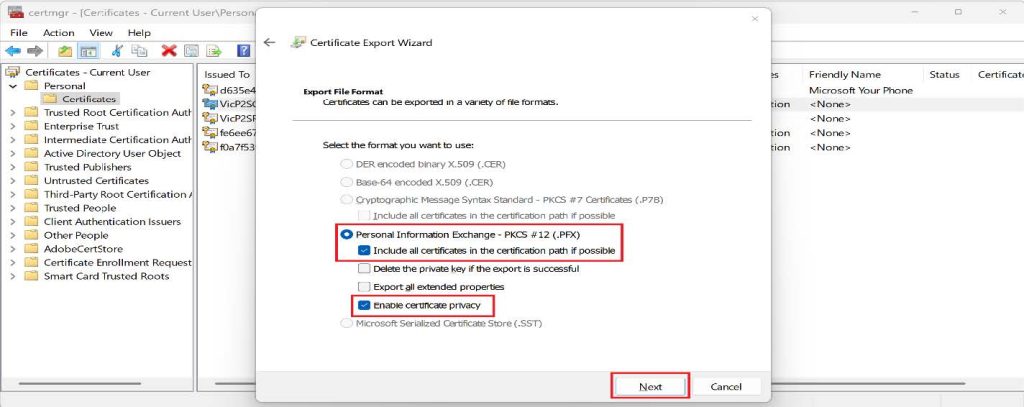
- Select Password on the Security page and protect the
.pfxwith a strong, unique password. The.pfxcontains the client private key; anyone who obtains the file and password can impersonate that VPN client. - Browse to the location you want to save it and give it your preferred name. Once that is done, click Next and then Finish.
- You’ll see a confirmation pop-up saying, “The export was successful.”
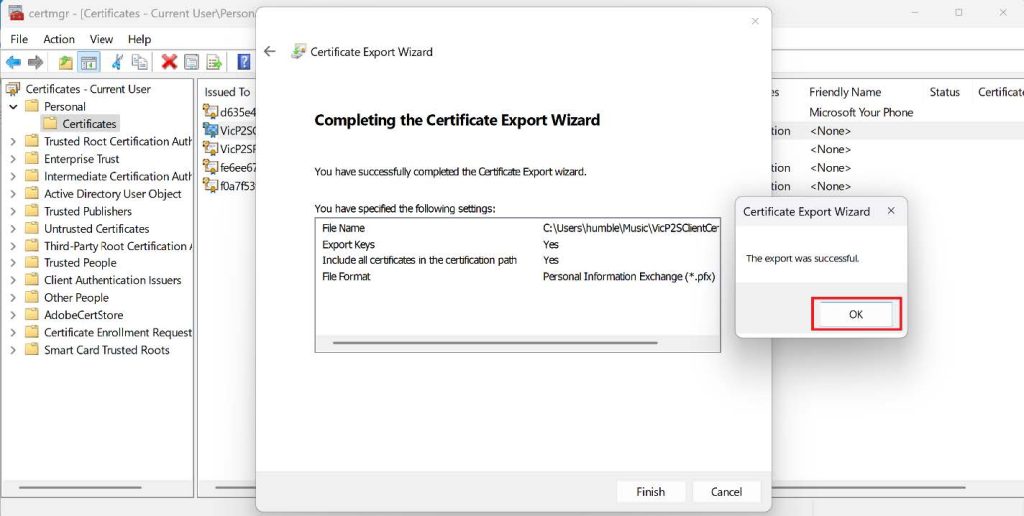
Now we have successfully exported our root and client certificates.
For us to configure Point-to-site on the virtual network gateway we created we will need our root certificate.
Configure Point-to-Site VPN Settings in Azure
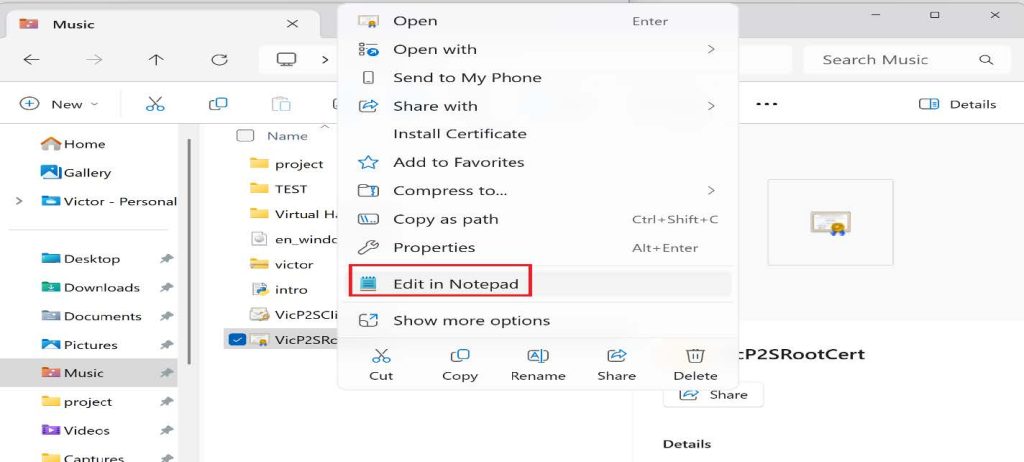
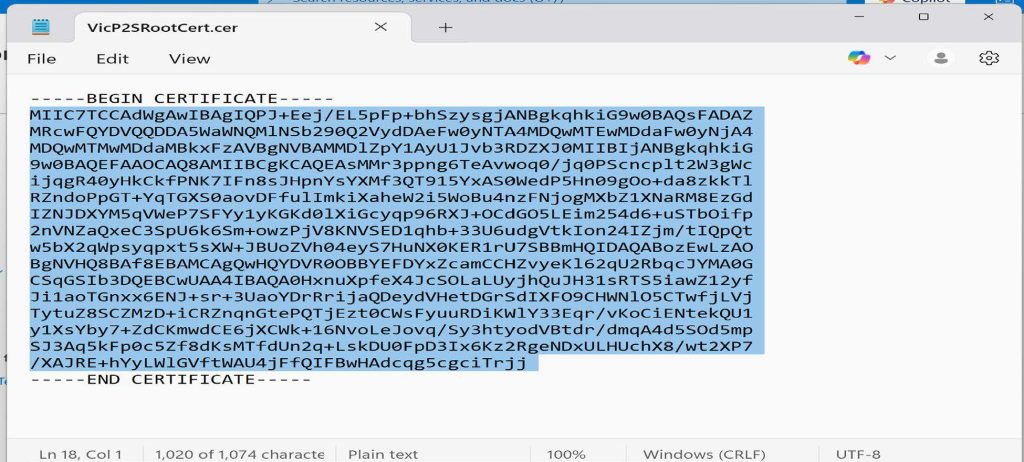
- Browse to the location where the root certificate was exported to and open it with a text editor such as Notepad
- Log in to the Azure portal and open the Virtual network gateway we created earlier.
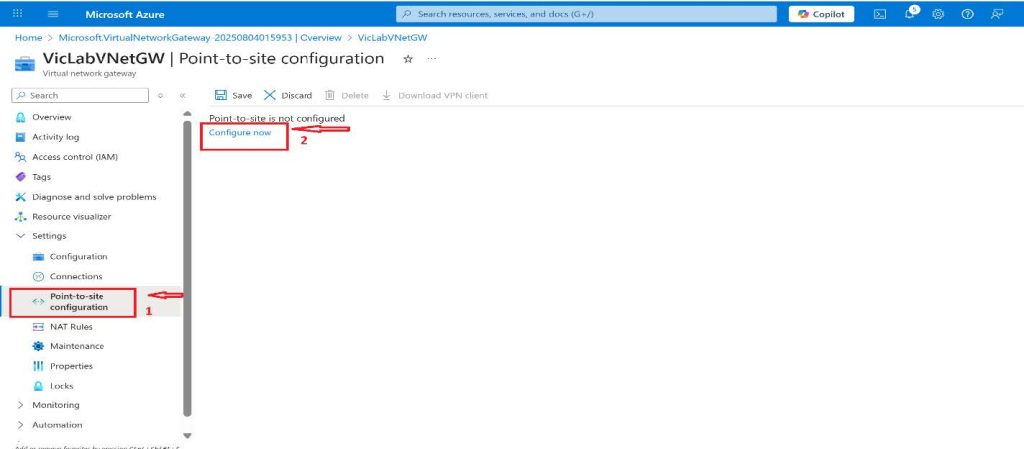
- On the Virtual network gateway page, click on the Point-to-site configuration under Settings on the left side menu and then click on Configure now on the right.
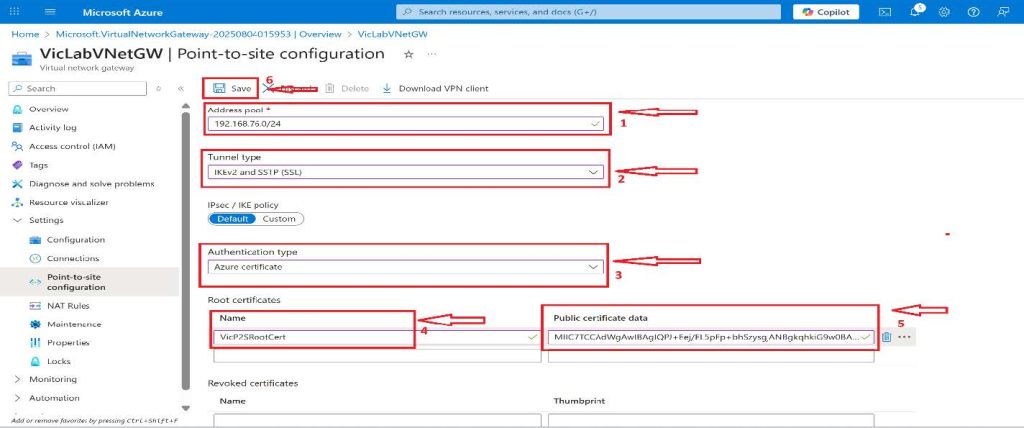
- I add the address pool that VPN clients receive when they connect. This lab uses 192.168.20.0/24. Confirm that it doesn't overlap the VNet, peered VNets, connected on-premises networks, or the networks used by remote clients; overlapping ranges create ambiguous routing.
- The tunnel type will be IKEv2 and SSTP (SSL), and the Authentication type should be Azure certificate.
- Under the Root certificates, select a preferred name for this project. I will be using VicP2SRootCert, and in the public certificate data, paste the text that you copied from the root certificate on our client computer, and click on Save at the top.
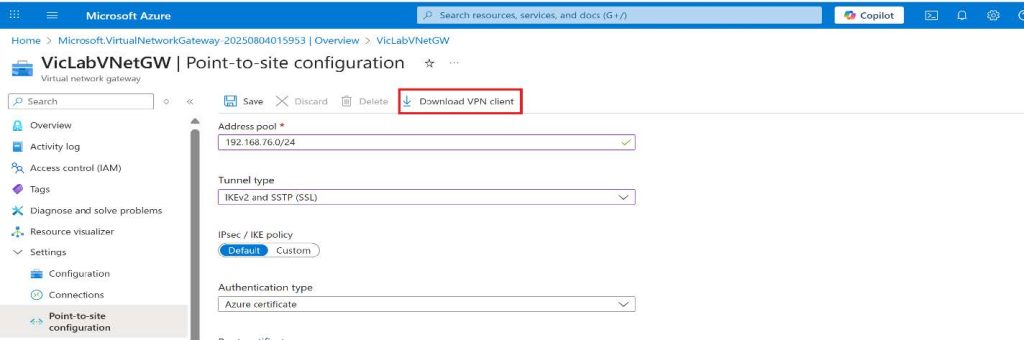
Download the VPN client by clicking on Download VPN client at the top.
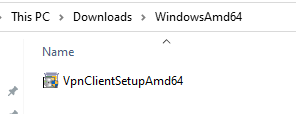
Copy the downloaded VPN client to the client computer and install it. For this tutorial, I will be installing WindowsAmd64.
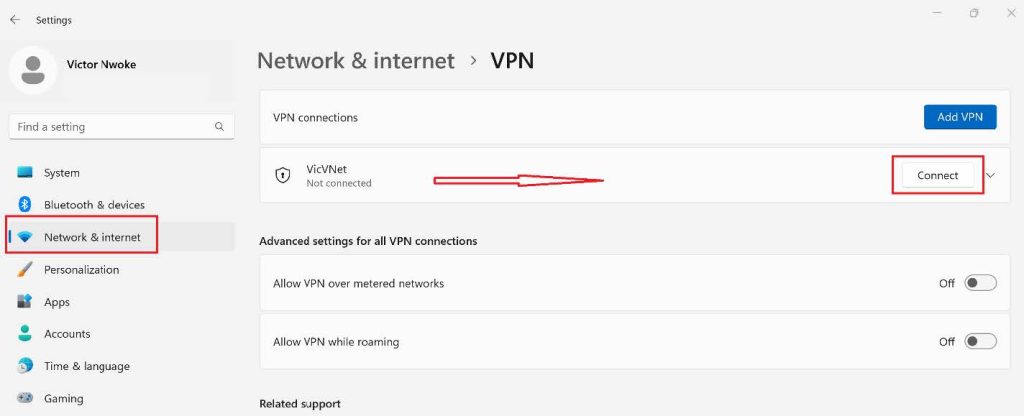
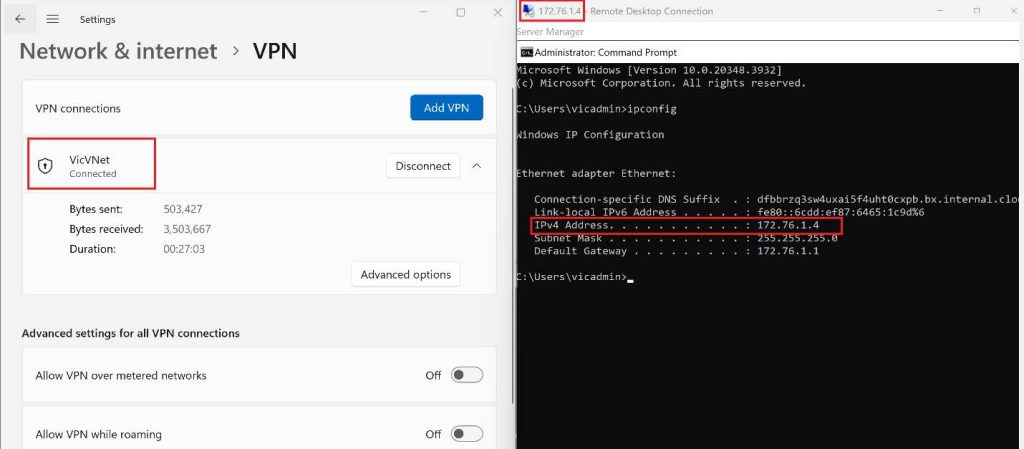
After installing the VPN client, go to Network and Internet in settings, then click on VPN, you should see the Virtual Network we created on Azure, click on it, then click on Connect.
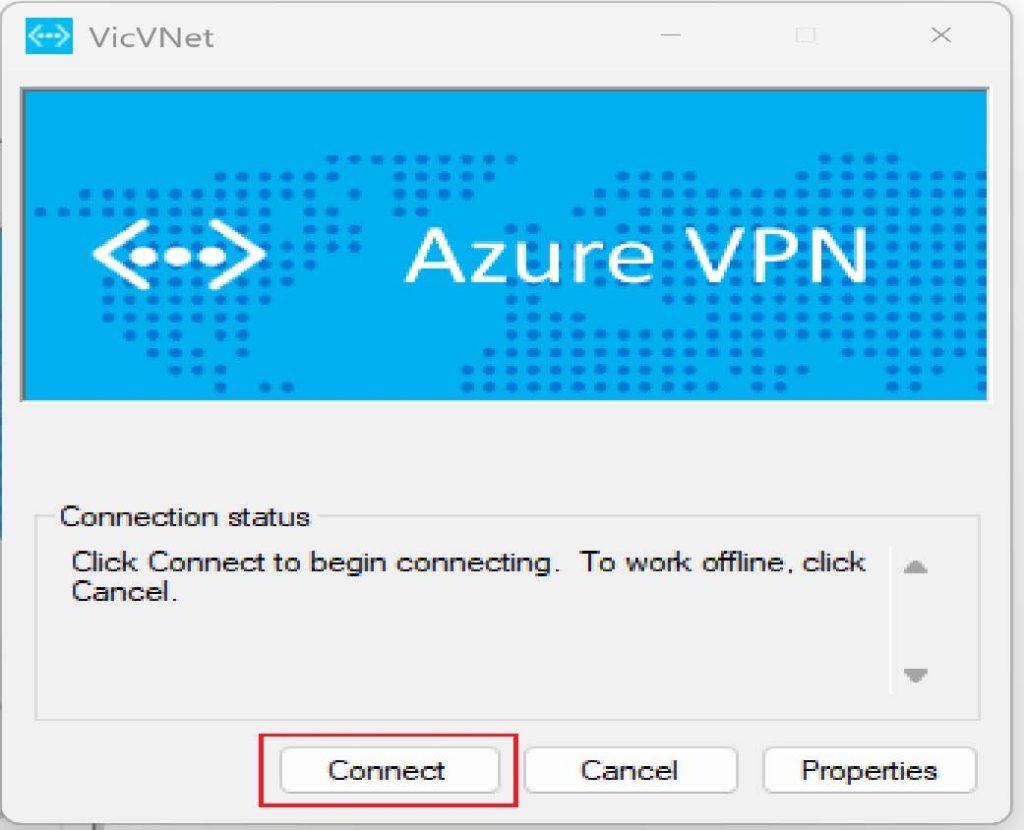
Once you click on the connect button the Azure VPN will pop up, then click on connect again.
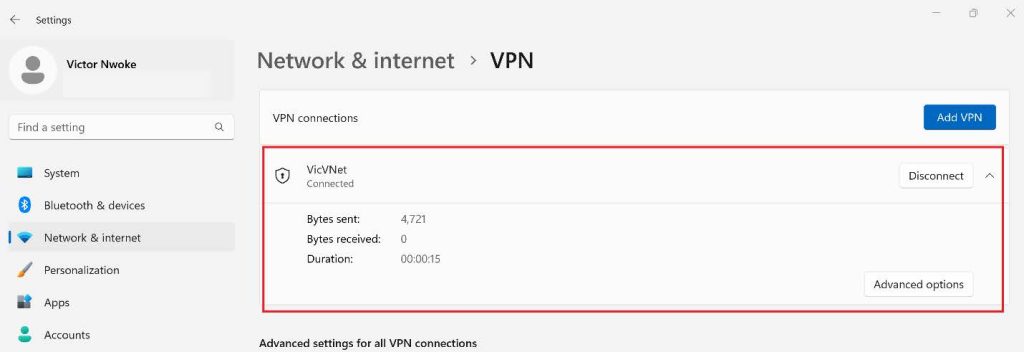
At this point, you have successfully configured your Point-to-Site VPN.
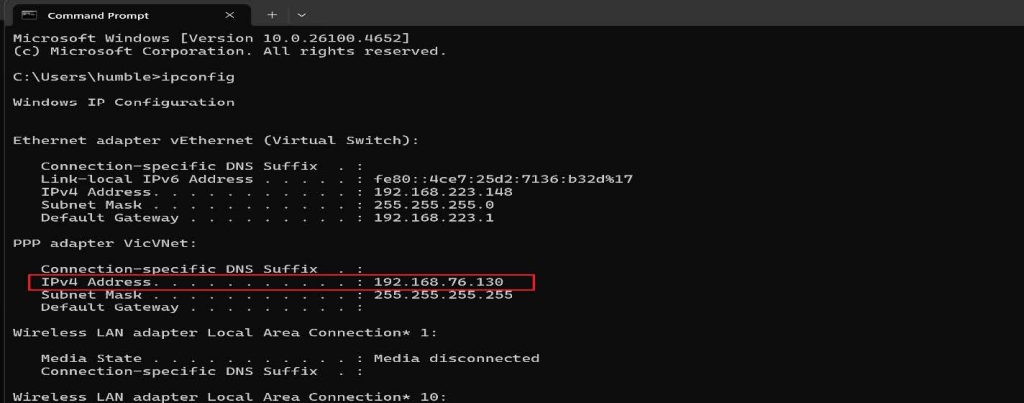
Bonus: test private access
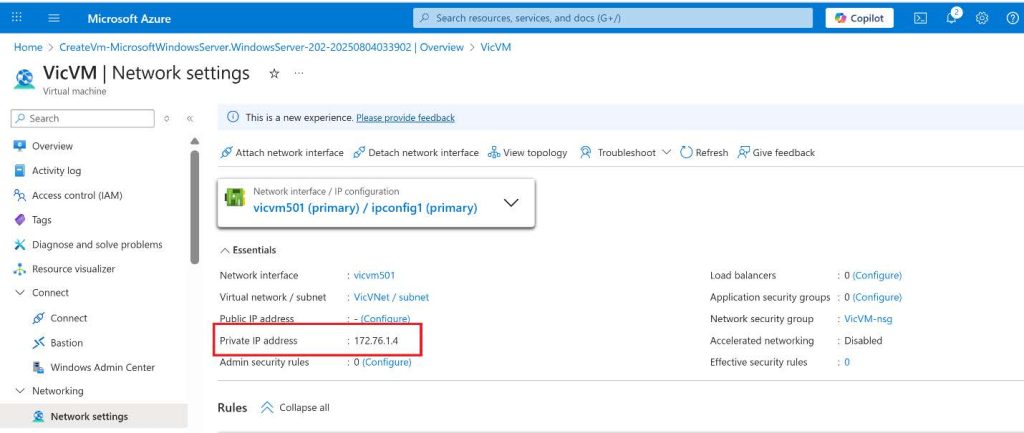
I create a Virtual Machine on my VNet, I will connect to the Virtual Machine using the private IP of the Virtual Machine from my client computer.
I used Remote Desktop Connection to reach the VM at its private IP, 172.16.0.4. The VM still needs an NSG rule and guest firewall rule that allow RDP from the P2S client pool. It doesn't need a public IP for this test.
If you made it to this point, Thank you for your time!
Troubleshooting Tips
- GatewaySubnet size: Microsoft recommends
/27or larger for many configurations. - GatewaySubnet name must be exactly
GatewaySubnet. - Certificate paste errors happen when formatting changes, use Notepad and copy only the cert block. (This aligns with Microsoft’s certificate workflow.)
- Connected but no resource access: inspect the client route table, NSG effective rules, guest firewall, and whether the client profile was regenerated after a gateway configuration change.
- Names don't resolve: P2S connectivity doesn't automatically design private DNS. Configure an appropriate DNS server or Azure DNS Private Resolver and verify the VPN client received the expected settings.
- Certificate failure: confirm the client certificate chains to an uploaded trusted root, includes the client-authentication EKU, is in the Current User personal store, and hasn't expired or been revoked.
Certificate Lifecycle and Cleanup
Self-signed certificates need the same lifecycle discipline as enterprise certificates. I record ownership and expiry, revoke compromised client certificates on the gateway, distribute .pfx files through an approved secure channel, and remove unused trusted roots. Regenerate and redistribute VPN profiles when required by gateway or certificate changes.
VPN Gateway is billed while provisioned, even when no client is connected. After the lab, delete the gateway and its public IP if they aren't needed. I review the destroy scope carefully if the VNet or resource group contains shared resources.
Key Takeaway
Point-to-Site VPNs provide a secure, scalable solution for remote access without exposing cloud resources to the public internet.
By combining Azure Virtual Networks, VPN Gateway, and certificate-based authentication, this lab demonstrates a real-world hybrid connectivity pattern used across enterprise environments.
For another private-access pattern, compare this guide with Azure VNet peering and hub-and-spoke routing. P2S connects individual clients; peering connects Azure virtual networks.