In many real-world cloud environments, organizations need to securely connect their on-premises network to Azure. This is especially common during cloud migrations, hybrid deployments, or when extending existing infrastructure into Azure without exposing services to the public internet.
This tutorial walks you through how to configure an Azure Site-to-Site (S2S) VPN connection step by step, using an Azure VPN Gateway. More importantly, this guide does not stop at deployment, you will also verify and test the VPN connection in real time to confirm that traffic is flowing correctly between on-premises and Azure resources.
Seeing the configuration actually work is critical. In production environments, a VPN that is “successfully deployed” but not tested is a risk. This tutorial ensures you understand both the configuration and validation process.
What is Site-to-Site VPN
An Azure Site-to-Site VPN is a secure network connection that links your on-premises network to an Azure virtual network (VNet) over the internet using an IPsec/IKE encrypted tunnel.
- The connection uses IPsec/IKE (IKEv1 or IKEv2) for encryption
- Traffic is securely encapsulated and protected over the public internet
- Resources in Azure can communicate with on-premises systems using private IP addresses
- The connection behaves like an extension of your local network
What is a VPN Gateway
An Azure VPN Gateway is a managed virtual network gateway that enables encrypted communication between Azure and external networks.
The VPN gateway:
- Resides within a dedicated GatewaySubnet inside your Azure VNet
- Encrypts and decrypts traffic using IPsec/IKE
- Routes traffic between Azure VNets and on-premises networks
- Can also be used for VNet-to-VNet connections
It acts as the secure endpoint in Azure for your Site-to-Site VPN connection.
What is a Local Network Gateway
A Local Network Gateway represents your on-premises network in Azure.
It is not a physical device, it is a logical object that defines:
- The public IP address of your on-premises VPN device (firewall or router)
- The IP address ranges (prefixes) used within your on-premises network
Azure uses this information to:
- Know where to send traffic destined for on-premises networks
- Establish routing over the VPN tunnel
- Maintain secure, encrypted connectivity
Without a Local Network Gateway, Azure has no knowledge of your on-premises environment.
What you need for this Site-to-Site VPN lab
- An Azure virtual network with a non-overlapping address space
- A dedicated subnet named
GatewaySubnet - An Azure VPN gateway
- A local network gateway that describes the lab's on-premises network
- Windows Server Routing and Remote Access to act as the lab VPN device
- A matching pre-shared key on both sides of the connection
Creating a Virtual Network
This lab uses 172.16.0.0/16 for Azure and 172.16.0.0/24 for the workload subnet. Your on-premises address range must not overlap either range. Overlapping prefixes prevent Azure from making an unambiguous routing decision.
If you need the full portal walkthrough for creating the VNet and workload subnet, follow Setting Up Clean Azure VNets, Subnets & Tagging. Return here before creating the gateway because this lab adds a dedicated GatewaySubnet with 172.16.1.0/27.
Before continuing, verify these values on the VNet's Address space and Subnets pages:
| Setting | Lab value |
|---|---|
| Azure VNet address space | 172.16.0.0/16 |
| Workload subnet | 172.16.0.0/24 |
| Gateway subnet name | GatewaySubnet |
| Gateway subnet range | 172.16.1.0/27 |
I do not attach a network security group to GatewaySubnet. Microsoft documents that this configuration is unsupported and can stop the gateway from working correctly.
Let's Create the VPN Gateway
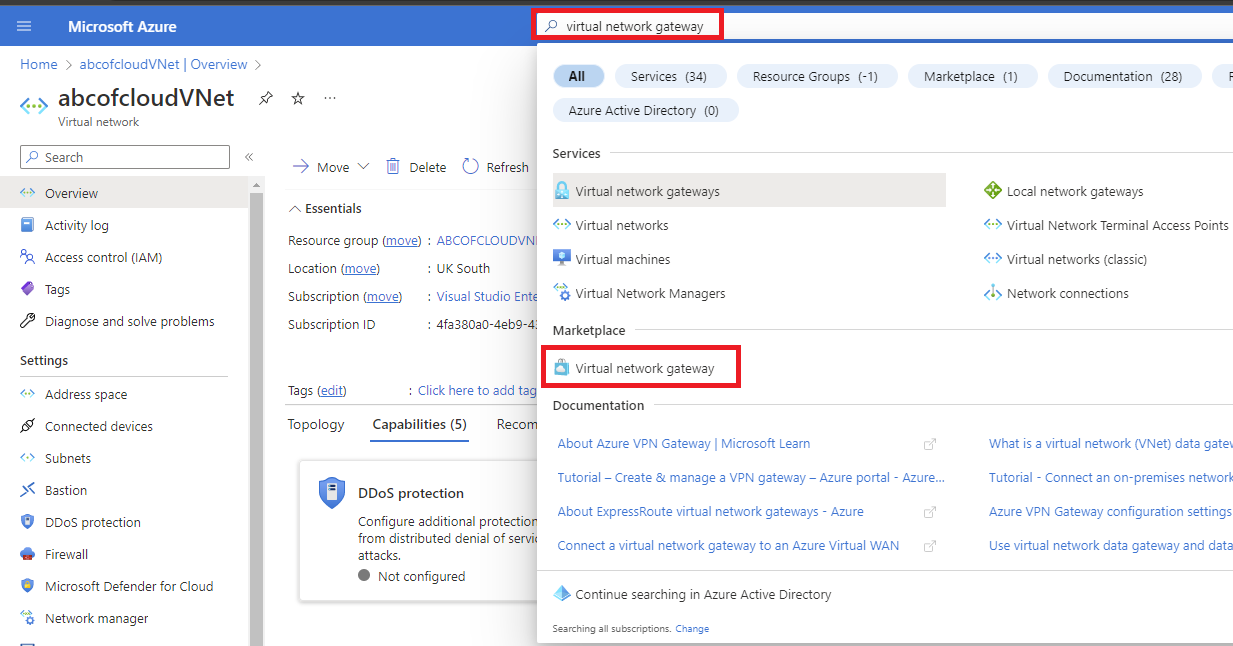
Step 1: Search for Virtual network gateway in Azure portal.
Step 2: In the Search result, under Marketplace select Virtual network gateway.
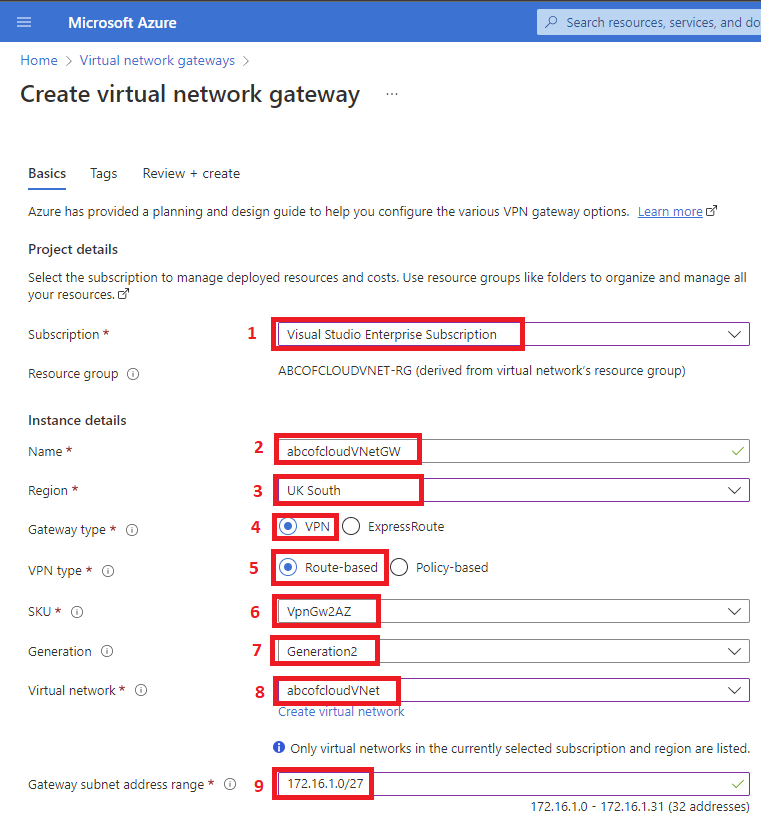
Step 3: Choose the subscription you want from the drop-down.
Step 4: The Resource Group will be auto-filled when we select the virtual network.
Step 5: Enter any preferred name for your gateway.
Step 6: We will be using VPN as the Gateway type in this tutorial.
Step 7: Route-based is the VPN type we will be using for this tutorial, this can be selected based on your requirement or business need.
Step 8: SKU will be VpnGw2AZ for this tutorial, I will be adding some links where you can learn more about the SKU, resizing, and zone redundant.
Step 9: Generation2 will be the choice for this tutorial.
Step 10: Our Virtual network will be the one we created previously.
Step 11. You can either create a subnet in your virtual subnet with the name Gatewaysubnet or you get the Gateway subnet address range automatically.
Step 12: We will change the default Gateway subnet address range to 172.16.1.0/27 or larger which is (/26,/25,/24, etc.) Anything lesser will throw an error if you’re trying to deploy a zone-redundant/zonal gateway and also this allows enough IP addresses for future changes.
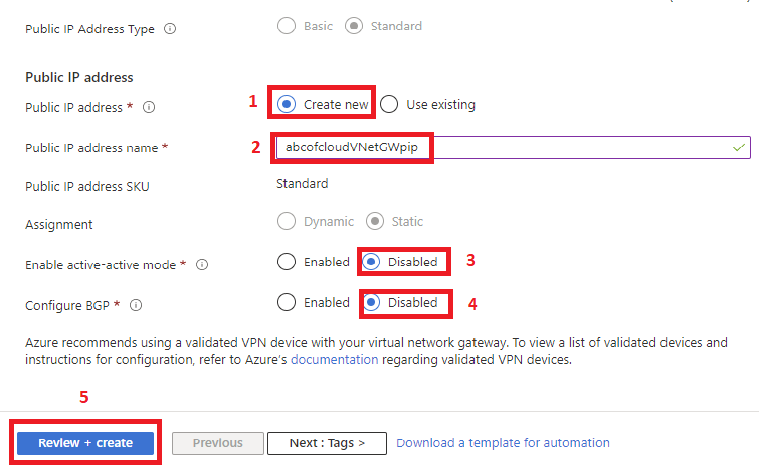
Step 13: Public IP address is set to Create new; you can choose to use existing if you already have one created. These settings specify the public IP address object that gets associated with the VPN gateway. The public IP address is assigned to this object when the VPN gateway is created. The only time the primary Public IP address changes is when the gateway is deleted and re-created. It doesn't change across resizing, resetting, or other internal maintenance/upgrades of your VPN gateway.
Step 14: Enter a preferred name for the Public IP address name.
The Assignment setting is controlled by the Public IP Address Type value.
Enable active-active mode and Configure BGP will be disabled in this tutorial.
Step 15: Click on Review + Create and then Create. Tags can be added based on your requirements.
Once you hit the Create button, it’s time to go get a bottle of drink because I also paused and went to a bottle of drink. Also, make sure you don’t refresh the page because it can take 45 minutes or more to fully create and deploy. You will see the status of the deployment on the overview page for the gateway.
Creating the Local Network Gateway
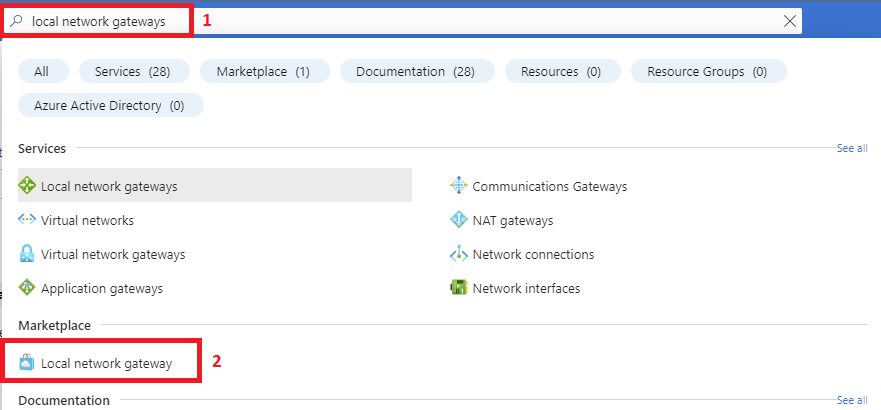
Step 1: Search for local gateway in the Azure portal.
Step 2: Under Marketplace, select local network gateway in the search result.
Step 3: Select your subscription from the drop under Project details.
Step 4: Choose your Resource group, for this tutorial I will be using ABCOFCLOUDVNET-RG
Step 5: For the region, I will be using UK South.
Step 6: Enter a preferred name for your gateway.
Step 7: Endpoint for this tutorial will be the IP address.
Step 8: IP address should be the static public IP address allocated from your Internet service provider for your VPN device, but if you don’t have one and you’re doing this for training purposes then you can type whatsmyip on your web browser to see the dynamic public IP address allocated to you from your Internet service provider which is what I am using in this tutorial.
Step 9: The address space is the private network on your on-premises which this local network represents. The address space I am using is the private IP for my on-premises network, and also note you can add more than one address space if you do have more.
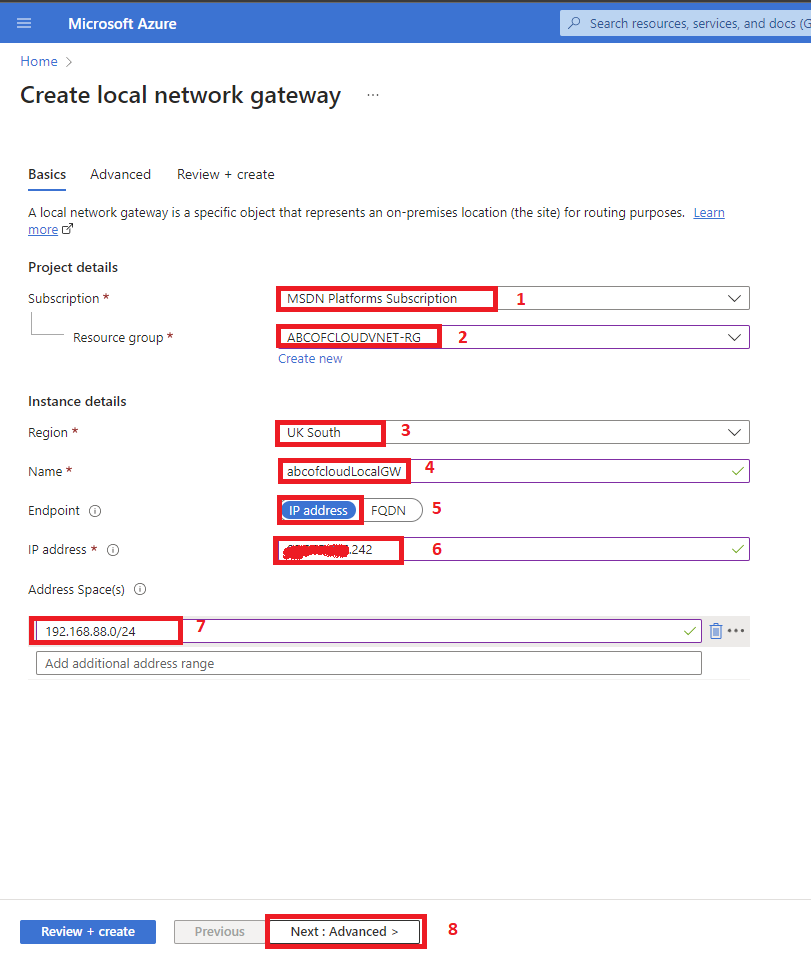
Step 10: On the Advanced tab Configure BGP settings is set to No for this tutorial.
Step 11: Click on Review + create to validate the page and then click on Create.
Configuring VPN on Windows Server 2022
In order for you to configure your VPN in Windows Server you will need to install the Remote Access Role from your Server Manager Dashboard. Once this is completed you can follow the steps.
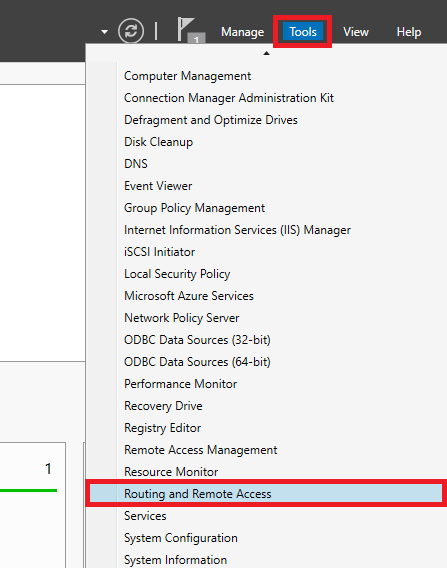
Step 1: Open the server manager and click on Tools then select Routing and Remote Access, this will pop-up the Routing and Remote Access page.
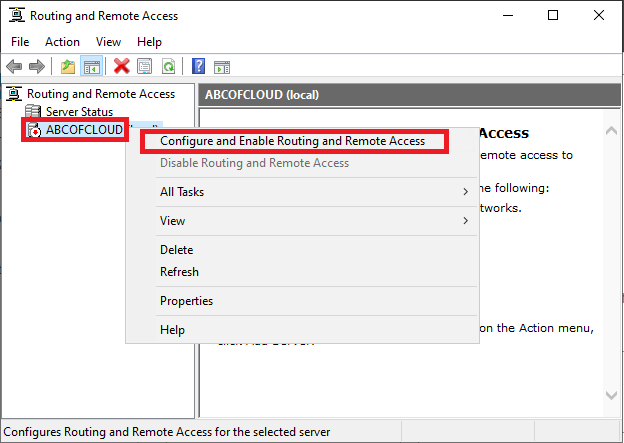
Step 2: Under Server Status right click on your server name and then select Configure and Enable Routing and Remote Access which will then launch the Routing and Remote Access Server Setup Wizard.
Step 3: Click on Next on the Routing and Remote Access Server Setup Wizard.
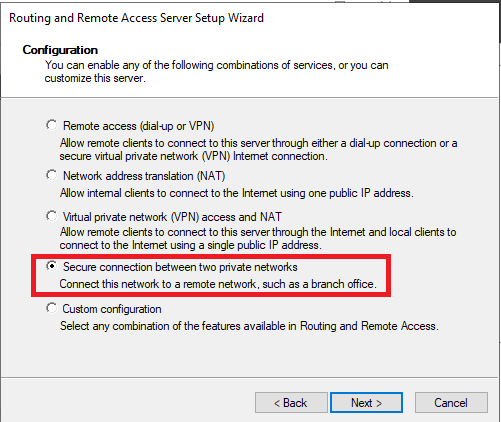
Step 4: Choose the Secure connection between two private networks and then click Next.
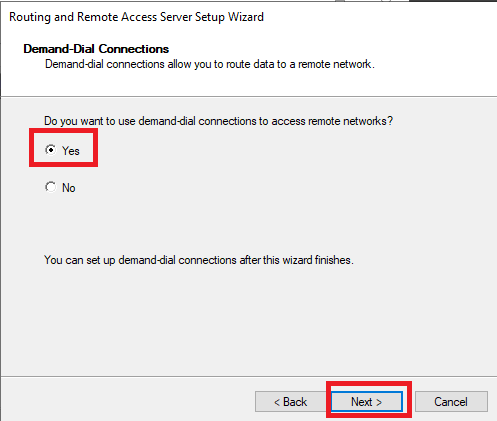
Step 5: On the Demand-Dial Connections page, you will be asked Do you want to use demand-dial connections to access remote networks? Choose Yes and hit Next.
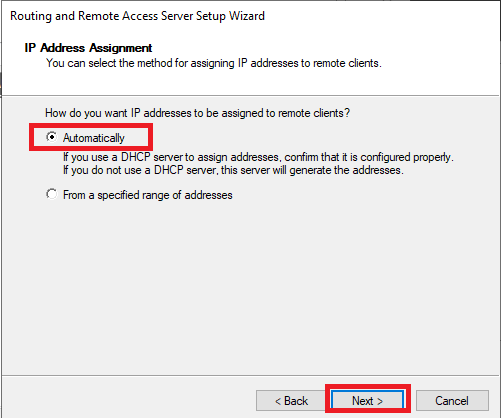
Step 6: IP Address Assignment I will be using Automatically for this tutorial then click on Next on the Completing the Routing and Remote Access Server Setup Wizard click on Finish.
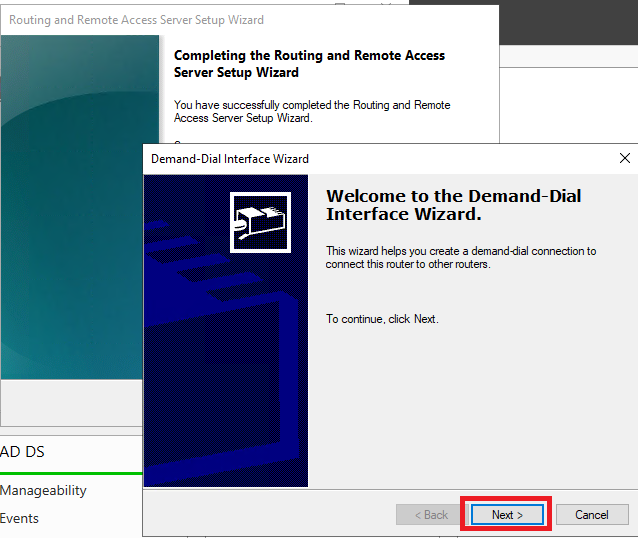
Once this is done you will see the Demand-Dial Interface Wizard pop-up, click on Next to continue.
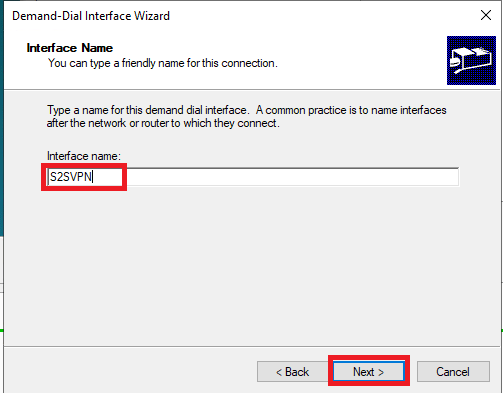
Step 7: Enter a number for the Interface, I will be using S2SVPN and click Next.
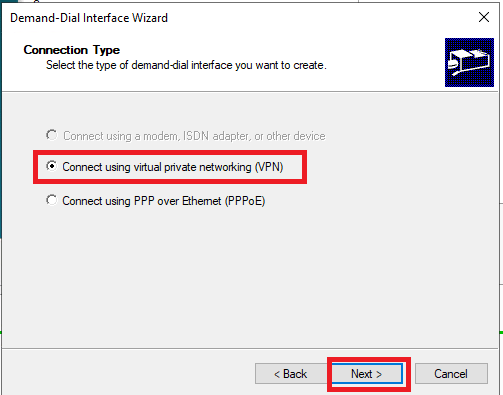
Step 8: On the connection type page, choose to connect using virtual private networking (VPN).
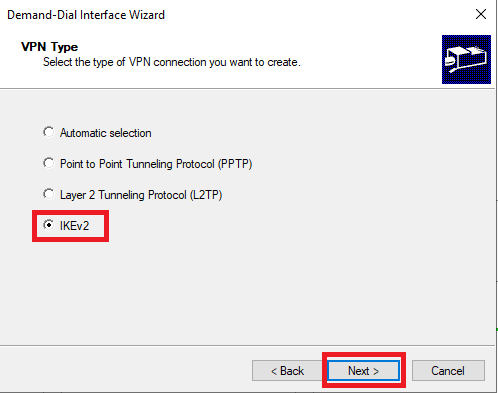
Step 9: Select IKEv2 for VPN Type.
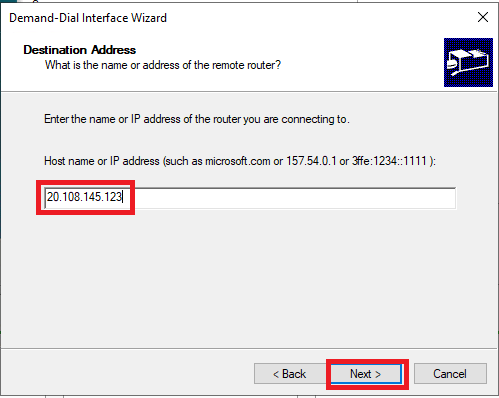
Step 10: In the Destination Address enter the public IP for the virtual network gateway.
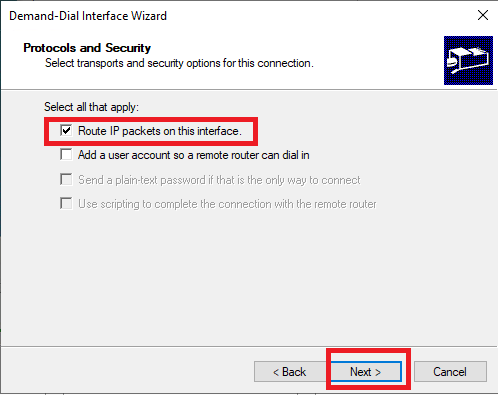
Step 11: Select Route IP packets on this interface for the Protocols and Security.
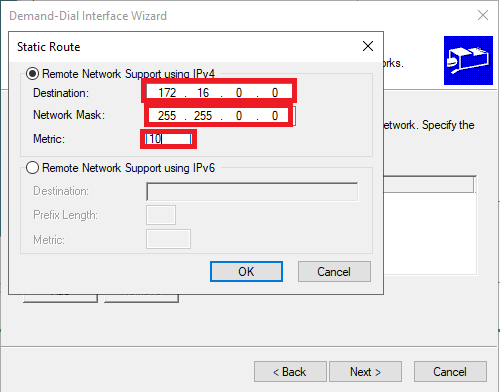
Step 12: On the Static Routes for Remote Networks page we will be adding the IP address space from the virtual network we created on Azure mine was 172.16.0.0/16. Click on the Add button and then type in the IP address. I will use 10 for the Metric and then click ok. The metric is used to determine the priority of different routes to the same network, and the route with the lowest metric value is chosen as the preferred route.
Step 13: After Adding the virtual network IP address space, click on next, you will see the Dial-Out Credentials page, you can leave the credentials blank and click next, and then click Finish to complete the Demand-Dial Interface Wizard. Once that is done you should see it enabled and all green.
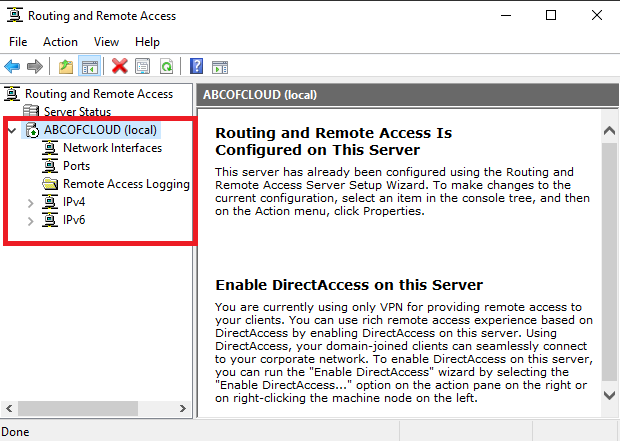
The next thing we are going to do is update the connection type and choose a shared key we will use for the VPN connection in Azure.
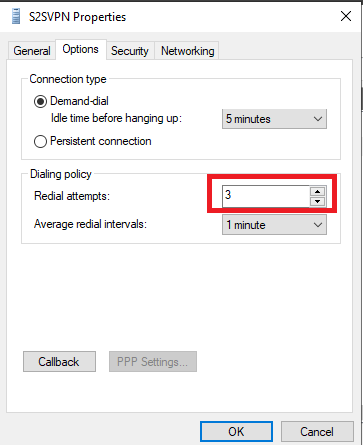
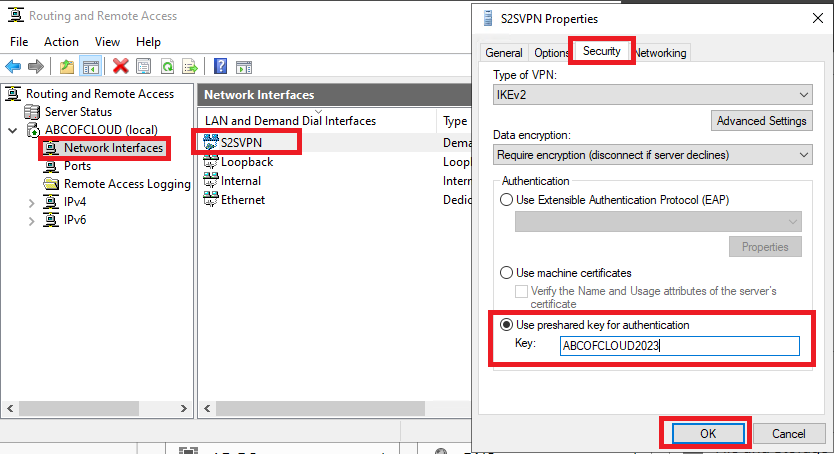
Step 14: Click on the Network Interface and right on the Demand-dial and then click on the properties. Click on the Options tab under Dialing policy set the Redial attempts to 3, then click on the Security tab select the Use preshared key for authentication, and type in your preferred shared key, I will be using ABCOFCLOUD2023 then hit OK.
Create a Connection
This will be creating a VPN connection between the virtual network gateway and the on-premises VPN.
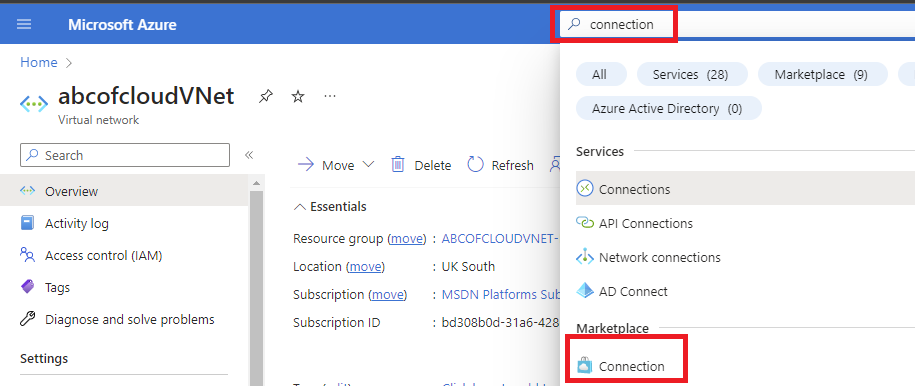
Step 1: Log in to Azure portal and type connection in the search bar.
Step 2: In the search result, under Marketplace select the connection.
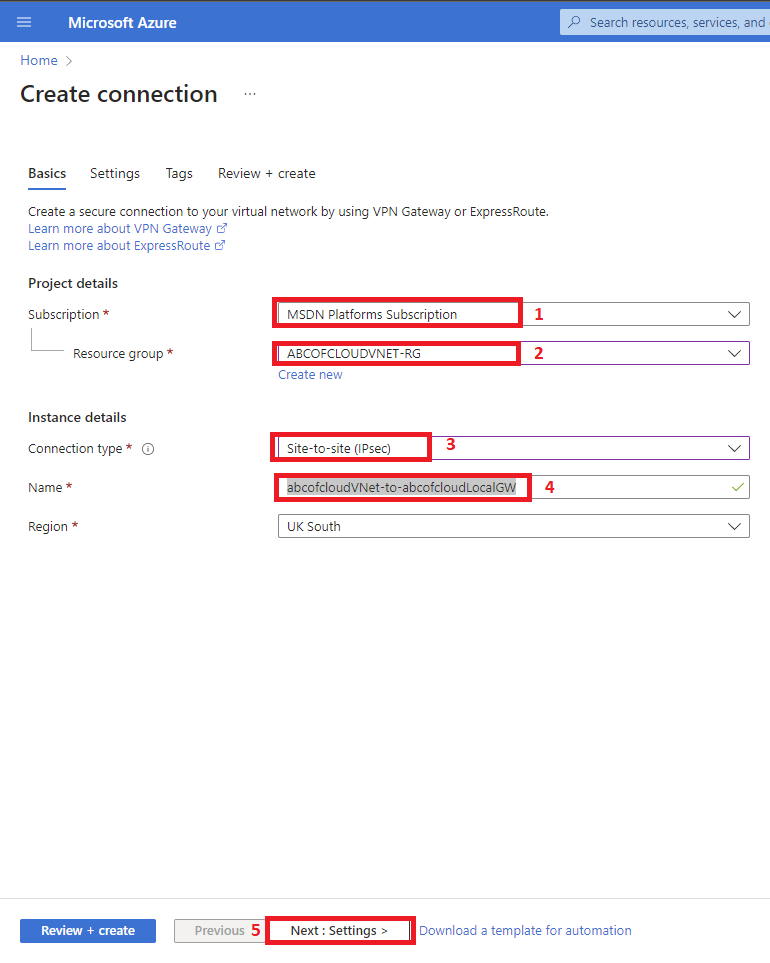
Step 3: Choose your subscription and Resource group.
Step 4: Connection type select Site-to-Site(IPsec) from the drop-down.
Step 5: Enter a preferred name, for this tutorial I will be using “abcofcloudVNet-to-abcofcloudLocalGW”.
Step 6: Choose your preferred region from the drop-down, I will be choosing UK South for this tutorial, after that click on Next.
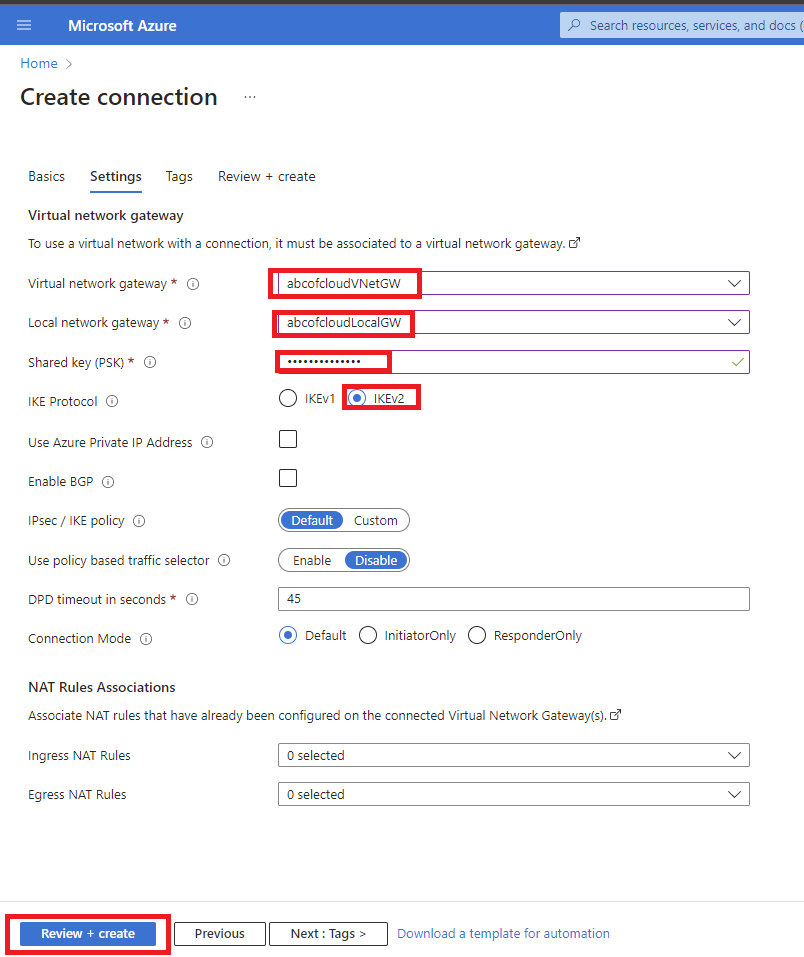
Step 7: The virtual network gateway we created will be selected.
Step 8: Local network gateway we created will be selected.
Step 9: The Shared key we created on our VPN which was ABCOFCLOUD2023 will be entered
Step 10: IKE Protocol will be IKEv2.
Every other setting will be left on the default selection for this tutorial. Once this has been selected click on Review + Create to validate then Create.
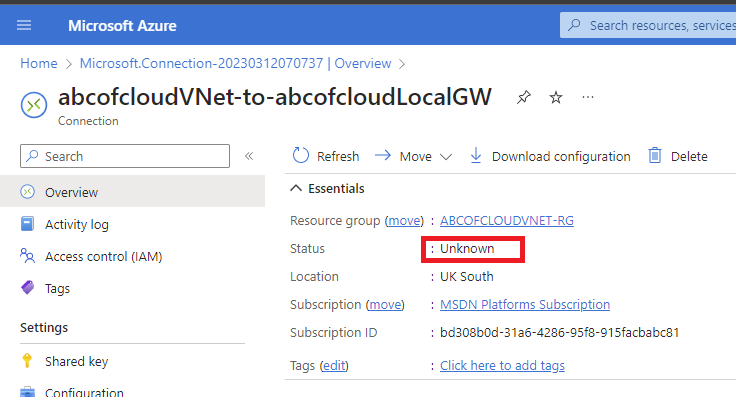
Now if I click on the connection that has been created, and take a look at the overview the status will be Unknown.
Connecting to Azure Virtual Network Using the Site-to-Site VPN
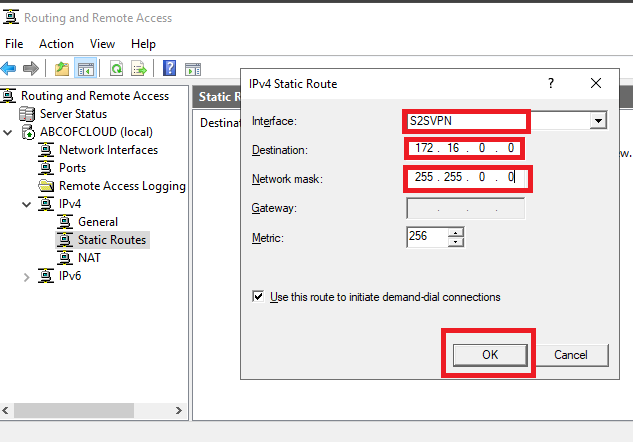
Step 1: On my Routing and Remote Access, open the drop-down menu on IPv4 and right-click on the Static Routes then click on New Static Route. On the IPv4 Static Route that pops up change the Interface to the Demand-dial that was created. The destination and Network mask should be the same as the one on the virtual network we created and then hit ok.
We are adding this route to make sure the traffic reaches the right network on Azure.
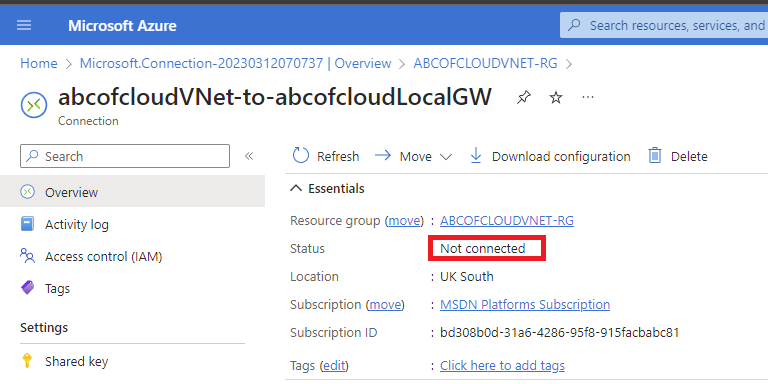
The connection status has now changed from Unknown to Not connected, the next step we will be connecting using the VPN.
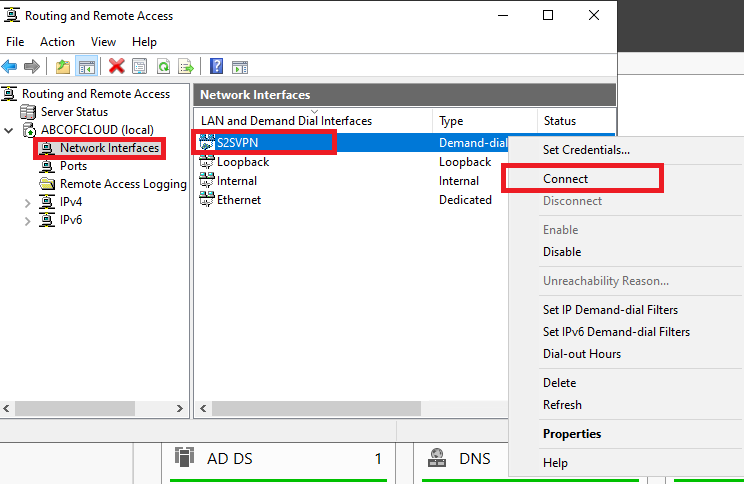
Step 2: Go to the Routing and Remote Access and then click on the Network Interface, right-click on the Demand-dial, and then click on connect.
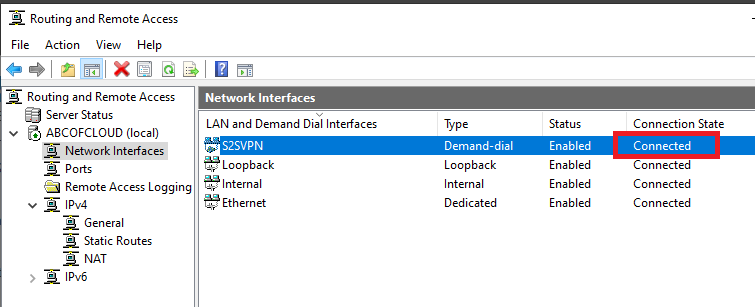
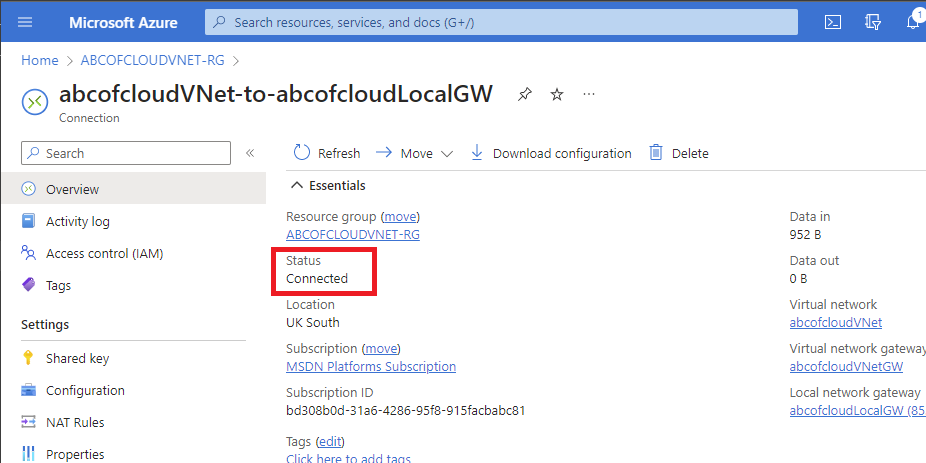
We are now Connected
References: Tutorial:Create a site-to-site VPN connection in the Azure portal