Managing storage in virtualized environments isn’t just about adding disks; it’s about ensuring performance, scalability, and **resilience **while controlling costs and downtime.
Whether dealing with aging on-prem hardware, hybrid workloads, or budget-sensitive cloud extensions, storage design directly impacts stability and growth.
In this hands-on lab, I walk through the mechanics of adding VHDX files, creating a Storage Spaces pool, and presenting block storage through Windows iSCSI Target Server. The workflow is useful for learning, but it doesn't become production-ready merely by increasing disk size. Production storage needs measured workload requirements, independent failure domains, redundant network paths, supported clustering, backup, monitoring, and tested recovery.
What This Lab Covers
In this tutorial, you’ll learn how to:
- I add Virtual Hard Disks (VHD/VHDX) to Hyper-V virtual machines
- Build Storage Pools for elastic capacity and simplified management
- I create Virtual Disks with appropriate resiliency settings
- Configure iSCSI Targets and Initiators for remote, shared storage access
- Extend Hyper-V storage over Ethernet in a cost-effective and scalable way
Why iSCSI for Hyper-V Storage?
iSCSI (Internet Small Computer Systems Interface) allows servers to access block-level storage over standard TCP/IP networks.
Why it works well with Hyper-V:
- Reliable over Ethernet
- Budget-friendly compared to Fibre Channel
- Scales from homelabs to production
- Suitable for hybrid designs extending to cloud platforms
iSCSI presents block storage, not a shared file system. I never mount the same ordinary NTFS/ReFS volume read-write on multiple independent servers. Multi-host access requires a supported cluster design, coordinated ownership, and usually Cluster Shared Volumes or another cluster-aware filesystem/workload.
Lab Environment Overview
- Hyper-V Hosts
- Windows Server (File & Storage Services enabled)
- iSCSI Target Server
- iSCSI Initiator (Hyper-V host or access server)
For a safe lab, separate the storage network from general client traffic, use static addresses, and ensure only the intended initiator can reach TCP 3260. For production, design redundant NICs, switches, target paths, MPIO, authentication or IPsec, monitoring, and capacity thresholds before presenting storage to a host.
Step 1: Add Virtual Hard Disks to Hyper-V VMs
Open Hyper-V Manager
Select the VM → Settings
Under Hard Drive, click Add
Choose New Virtual Hard Disk
Select Dynamically expanding VHDX for this capacity-efficient lab, or Fixed size when predictable allocation and workload requirements justify it.
Set disk size and location → Apply
Inside the VM:
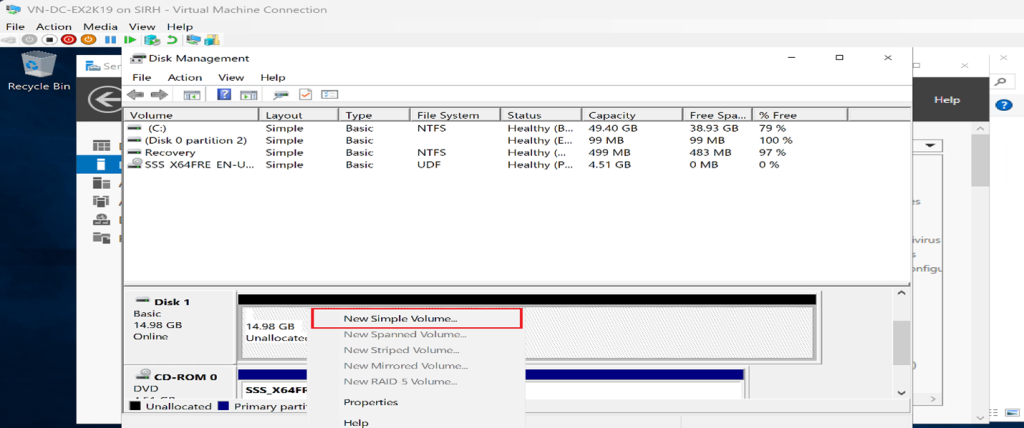
- Open Disk Management
- Initialize, partition, and format the disk (no reboot required)
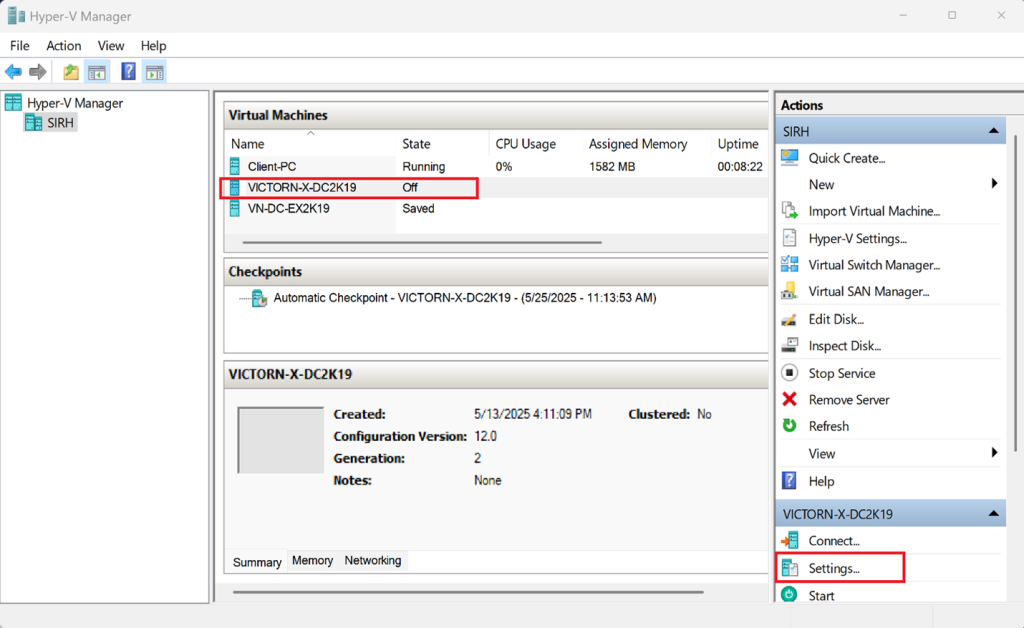
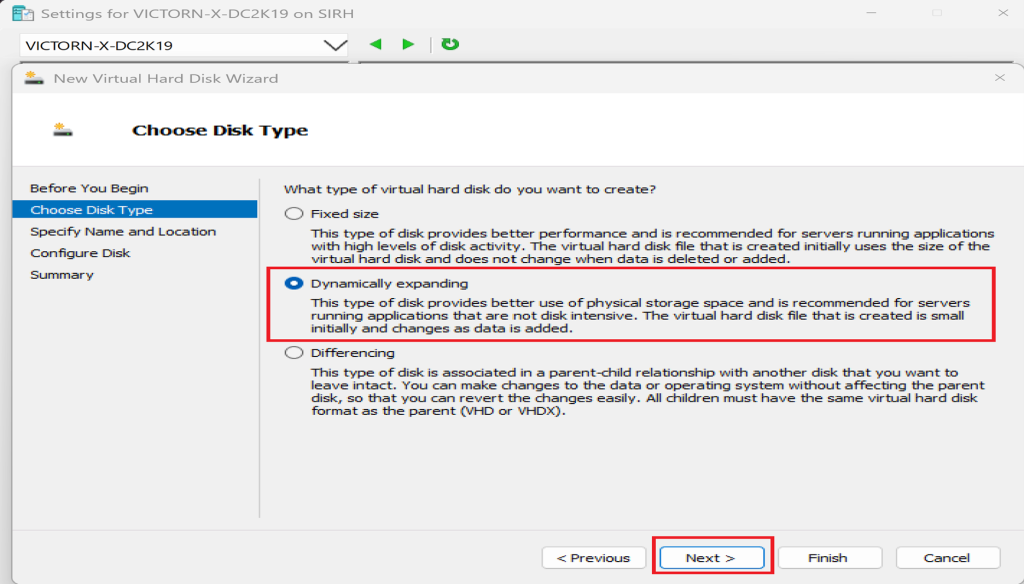
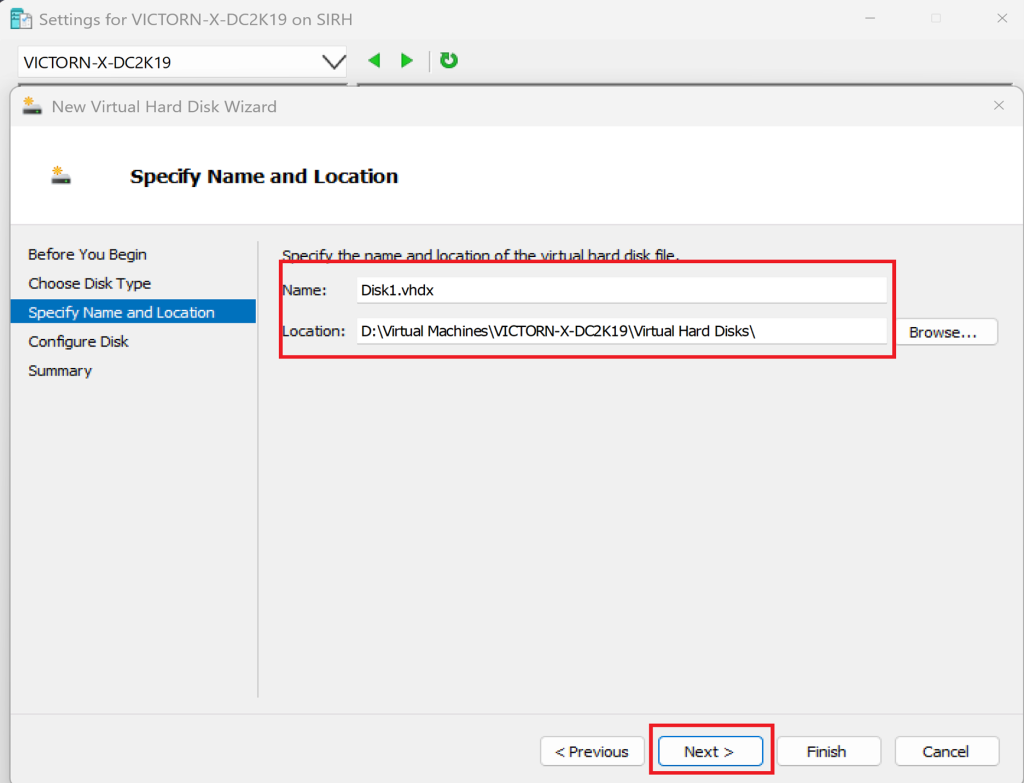
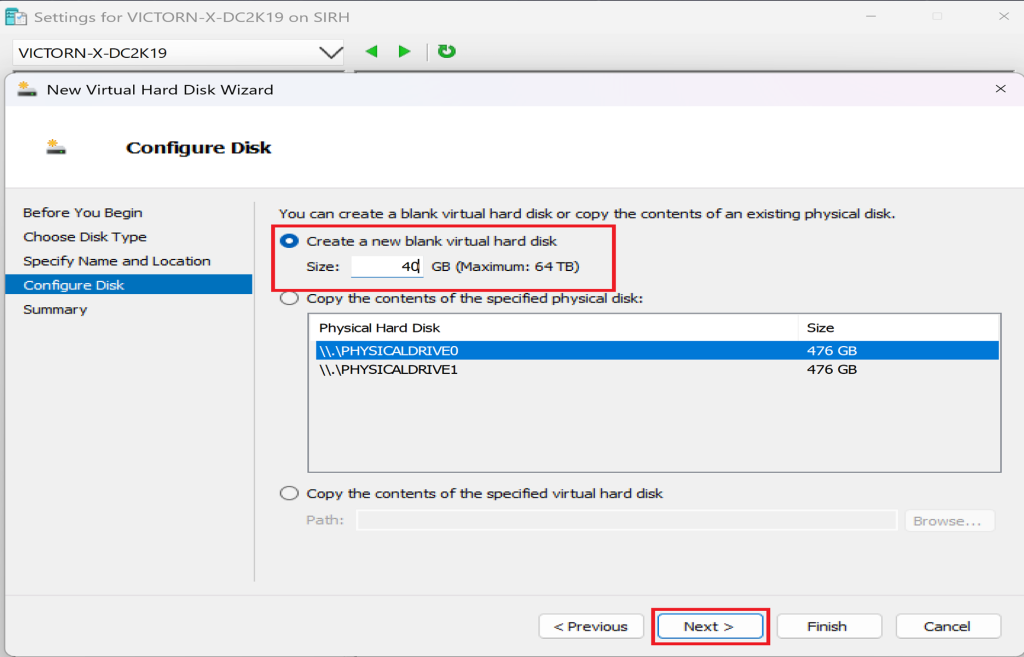
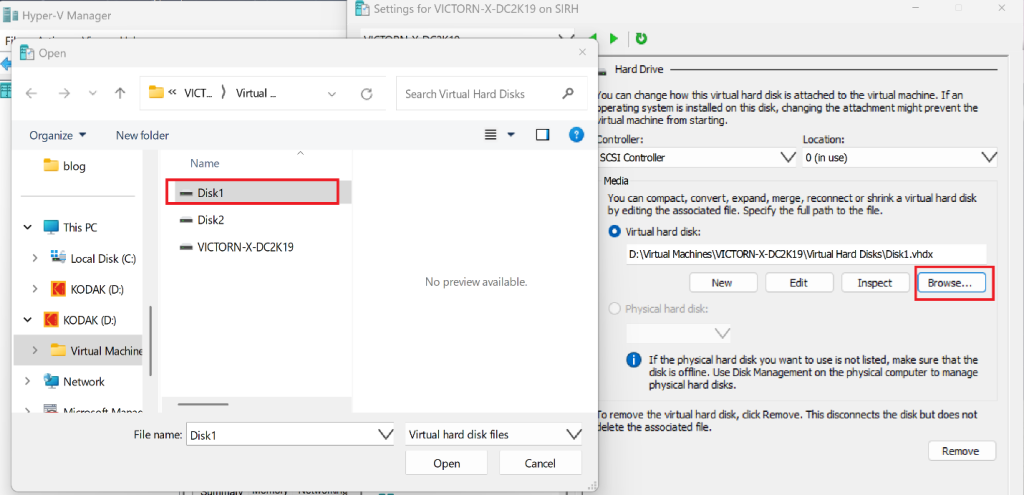
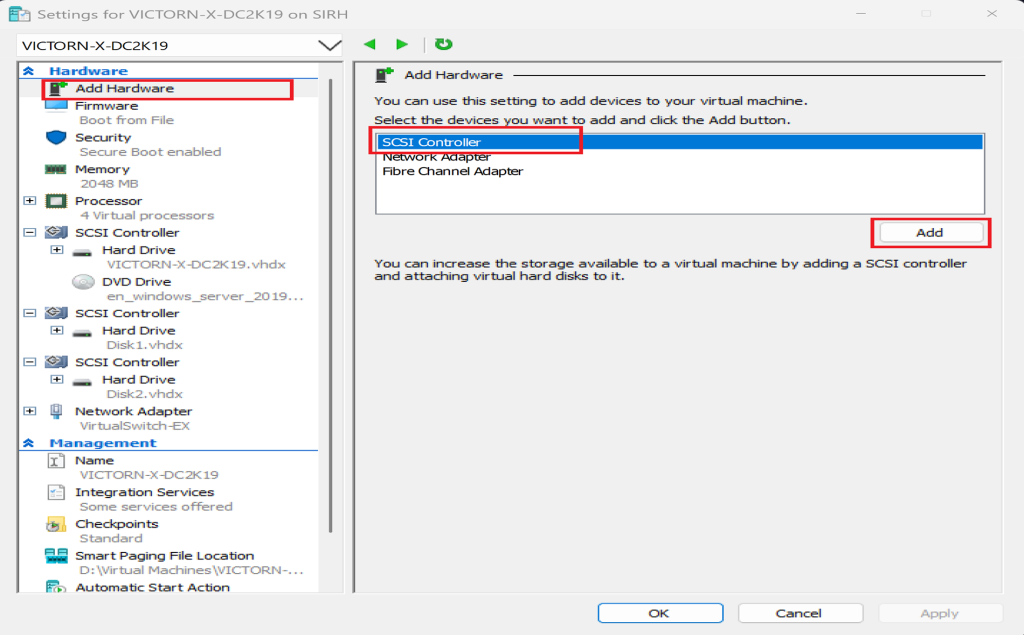
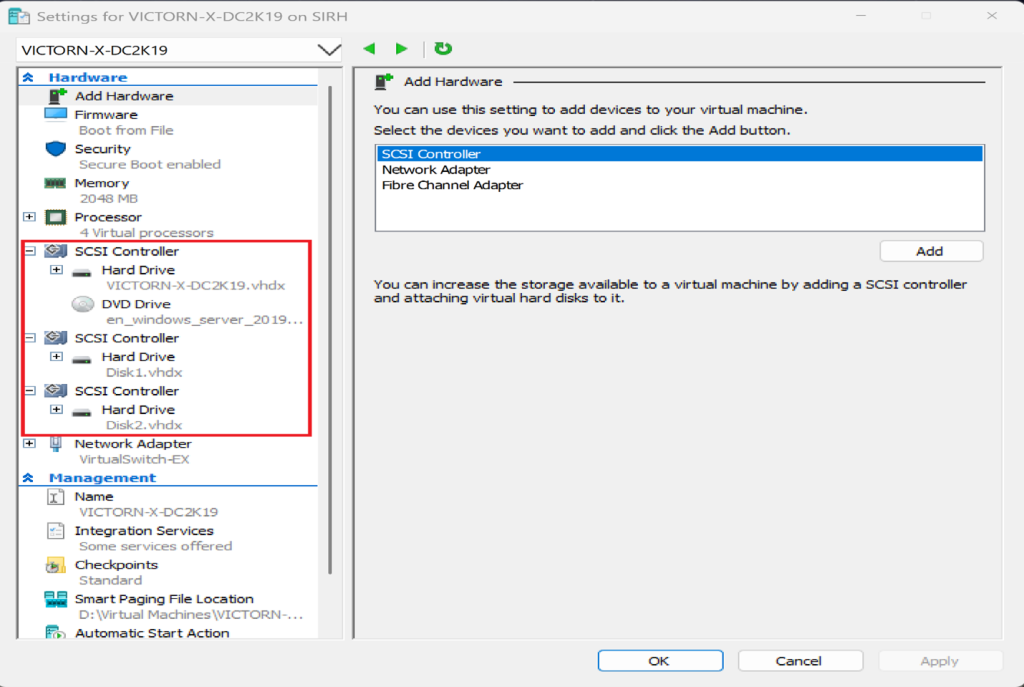
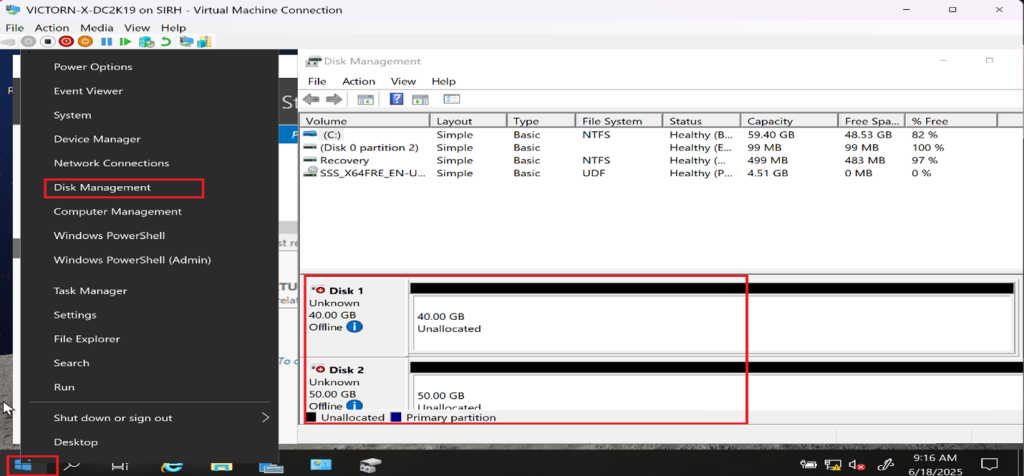
Terminology matters: a dynamically expanding VHDX is a virtual-disk file whose physical allocation grows as data is written. It is not the legacy Windows Disk Management “dynamic disk” technology. Don't choose VHDX allocation from a blanket rule; benchmark the workload and account for host free-space exhaustion, fragmentation, backup behavior, and recovery time.
Step 2: Create a Storage Pool on the Target Server
Create the Storage Pool
Open Server Manager
Navigate to File and Storage Services → Storage Pools
Click Tasks → New Storage Pool
Name the pool
Select available physical disks
Click **Create **to finalize the storage pool.
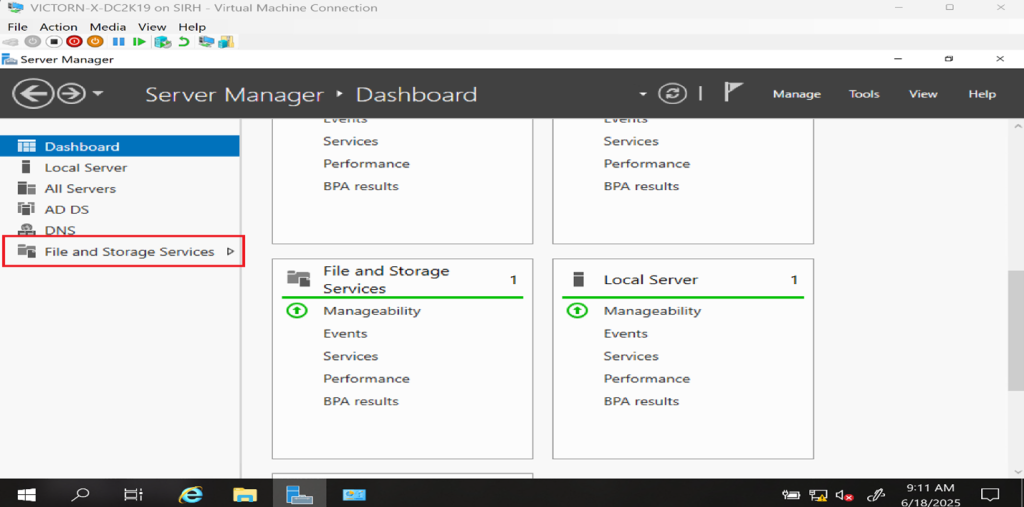
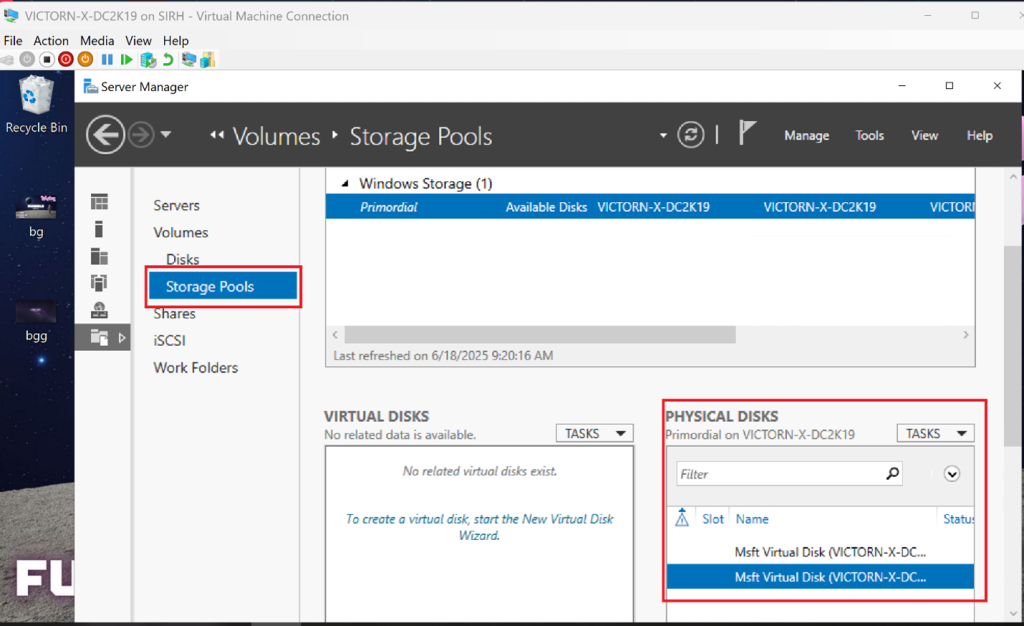
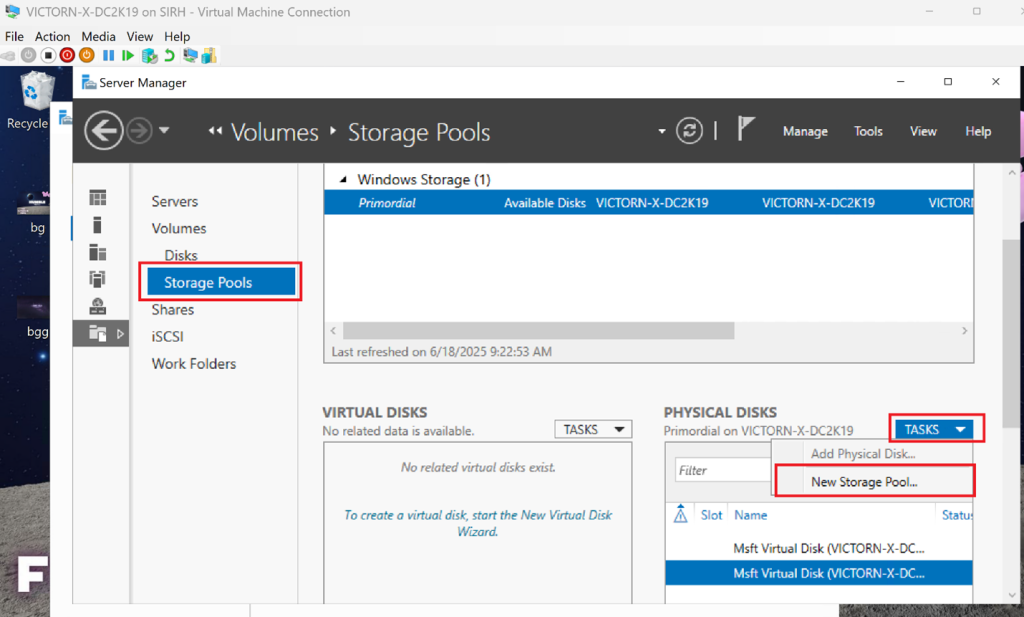
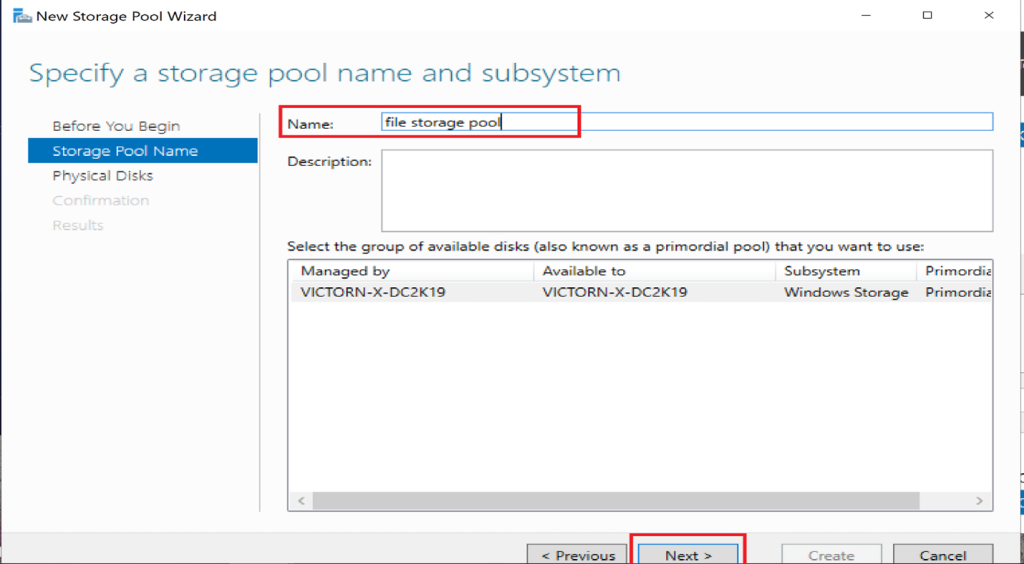
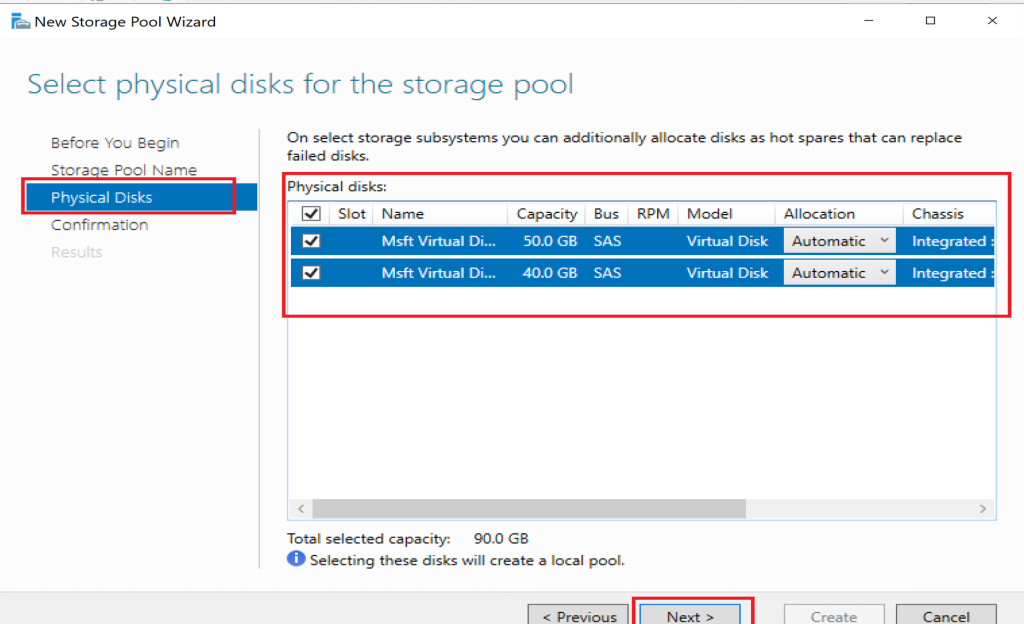
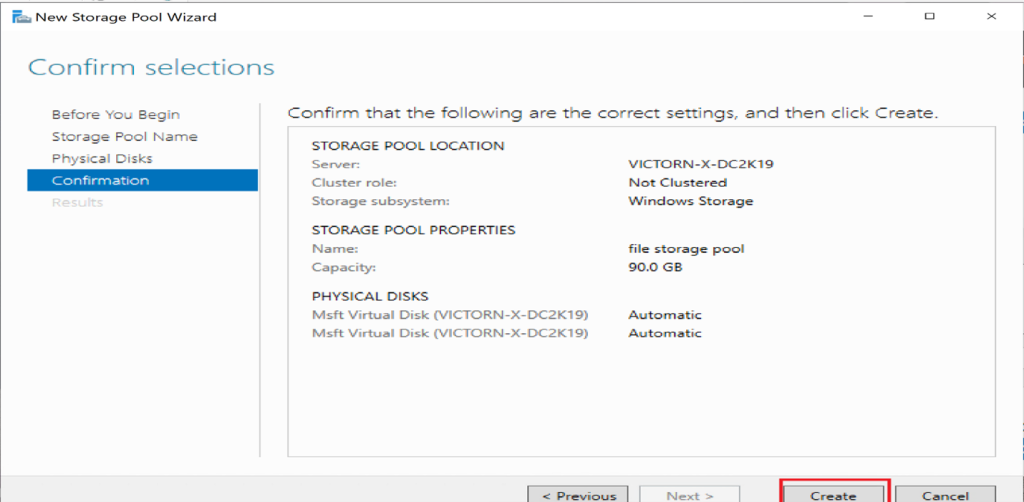
Step 3: Create a Virtual Disk from the Storage Pool
In Server Manager, go to File and Storage Services → Storage Pools
Select your storage pool
Under Virtual Disks, click Tasks → New Virtual Disk
Follow the wizard prompts:
- Choose the storage pool
- Name the virtual disk
- Proceed with storage layout selection.
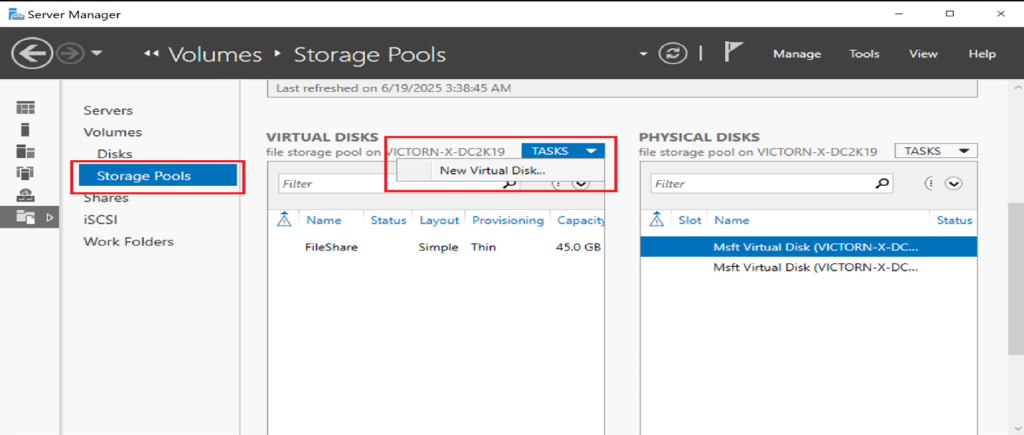
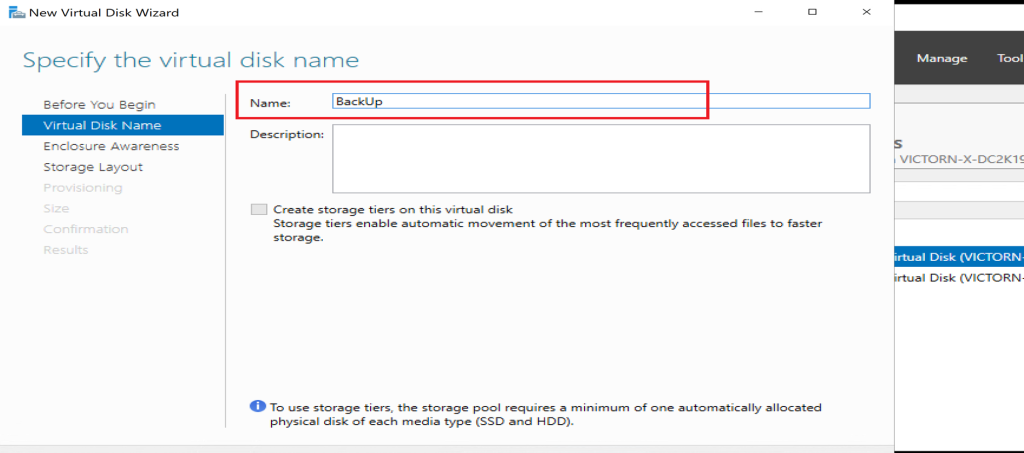
Assign a Resiliency Type
Within the wizard:
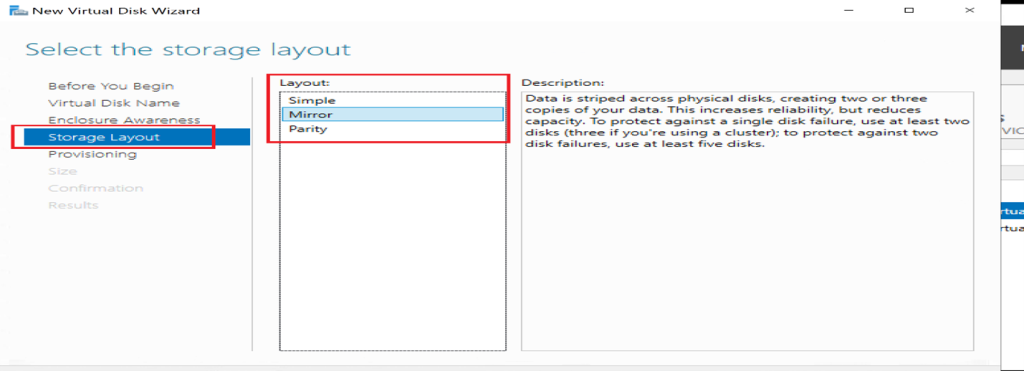
Choose the desired Resiliency Layout:
- Simple - Stripes data for performance (no redundancy)
- Mirror - Two-way or three-way replication for Fault tolerance
- Parity - Balanced performance and redundancy using striping with parity.
The labels describe data layout, not guaranteed availability. I verify the minimum disk count, enclosure awareness, column count, repair capacity, write pattern, and failure behavior for the selected layout. A virtual lab made from VHDX files on one physical disk doesn't provide real hardware redundancy even if the pool reports Mirror or Parity.
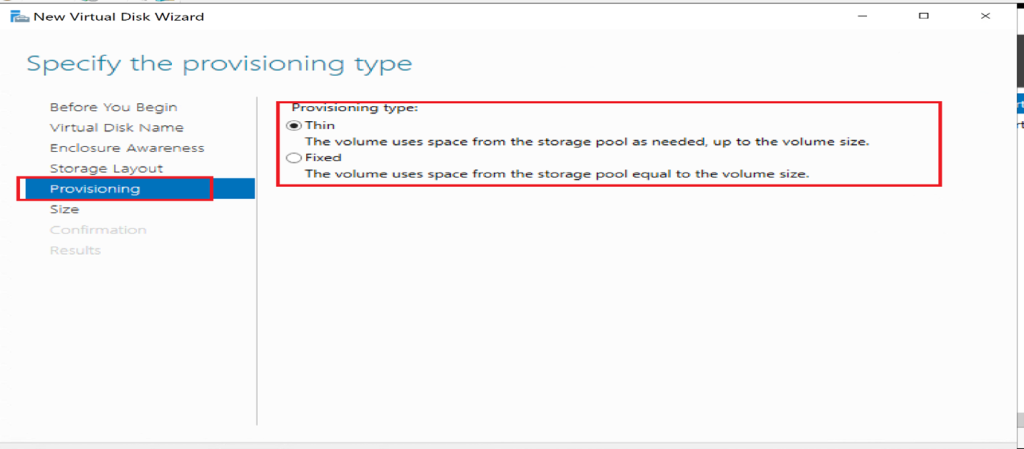
Provisioning Type
- Thin - Allocates space as needed
- Fixed - Reserves the full disk size upfront.
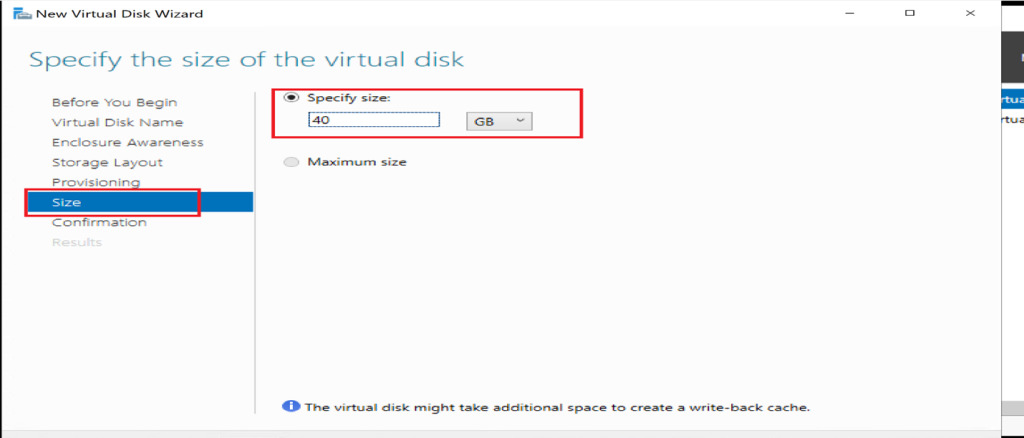
Set the disk size and complete the wizard to create the virtual disk.
Step 4: Format the Disk and Assign a Drive Letter
Still in Server Manager, after the disk is created, Click Tasks → New Volume
Select the server and virtual disk
Specify the volume size.
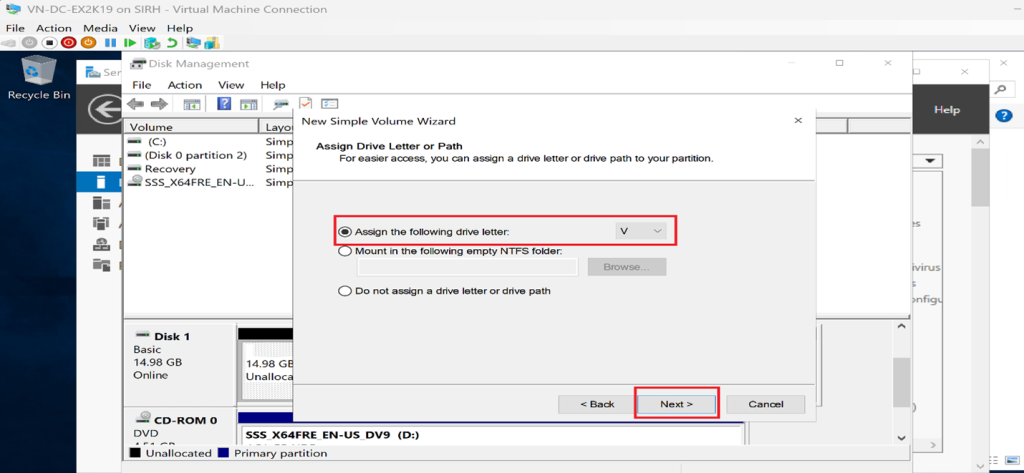
Assign a drive letter or mount as a folder.
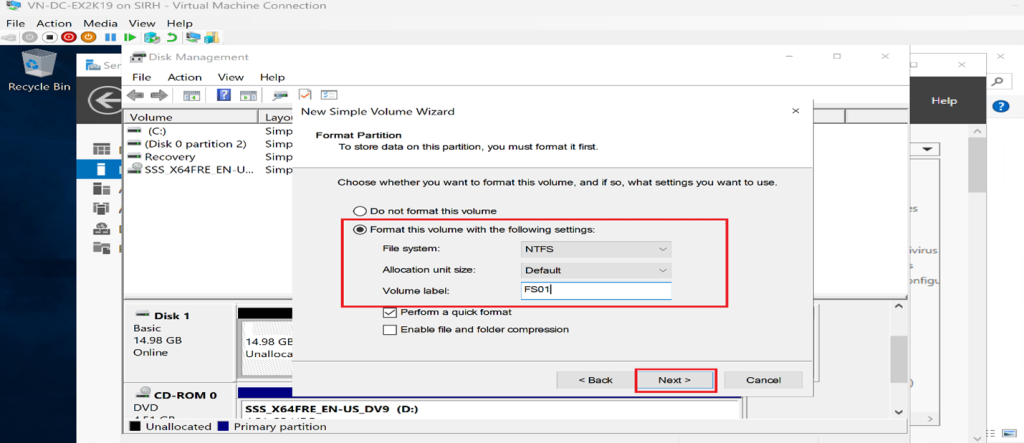
Choose a file system (e.g., NTFS or ReFS), allocation unit size, and provide a volume label.
📌 Finish the wizard to format and mount the volume.
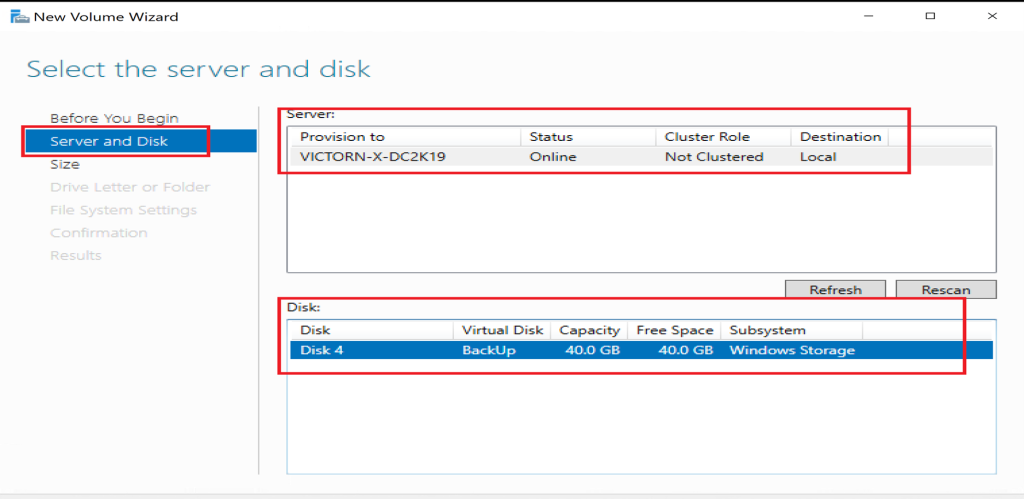
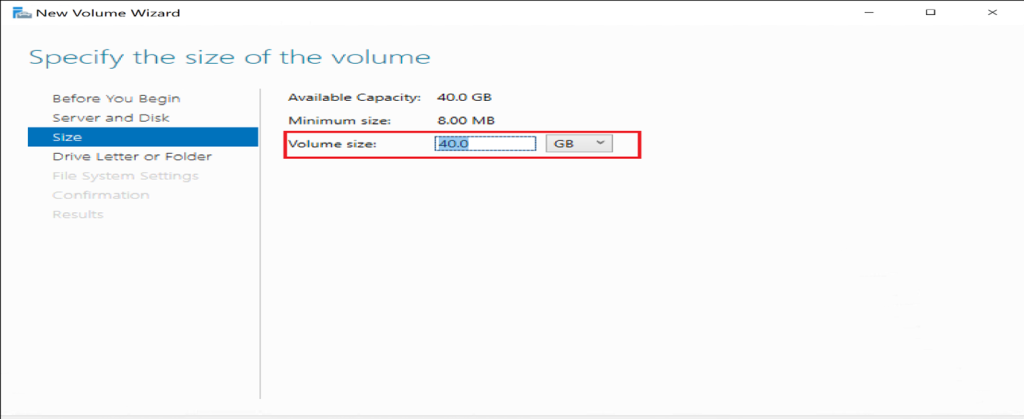
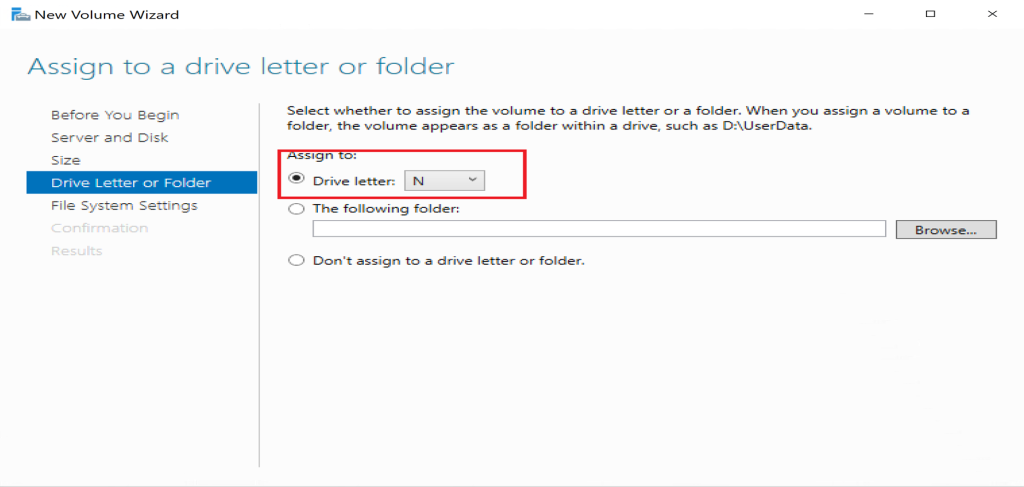
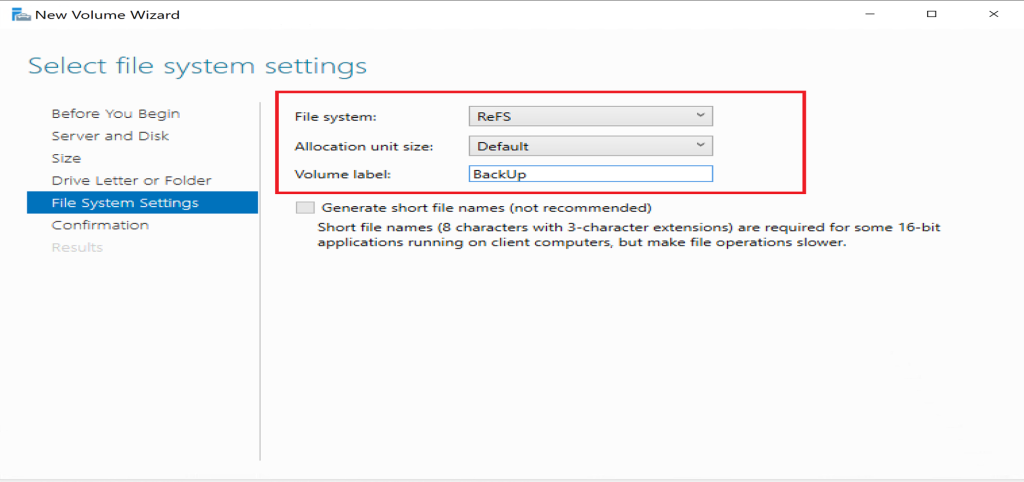
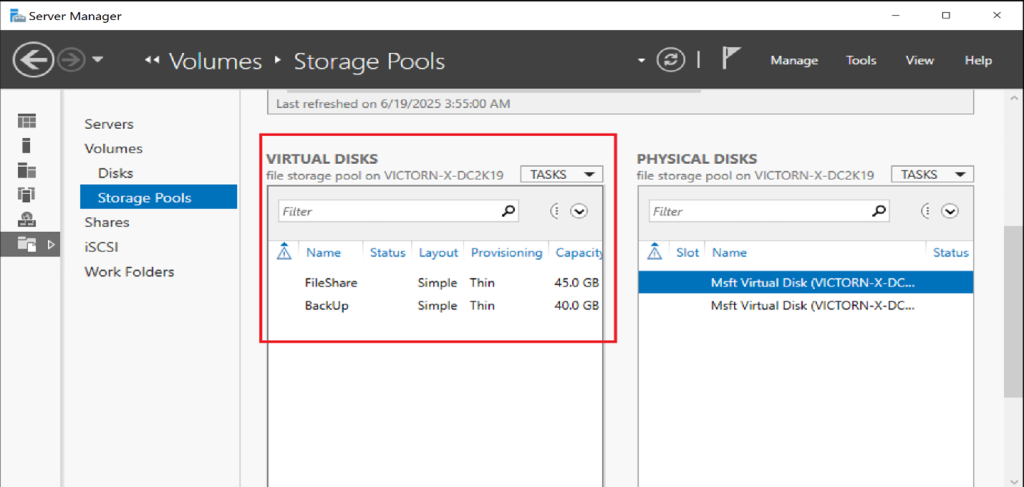
✅ Result: Storage can now be expanded logically without adding physical disks, extending infrastructure lifespan.
Step 5: Configure iSCSI Target Server (Storage Provider)
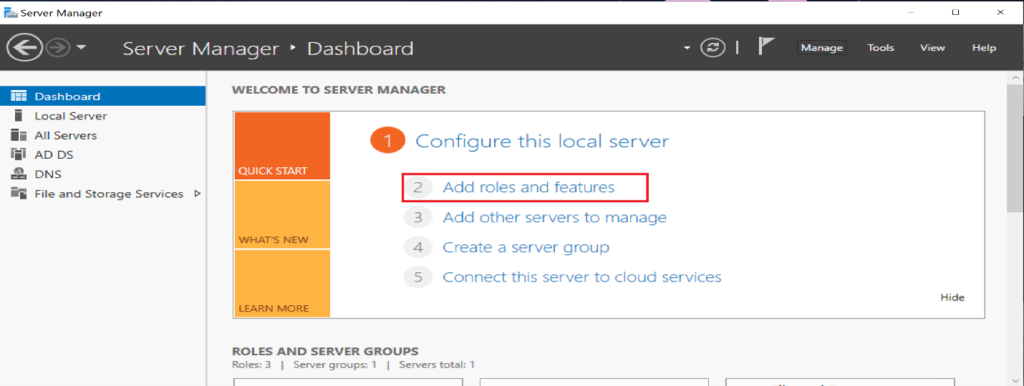
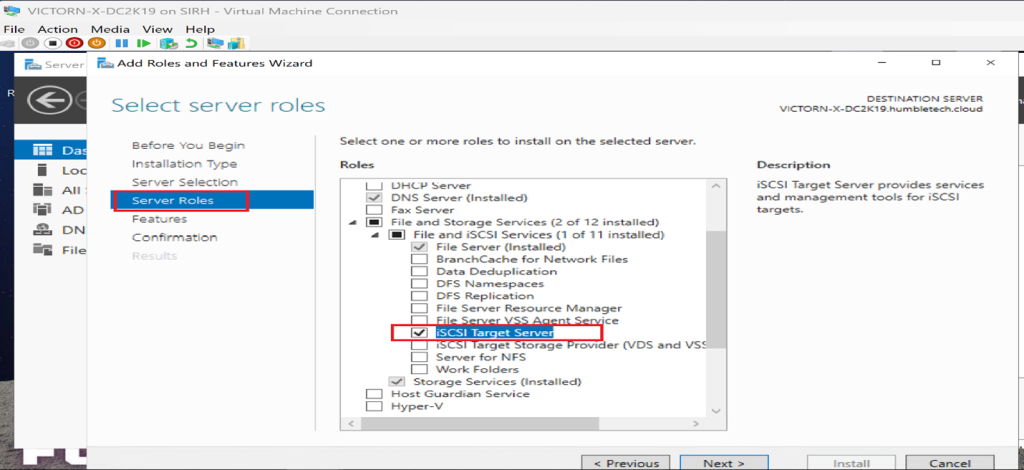
Install iSCSI Target Server Role
- Open Server Manager
- Manage → Add Roles and Features
- Select Role-based or feature-based installation → ClickNext.
- Select your server → Click Next.
- Under **File and Storage Services → **Expand File and iSCSI Services
- Enable iSCSI Target Server
- Click Next, then Install.
Create an iSCSI Virtual Disk
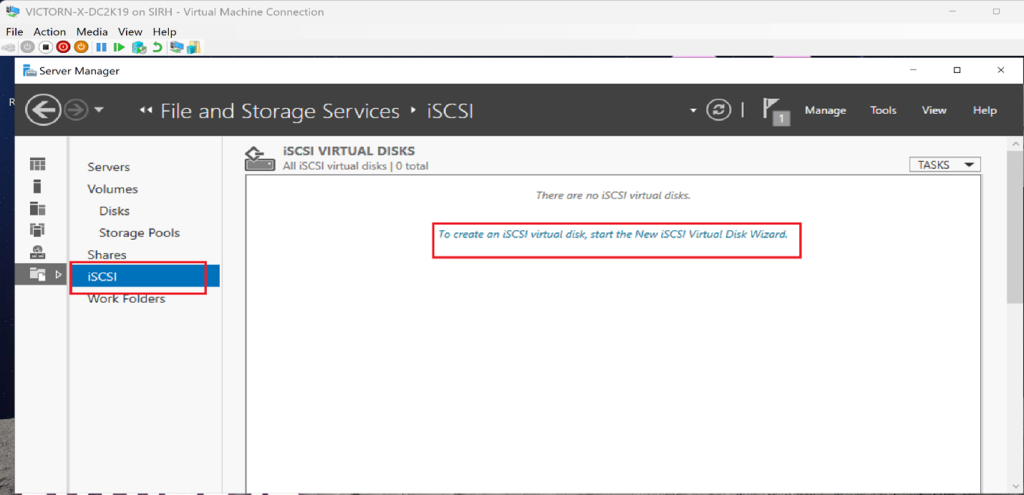
- In Server Manager, go to File and Storage Services and click iSCSI.
- On the right pane, click “To create an iSCSI virtual disk….”
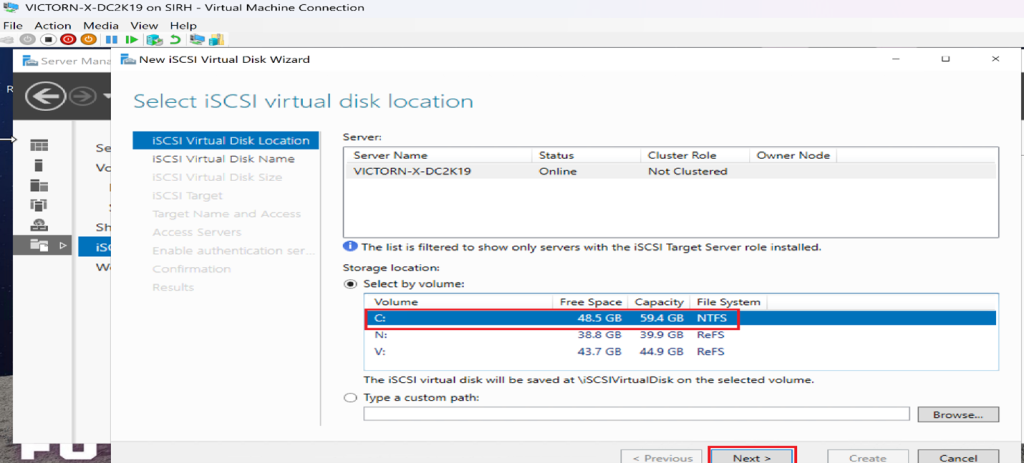
- Choose a volume or custom path to store the virtual disk
- Name the disk → Click** Next.**
- Set the disk size and choose the type:
- Fixed - pre-allocated space.
- Dynamically Expanding - Grows as needed.
- Differencing - Tracks changes from a parent disk.
- Click Next to proceed.
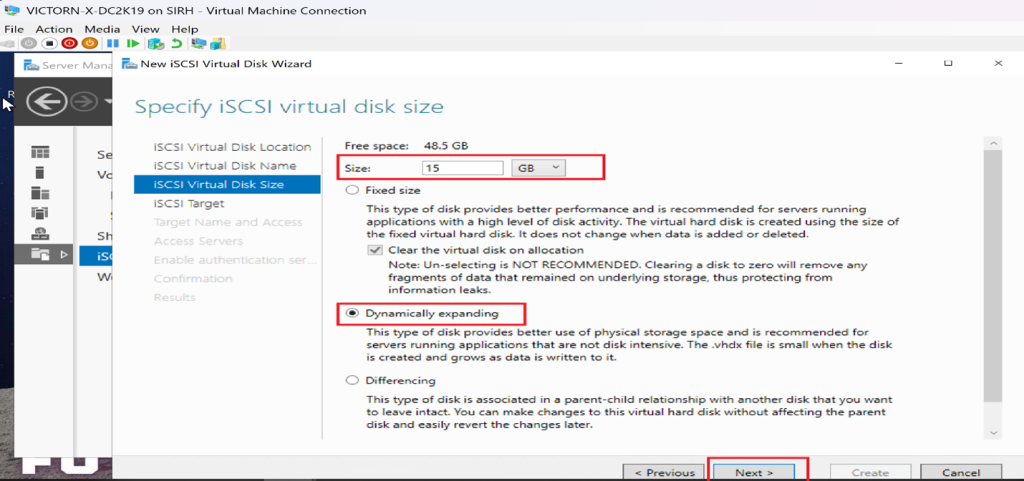
Create an iSCSI Target
- Choose New iSCSI Target** → Click Next.**
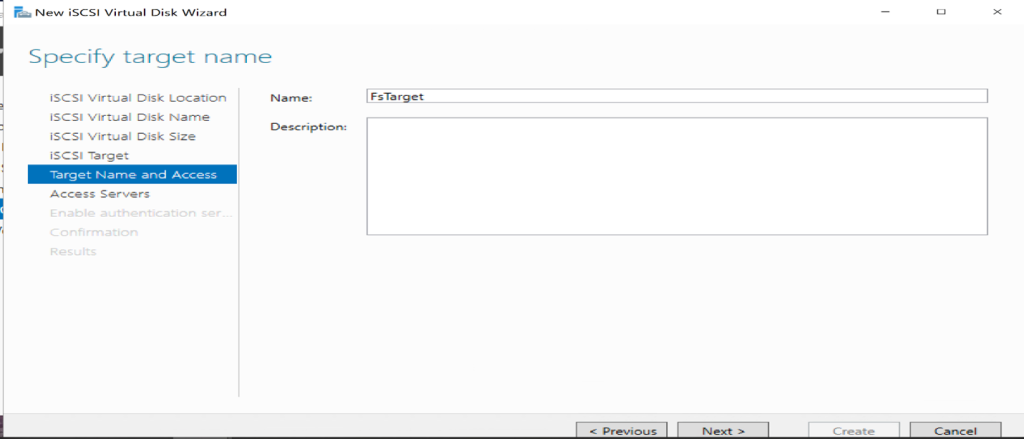
- Name the target → Click Next.
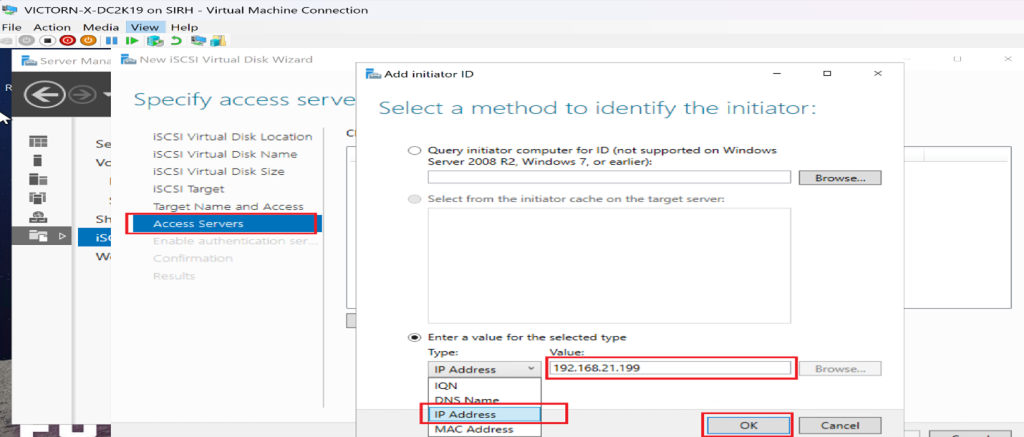
- Click **Add **to specify access servers:
- Choose IP Address and enter the initiator server’s IP.
- Configure CHAP or IPsec where required, and restrict the target to the exact initiator identifiers and storage network. CHAP authenticates the connection but doesn't encrypt iSCSI payloads.
- I review settings → Click Create.
Step 6: Configuring iSCSI Initiator for Remote Storage Access Server
** Steps to Access the Storage Pool from the Access Server**
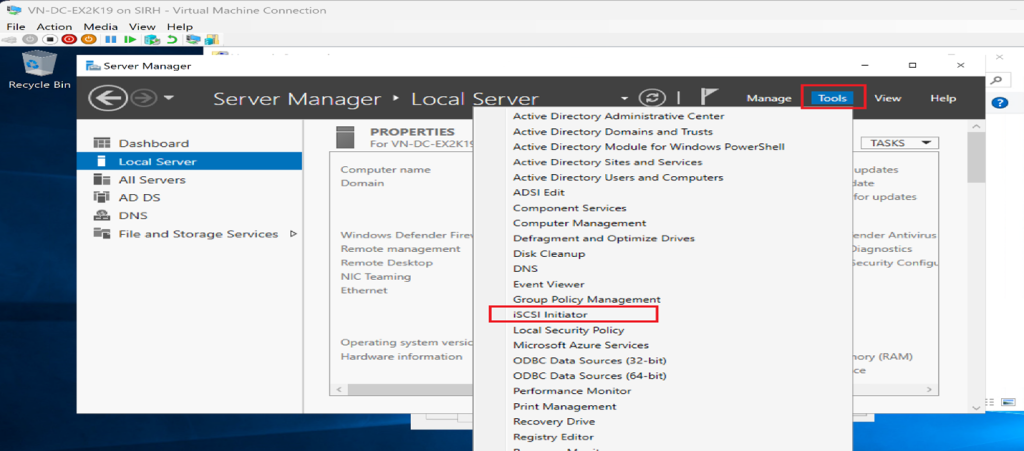
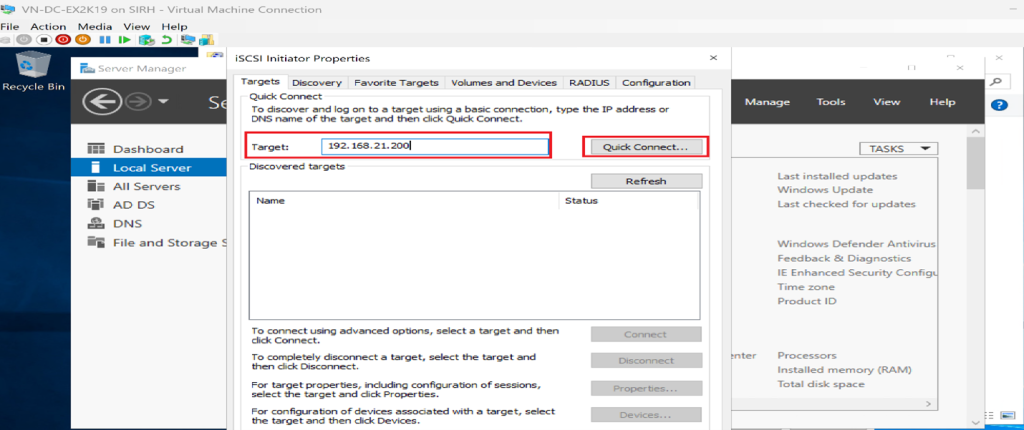
- Enable **iSCSI Initiator **on the Access Server.
- Open **iSCSI Initiator Properties **
- Go to **Discovery → **Click Discover Portal
- Enter the IP address of the Target Server and click OK.
- Go to Targets → Select the discovered target** → Click ** Connect.
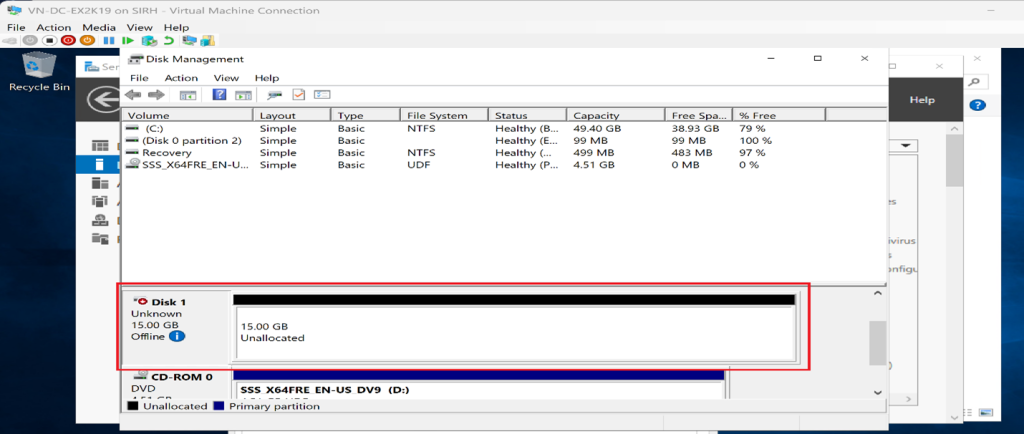
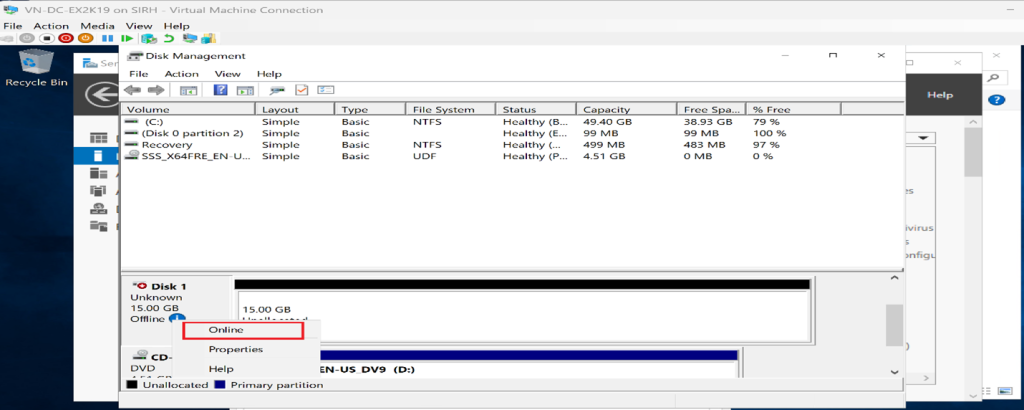
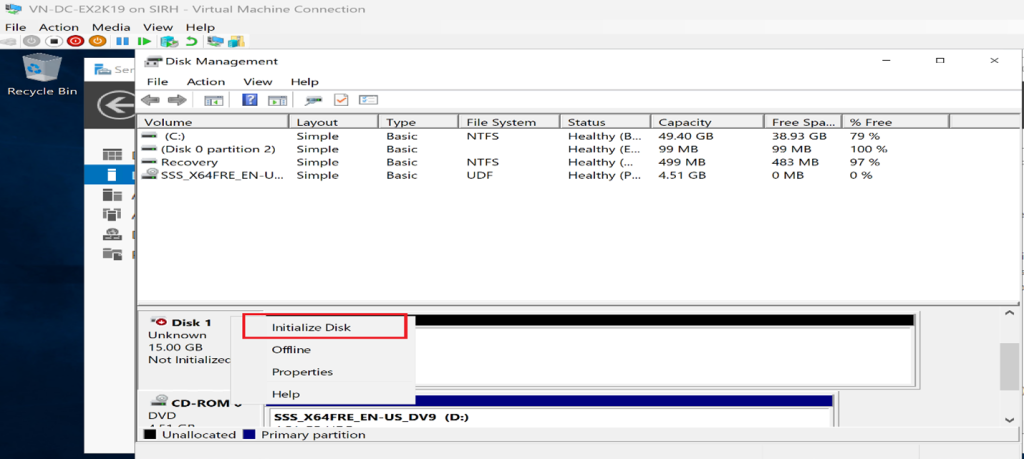
- Open Disk Management
- Initialize and format the newly connected disk.
Initialize the disk on only the server that owns it. If the LUN is intended for a failover cluster, follow the supported cluster-validation and storage-addition workflow instead of independently bringing the disk online on every node.
✅ Final Steps:
- Assign a drive letter to the disk.
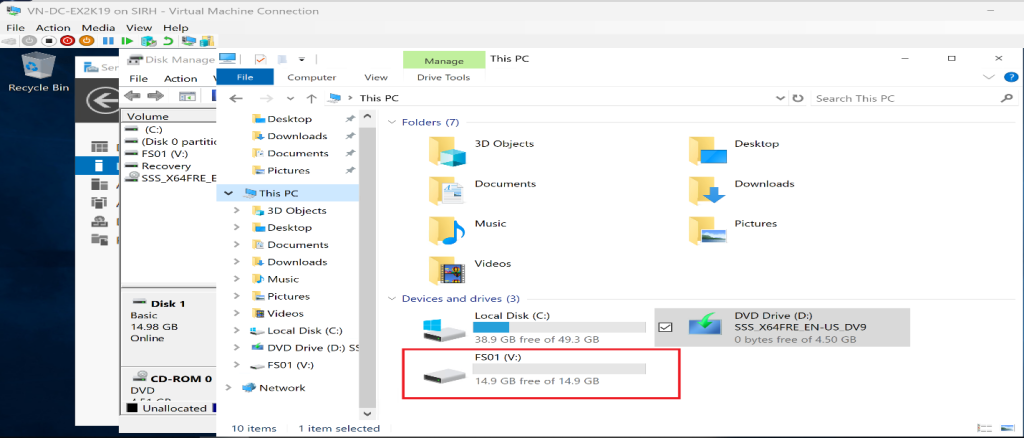
- I verify connectivity and storage availability.
Final Result
The virtual disk is now exposed via iSCSI. The initiator server can access it as if it were local storage, enabling:
- Centralized storage
- Easier scaling
- Improved workload consolidation
“Local” describes the block-device experience, not the failure or latency characteristics. An iSCSI volume still depends on the target server, its disks, network paths, authentication, and every switch between initiator and target.
Validate Performance, Failure, and Recovery
Before placing a workload on the LUN:
- Confirm the initiator is connected through the intended source and target interfaces.
- I verify the expected disk appears once, with the correct size and ownership.
- Measure latency, IOPS, throughput, and queue depth with a representative non-destructive test.
- If MPIO is configured, verify multiple paths and the selected load-balancing policy.
- I test one path failure, target-service restart, and recovery during a maintenance window.
- Confirm backup captures application-consistent data and perform a restore test.
- Monitor target capacity, pool health, physical disk health, path state, latency, and event logs.
Useful inventory commands include:
Get-IscsiConnection
Get-IscsiSession
Get-Disk
Get-StoragePool
Get-VirtualDisk
Get-PhysicalDisk
For clustered Hyper-V, run cluster validation and follow Microsoft's supported storage architecture. A standalone Windows iSCSI Target Server is still a single service and storage failure domain unless the target itself is made highly available through a supported design.
Security Checklist
- I use a dedicated storage VLAN or isolated network and tightly scoped firewall rules.
- Don't route iSCSI over untrusted networks without an approved encrypted design.
- I use unique CHAP secrets where CHAP is selected and store them securely.
- Patch the target and initiators, and restrict administrative access.
- Prevent ordinary users and unrelated servers from discovering or logging into the target.
- Document LUN-to-host ownership so a disk isn't accidentally initialized or formatted by the wrong system.
Key Takeaway
If you’re running Hyper-V or any hypervisor, storage strategy should be a top priority.
Efficient storage management is foundational for:
- Virtualization
- Hybrid cloud workloads
- Enterprise scalability
- Performance and resilience
Smart storage decisions today prevent outages and costly redesigns tomorrow.
Return to the Windows Server Hyper-V foundation lab for the virtual-switch and host basics, or compare this block-storage design with Azure Storage before choosing a cloud storage service.